We have now added the ability to validate records uploaded against a MegaEdit product which uses the Standard Batch Script. This validation is all powered through the use of Regular Expressions, commonly referred to as Regex.
A regular expression is a string of characters which are used to define criteria for the system to check against when validating input. One of the most common uses of this is to validate email addresses in email input fields. Below is an example of a regex to validate an email address:
(([^<>()\[\]\\.,;:\s@"]+(\.[^<>()\[\]\\.,;:\s@"]+)*)|(".+"))@((\[[0-9]{1,3}\.[0-9]{1,3}\.[0-9]{1,3}\.[0-9]{1,3}])|(([a-zA-Z\-0-9]+\.)+[a-zA-Z]{2,}))
This is the one our system uses, and as you can see, a regex can quickly become quite complex.
Below is a far simpler example, which simply checks to ensure that the word starts with a capital letter:
/([A-Z])\w+/
The above examples are just proof of how easily customised regular expressions are, and below is a link to a website which allows you to test your regex in real time:
Live Regex Editor
These expressions can be used to validate the record entries for a batch upload with MegaEdit and either prevent the user from adding the product to the basket, or simply warn them that some records will not be processed - this is controlled in the configuration.
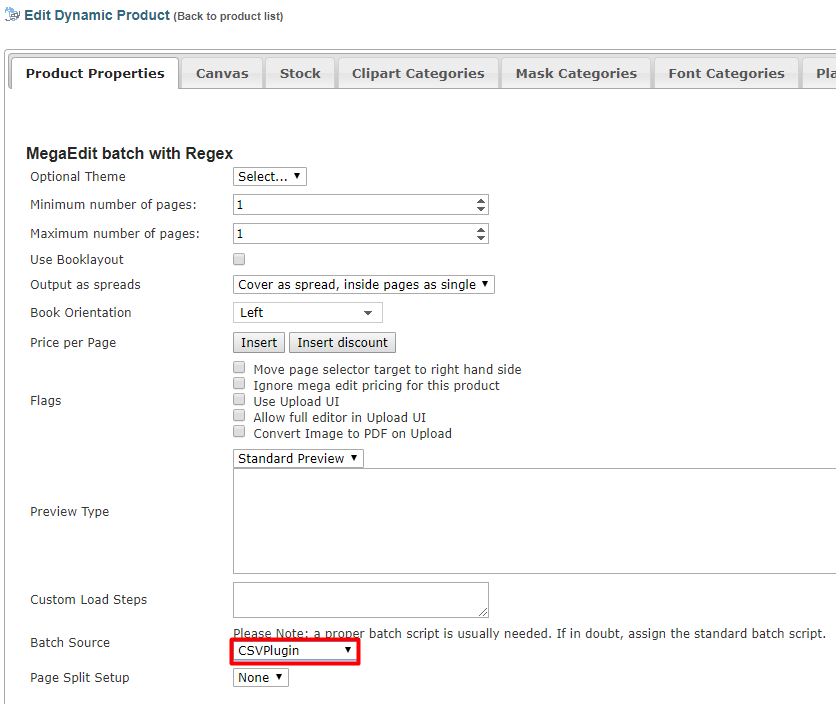
To enable this functionality, you need to ensure that the "Standard Batch Script" is enabled in your MegaEdit product's "Scripts" tab (this is done by checking the box next to the script and clicking the green tick). You must also ensure that the "Batch Source" setting is set to "CSVPlugin" under the "Product Properties" tab, as seen in the screenshots below.

Once you have enabled both of these settings for the product, you then need to add the following snippet of code to the "CONFIG" column for the Standard Batch Script:
{
validateData: true,
disableAddToBasket : false
}
You can place this in the configuration section by clicking the field with your mouse, which will then bring up an editor. Once you have entered the code in the field, you will need to click on the green tick again to save the configuration. See the screenshot below for an example of how this should look once copied in.

Simply adding the code in will enable the regex function, however you can edit the config to tweak its behaviour to your liking.
You can change "validateData: true," to "validateData: false," to disable the feature, and you can change "disableAddToBasket : false" to "disableAddToBasket : true" to prevent the user from being able to add the product to the basket if there were any erroneous records in the csv uploaded.
Once you have configured the plugin to your liking, the rest of the setup takes place in the MegaEdit product itself, so to continue setting this up you will need to sign in as a storefront administrator, or someone with equal rights, and launch the product in the editor.
By default, there will already be a "FirstName" placeholder as an example of what the placeholders should be called. If you click "Use" beside it, MegaEdit will create a text field on the page and populate it with the placholder to allow you to use it with the batch upload. However, you can also manually type the placeholder in so long as it follows the format "[++PlaceholderName++]".
You can also add your own by clicking the "Add" button and naming the variable whatever you would like, however this name must correspond to a column header for the CSV you wish to upload.
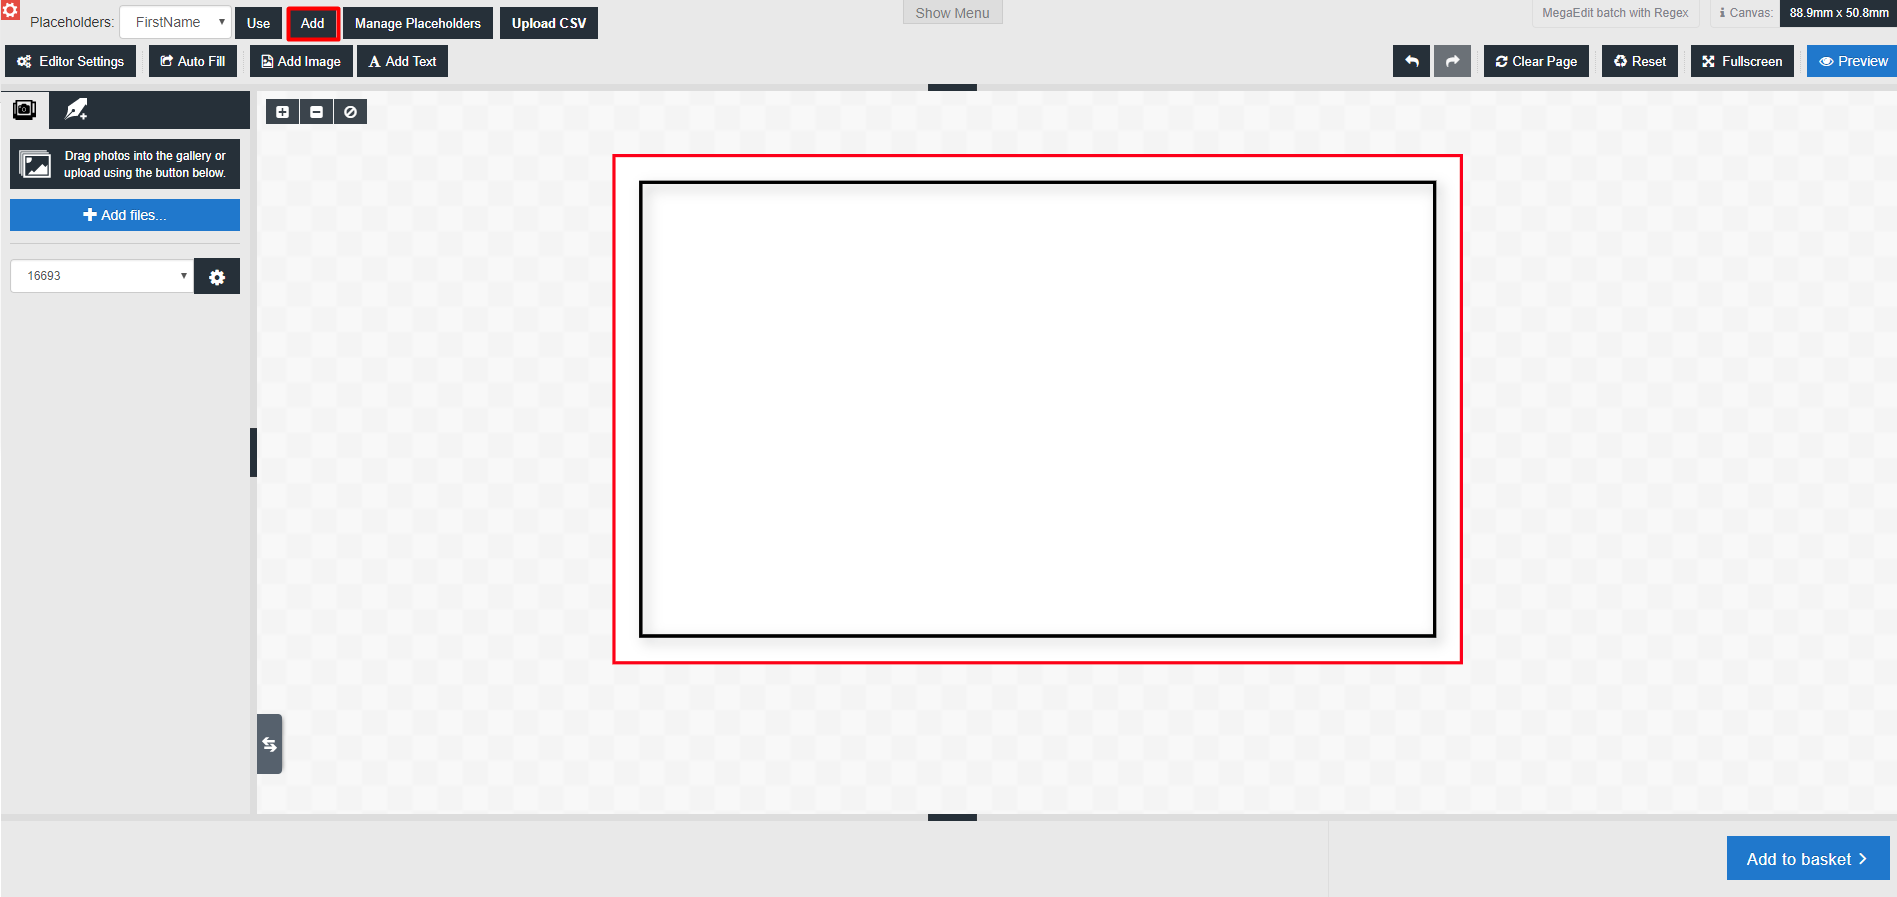
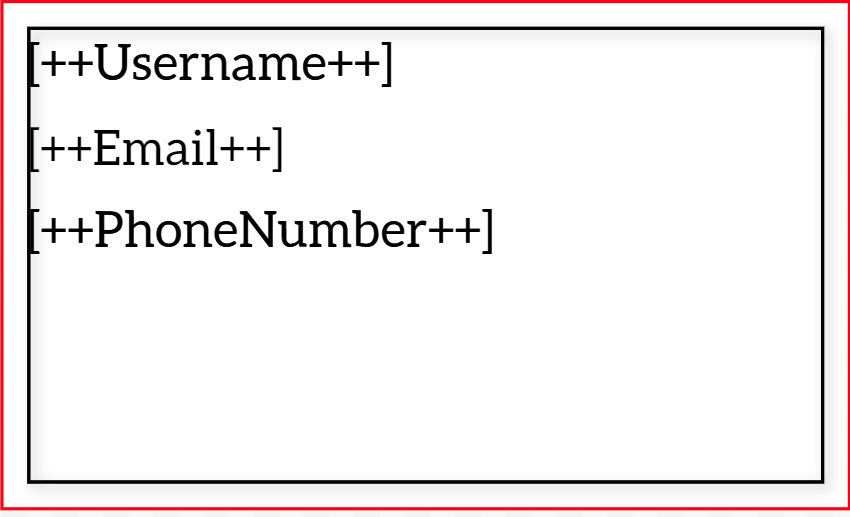
As you can see below, I have added some basic placeholders to demonstrate different types of regex.
Now that there are some placeholders to work with, you can start applying regex validation to them. To do this, click the "Manage Placeholders" button in the top left menu of the editor:

Once you click this button, a menu will pop up which will show all the placeholders present on the product and allow you to assign regex validation to it.
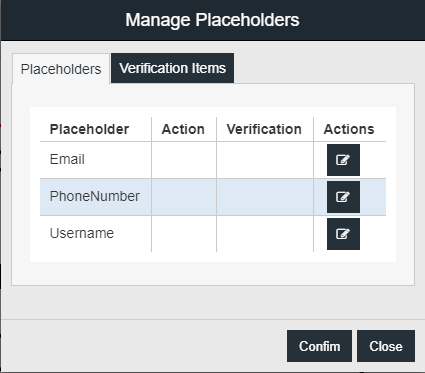
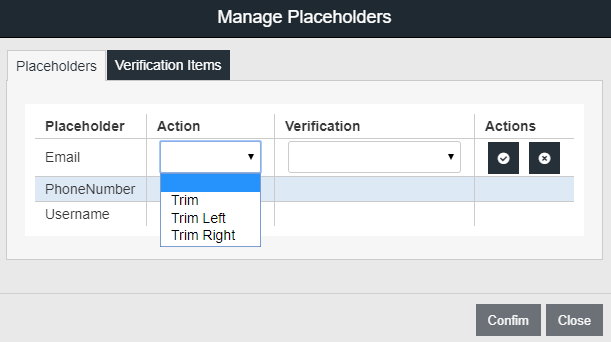
If you click on the edit button in the "Actions" column next to a placeholder, you will be able to edit both the action and the verification field.
The action field contains a dropdown list which will allow you to "trim" the CSV fields before validating them. The three options are: "Trim", "Trim Left", and "Trim Right", which will delete blank spaces either from both sides of the field's entry, or the left or right respectively. This will allow you to write your regex without having to account for blank spaces.
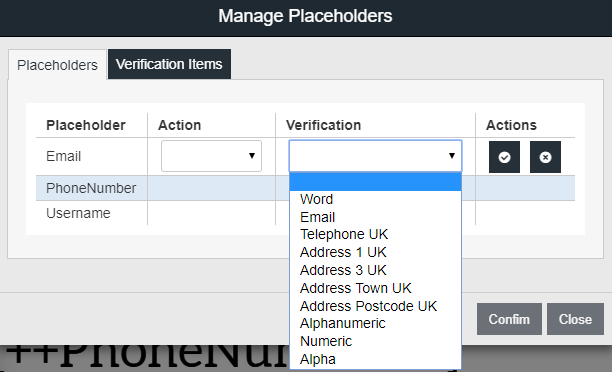
The dropdown in the "Verification" column will allow you to select from any of the regular expressions currently present in the "Verification Items" tab. There are a handful of pre-set ones which are added by the script, however you can add as many as you would like so that you can have full control over your regex.
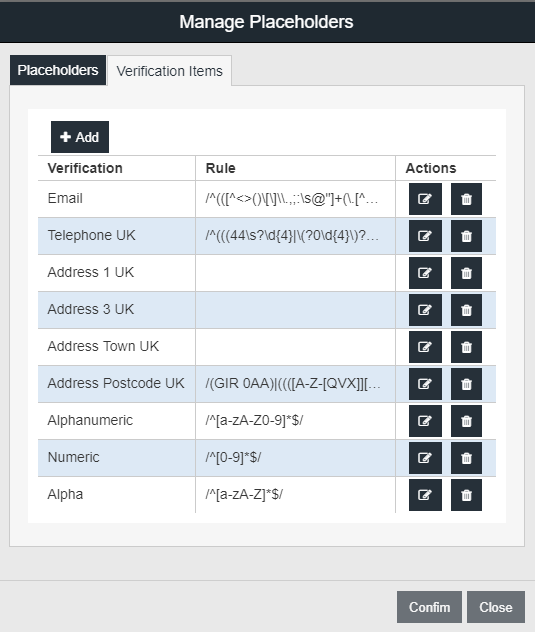
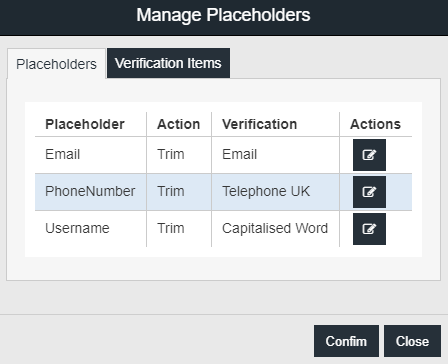
Under the "Verification Items" tab, you can see a list of the pre-set expressions, with both their name and their expression, as well as a button to add new ones to be used in the "Placeholders" tab.
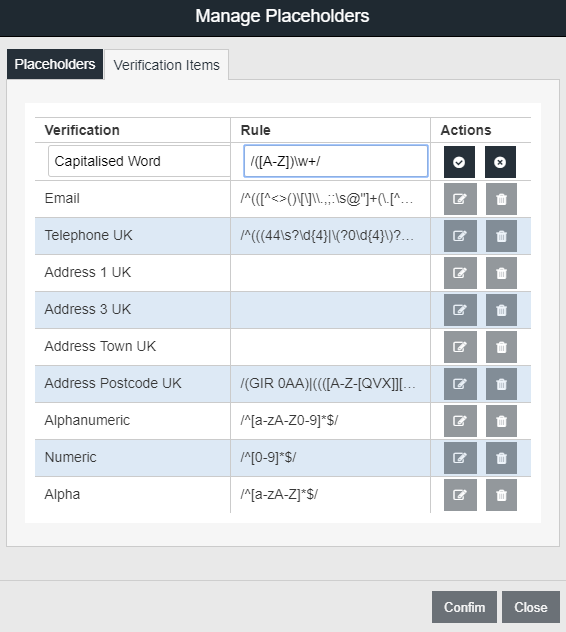
As you can see in the screenshot below, I am adding a simple regex to check that the first letter of the word is capitalised. I will be using this for the "Username" placeholder.
After clicking the tick in the "Actions" column and clicking "Confirm" I then navigated to the "Placeholders" tab and selected my new regex from the dropdown for the "Username" placeholder.
I then selected the "Telephone UK" regex and the "Email" regex to the respective rows, as well as adding the "Trim" feature to all three fields.
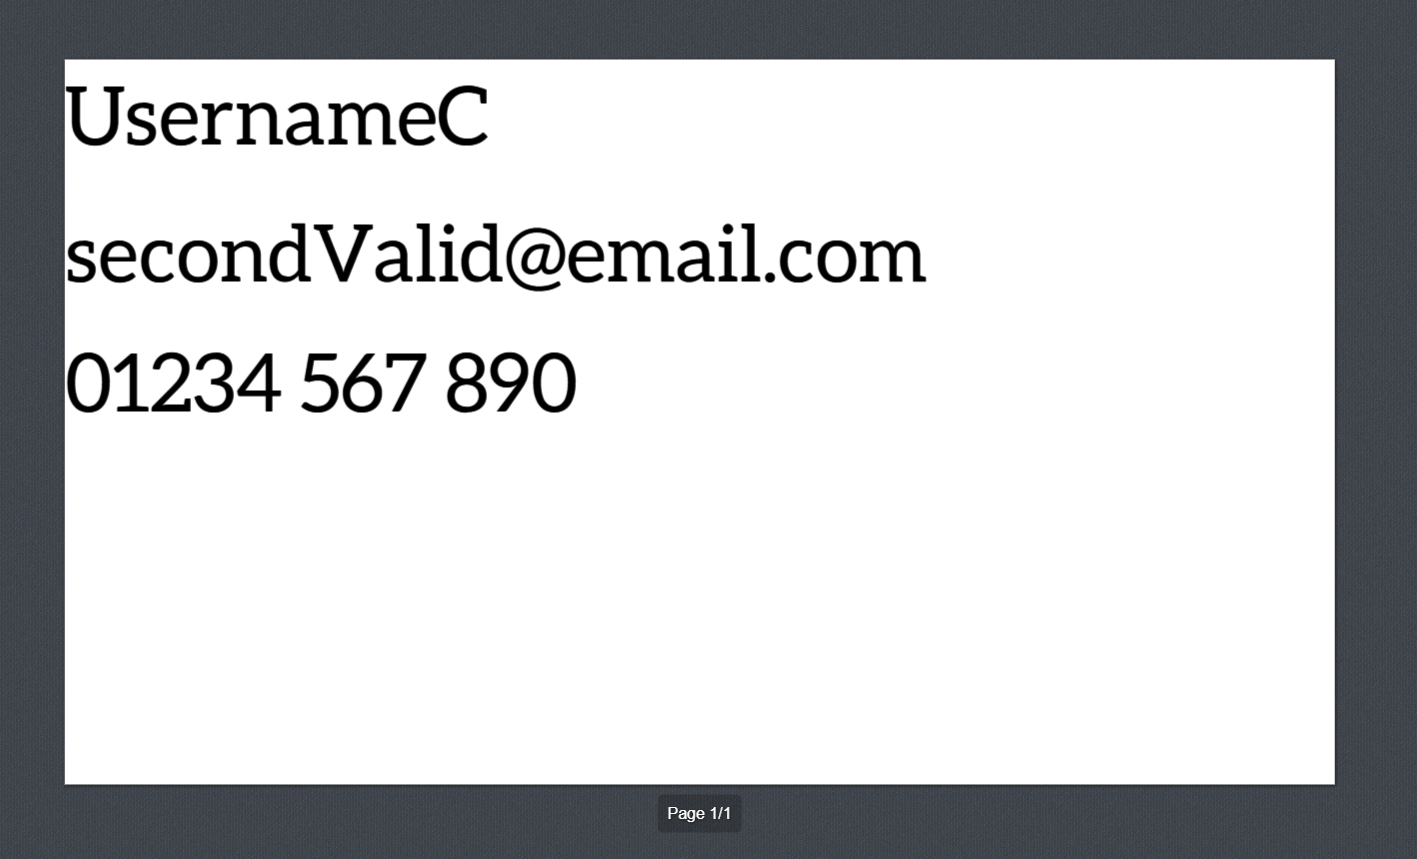
Now, using the "Upload CSV" button, I am going to upload a CSV which contains three records. The first will have one invalid field, the second will have no valid fields, and the third will be perfectly valid.

When I upload this, I will receive an error in the top right saying that there were 4 invalid values, which is correct. It also allowed me to download a CSV which identifies the issues.


As you can see in the screenshot below, there is only one output previewed as there is only one record which is completely valid.
However, since I have left "disableAddToBasket" as "false" I am still able to add this product to the basket, however there will only be one record output. If I were to set this to "true", the "Add to Basket" button will be greyed out.