Infigo Academy: Enabling and Configuring Easypost
Overview
Firstly you need to have purchased our Easypost plugin and have created an account with Easypost.
Now you need to enable the plugin and configure it. To do so, go to the admin menu > Configuration > Settings > Integrations > Connect Settings
Plugins > Connect Plugins, or search 'Connect Plugins' in the admin search at the top of the menu.
Enable EasyPost both in the Enabled MIS Plugins section and the Plugins to Handle Delivery
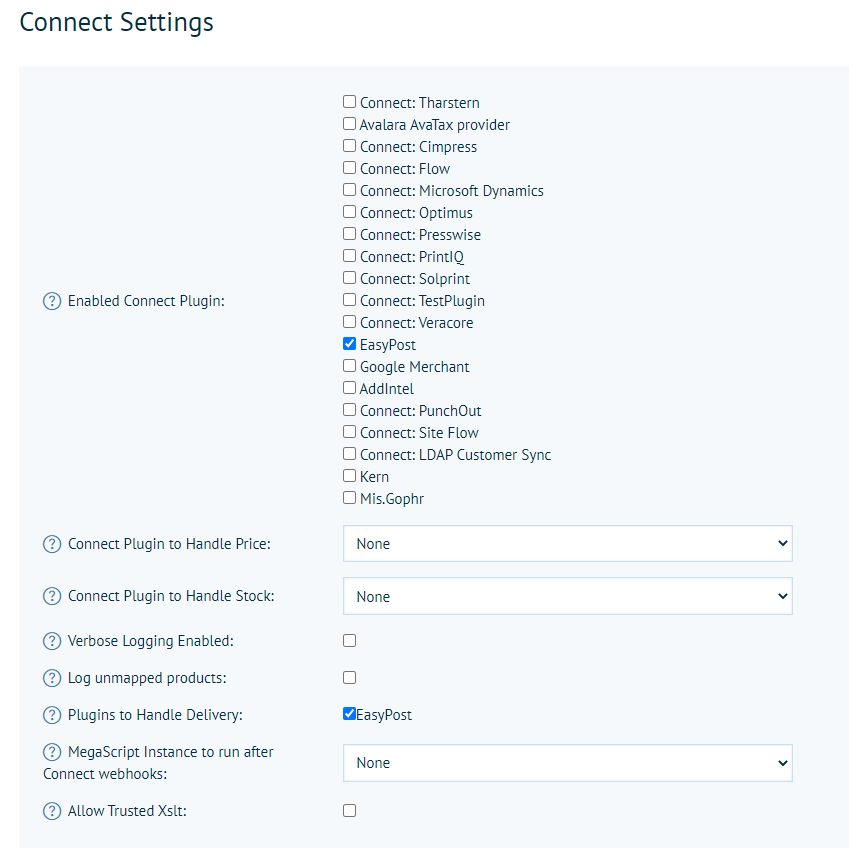
Now navigate to MIS Plugins to configure the connection and how you want it to behave. Either search 'Connect plugins' in the admin search or navigate to Configuration > Plugins > Connect Plugins.
Easypost Plugin Configuration Settings
Connecting to Easypost
In order to establish a connection the following fields need to be populated
API Key – This API Key can be obtained from your Easypost account (see here for more details) and can either be your Test API Key or your Production API key depending on whether you're testing this and do not want to have shipments actually created with your shipping providers, or using it in live production.
Production API Key – This API Key can also be obtained from your Easypost account and should be the production API Key always as this is used to fetch your list of available carriers mapped to your Easypost account.
Additional Shipping Fees
If you wish to apply an additional uplift to your shipping prices, this can be configured here.
Additional Shipping Fee Per Parcel – This fee (set in your primary store currency) will be added to each Parcel that is created for the order. It is applied either as a fixed amount, or a percentage.
Additional Shipping Fee Per Order – This fee (again set in your primary store currency) will be added to the total shipping cost for the whole order. It is applied either as a fixed amount, or a percentage.
General Settings
The main setting in this section that is important is the Buy Shipping Instantly, read below to understand why.
Buy Shipping Instantly
When enabled we will send a request to Easypost as soon as the order is placed. This means that you won't have to trigger the shipment manually but you will also not necessarily be able to control on an order by order basis the parcels and sizes that are sent. When you have Auto Parcel Size Calculation set to true we will send all the calculated parcels in the request. When you have Auto Parcel Size Calculation set to false we will send all your predefined parcel sizes in the request.
When disabled we will not send the request to Easypost to create shipping labels automatically. Instead if you navigate to Shared Print Operations in admin and locate the job and expand it you will see a link under Shipping Information called 'Show shipping information'
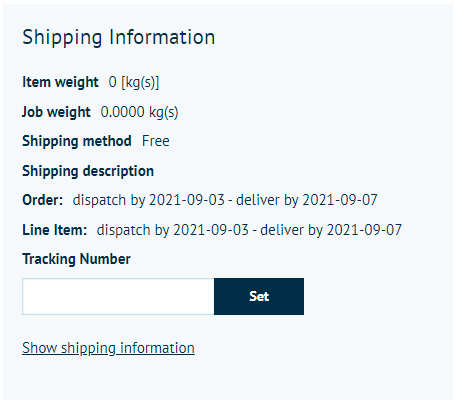
When you click this a popup will appear that will then let you manage your shipment request manually.
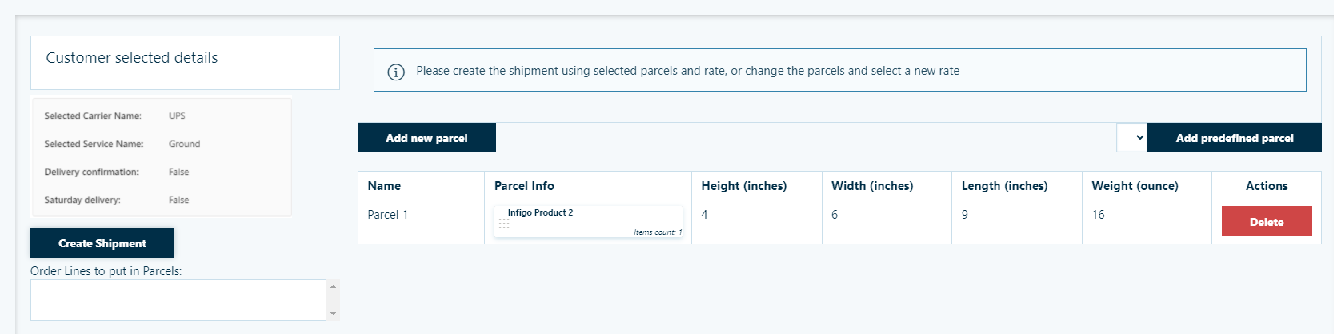
It displays the carrier and service the customer selected in checkout.
It also lets you define the parcels that you want to send as part of the shipment.
Once you have created your parcel sizes or selected from your predefined parcel list, you can create the shipment which at this stage will then send the request to Easypost and return the shipping labels.
NOTE: For international shipments that require customs information to be sent with the shipment you must assign items from the order specifically into parcels. To do this click on the 'Add shipment information' button and then drag each order item into the respective parcel you have created. We also do not support 'Buy Shipping Instantly' for international shipments due to the customs related information - these must be triggered and handled manually.
Send Calculated DispatchBy as label date
Enable this setting if you have potential production restrictions or cut off times enabled on your storefront. This will ensure that those dates calculated in Infigo for those offsets are sent to Easypost so that the date printed on the label reflects that. I.e. if you have a cut off time for 5pm and an order comes in after that time you will be shipping the items tomorrow, not today, so this setting will ensure that tomorrows date is included on the label and not todays.
NOTE: This setting is only valid when 'Buy Shipping Instantly' is enabled.
Multiply Quantity by Record Count
When working with batch products you can enable this setting if you want us to include the record count quantities when calculating the parcel dimensions and quantity.
Signature
This is a dropdown that allows you to decide if you want to include services to your customers that require a signature. You have 3 options to choose from:
- None - No services requiring a signature will be returned
- Required - Only services requiring a signature will be shown
- Optional - All services will be shown, both requiring and not requiring a signature
Saturday Delivery
Similar to the Signature setting above, this is a drop down that allows you to decide if you want to include services that will deliver on a Saturday. With the same three options as above.
Show Delivery Date/Days
This option allows you to decide if you want to display in the checkout the Delivery days or dates associated with that service and shipment.
- No - Will not show any delivery date or day information
- Delivery Days - Will show in the checkout next to each service the number of days returned from Easypost for the transit of that parcel for that service to that destination.
- Delivery Date - Will show in the checkout next to each service the estimated delivery date returned from Easypost if they were to choose that service.
Rate Type
Here we allow you to choose between three different rates that Easypost return for each service
Rate - This is the actual rate quote on your account for that service. This will usually be a slightly cheaper pre-negotiated rate that has been agreed with your carrier on your account.
Retail Rate - This is the retail rate for that particular servce for anyone wanting to use it that doesn't have an account already.
List Rate - This is the non-negotiated rate provided for every account with that carrier. So will generally be cheaper that the retail rate but not as competitive as the negotiated rate.
Debug Mode
As the name suggests, this should only be used when debugging to try and obtain additional information from the plugin. When used in live this should always be disabled.
Carrier and Services Settings
This section should be used when you are not using Easypost to obtain the rates and instead want to map Infigo delivery methods to Easypost services so that when the order is placed the correct services are used.
Carriers and Services Mapping - This section will display a list of all your mapped couriers that exist within your Easypost account.

Next to each carrier you have a text box and this should be used to enter in all the services for each carrier that you then want to map to a Infigo Delivery Method. It should contain a list of semi-colon-separated values that include the Easypost service name exactly as they have it on their site.
To understand all the Easypost service codes please have a look here. You can switch between carriers and there will find a list of Service Levels - each of these are the supported service that you can use for that carrier.
For example, if you want to map a series of UPS services for example 'Standard' and 'Ground' then you would enter in the following into the UPS carrier mapping field (as per the screenshot above)
Standard;Ground
These can then be used later when mapping your Infigo Delivery Methods to Easypost Services.
Vendor Information
This information essentially tells Easypost information about where the parcels will be shipped from, which gets used when helping to calculate the costs and also some contact information that may be passed on to the carriers about who to contact if they need to.
Vendor Name, Company Name, Street, City, State Province (Abbreviation), Zip code, Country ISO code, Phone Number and Email address should all be populated.
Parcel Settings
This section determines how your parcels sizes will be calculated and sent to Easypost.
Auto Parcel Size Calculation - This setting essentially determines whether or not you would like Infigo to calculate the number of parcels and the dimensions of the parcels based on a specific formula or use a set or predefined parcel sizes.
When enabled, we will take the quantity and the dimensions of the items being ordered and then along with the following two settings - Max Parcel Weight and Max Parcel Length - determine the optimum parcel count and size for the items being ordered. It is important that when using this that all your products have dimension values entered for weight, height, length and width.
When disabled we allow you to configure your own pre-defined parcel sizes as explained below.
Max Package/Parcel Weight - This setting lets you define the maximum parcel weight. As mentioned above it will be used when determining if multiple parcels are required if the maximum weight is exceeded. Currently this is a storefront setting so will be sent for all carriers linked to your Easypost account. This is in ounces.
Max Package/Parcel Length - This setting lets you define the maximum parcel length (longest side). It too is used when determining if multiple parcels are required if the maximum length is exceeded. This is in inches.
Parcel Allocation Level - There are three options here - Order, Order Line, Order Line Quantity. It allows you to decide what inputs into the parcel size calculations. If you set this to Order it will consider ALL items in that order when calculating the parcel sizes.
When you set this to Order Line it will do a calculation for each order line item, so at the very least you will receive back a shipping label for each order line item (more if the maximum parcel length or weights are exceeded).
When you set this to Order Line Quantity it will do the calculation for every quantity of order line items. So here you will essentially receive at least on parcel/shipping label per unit.
Use Predefined Package Names - When this setting is enabled it will instead of sending parcel dimensions and weights to the carriers it will instead send the predefined parcels you create in the below setting as predefined packages. The names of the predefined parcels you then set are important as they will relate to the services that you are requesting.
For example, Fedex offer a service called 'One Rate' this is a service where the parcels are all the same, specific size and generally cheaper and if you can fit the goods in that predefined box it can be shipped. So creating a predefined parcel called 'One Rate' and adding the set dimensions for it will request the One Rate shipping rates from Fedex.
Predefined parcels - When not using the Auto Parcel Size Calculation setting we allow you to configure your own predefined parcel sizes. These can then be selected when requesting a shipment.
When Buy Shipping Instantly setting is true we will request a shipping label for every predefined parcel size you have configured. If you also have your parcel allocation level set to Order Line or Order Line Quantity then your predefined parcels will be requested for each of those too. When Buy Shipping Instantly is disabled, and you are requesting your shipments manually, then these predefined parcels will becoming options for you to select from when requesting creating the shipment (saving you from writing out the dimensions manually each time).
Artifacts Settings
This section allows you to configure a specific hot folder mapping for your shipping labels.
Labels Hot Folder - If you want the shipping label to be automatically downloaded to a hot folder so that you can then automate the printing of it you can specify a hot folder mapping here.
Packaging Slip Hot Folder - We support for the shipping label to be embedded within a packaging slip so defining a hot folder mapping here will enable this functionality. The shipping label will be requested and returned by Easypost and then we will embed it within a specific region of your packaging slip which will then be downloaded to the specified hot folder.
Job Ticket Hot Folder - Similar to the Packaging Slip we also allow for the shipping label to be embedded within the job ticket. So depending on whether you are doing order line or order shipping you will generally use one or the other.
Customs Information
Customs information is only used when you are shipping your goods internationally and the origin and destination country requires it.
Here we allow for different information to be configured which will essentially be used as for the default requests when fetching rates before we understand what is in the parcels. All of the information entered below will be sent for ALL orders from that storefront when required.
Order Content Type - A drop down of options supported that help define what it is you are shipping
Order Content Explanation - A field for you to provide a more detailed explanation of the goods being shipped from your storefront
EEL Pfc Threshold - The threshold value to define what Pfc code should be sent with the order
EEL Pfc Over - The Pfc code that will be sent with the order when the value of the order is above the EEL Pfc Threshold amount.
EEL Pfc Under - The Pfc code that will be sent with the order when the value of the order is below the EEL Pfc Threshold amount.
Send dummy customs in rate call - Enable this setting if you want to send dummy customs information with the rates request when the customer is in the checkout. This will allow for international services that require customs information to be returned and shown to the customer when ordering and include a price.
HsTariffNumber - This is the fallback default Hs Tariff Number that will be sent with the order.
Manifest Files
Only really used for specific carriers that require a manifest to be sent. In situations where you do require this, please raise a support ticket and the team will help you configure this.