Setup
Go to Admin > Configuration > Payment Plugins > Credit / Debit Card, Payments.Authorize.Net > Configure.
The first section of the plugin configuration is "Authorize.Net Settings"
- Capture mode: When an Authorize.Net payment is cancelled or fails, the order will not be placed until the payment amount is authorized. You can choose one of the following options:
- On Checkout - meaning as soon as you place the order
- Manually - meaning the admin captures the payment manually from order details in admin page
- On Shipped - when the order gets shipped, the payment automatically gets captured. Authorized payments can be voided / cancelled.
- API Login ID: this is required and you will get it from your Authorize.Net account (see hint ?)
- Transaction Key: this is required and you will get it from your Authorize.Net account (see hint ?)
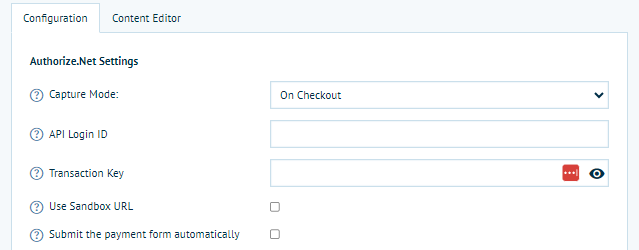
- Use sandbox URL: you can test the connection with this setting (see hint ?)
- Submit the payment form automatically: when ticked (enabled) this will automatically load the payment form. When unticked (disabled) the end user will be required to click a "show payment form" at checkout (see hint ?).
The second section is Payment Options.
Please see hints (the question mark alongside each setting) for more information.
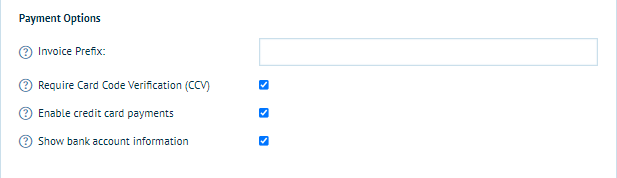
- Require Card Code Verification (CCV): This setting is provided by the Address Verification Service (AVS) from banks and card associations to help identify suspicious payment card activity for e-commerce transactions. AVS matches portions of the customer's billing address, as provided by the merchant, against the billing address on file with the issuing bank. Enable this setting if you want to enforce these additional checks
- Enable Credit Card Payments: This allows customers to pay via credit cards
- Show Bank Account Information: Enable this setting if you want to display bank account fields on the payment form.
Security options, show captcha form: enable this if you would like to have your Google security reCAPTCHA enabled in the Authorize.Net iFrame.
Show Shipping Address Form: Enable this setting if you would like the shipping information entered in Catfish's checkout flow to be displayed in the payment form.
Billing Address Options, Show Billing Address Form: Enable this setting if you would like the billing information entered in Infigo's checkout flow to be displayed in the payment form.
Customer Options, Show Email Address: Enable this setting if you would like to have the customer's email address on the payment form.
Style Options, Primary Accent Colour: Use this setting to select the primary accent colour of some of the payment form elements. These elements include the buttons, and field line colours.