Overview
A global fully integrated suite of payment products, Stripe offers many different methods of payment under one plugin. From standard credit and debit card payments, to Apple and Google Pay, using our Stripe plugin you can offer these methods of payment to your customers on your Infigo storefront.
This article will walk you through the steps for creating a Stripe account, then connecting up and enabling your Stripe payment plugin in your Infigo storefront.
Payment flow using Stripe
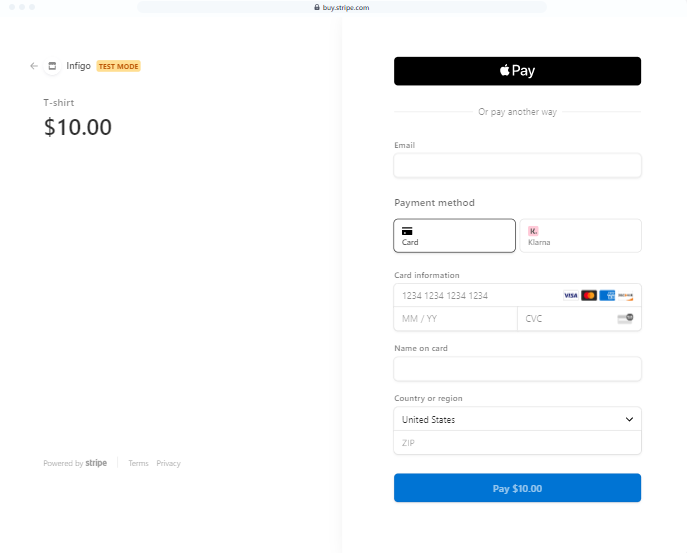
The flow of taking a payment through Stripe on your Infigo storefront is exactly the same as it currently is for all of our existing plugins (Paypal, Opayo / Sagepay, Authorize.net etc.). The customer will go through the checkout as normal, if you offer multiple payment options they will select 'Stripe' and then confirm their order. Then the stripe payment popup will appear, hosted and provided securely directly from Stripe and it will present the user with all the payment options you have configured and are applicable for them to use. Then once confirmed, the popup will close and the user will be returned to the order confirmation page on the Infigo storefront.
Register for a Stripe account
To start the process, you need to first ensure you have a Stripe account. If you or your business already have one and you are going to want to use this one for your payments on your Infigo storefront then you can ignore this step.
If you do not have a Stripe account already, or want to create a new one for this process, then simply start by creating an account here.
Note: On this form all the information used is for the admin user account. Make sure the email address is a specific email address and only the person dealing with company financials has access to it.
It's also the email address that will be contacted when you need to change your password.
During normal business operation, this email address will receive notifications about payments and other important messages about your online account.
When selecting a password, make sure it contains at least one lowercase, one uppercase, one number and one special character.
Stripe will request lots of information from you during the registration process, including information about your role at the business and to identify you.
Obtain your Stripe API keys
In order to connect your Infigo storefront to your Stripe account you need to obtain your Stripe API keys from within your Stripe account. You can find these here or by logging in and navigating to 'Developers' And then API Keys in the menu on the left.
From here you will be presented with two keys, a Publishable key (public key) and a Secret key. You need to copy these and paste them into the correct fields in the Infigo Stripe payment plugin.
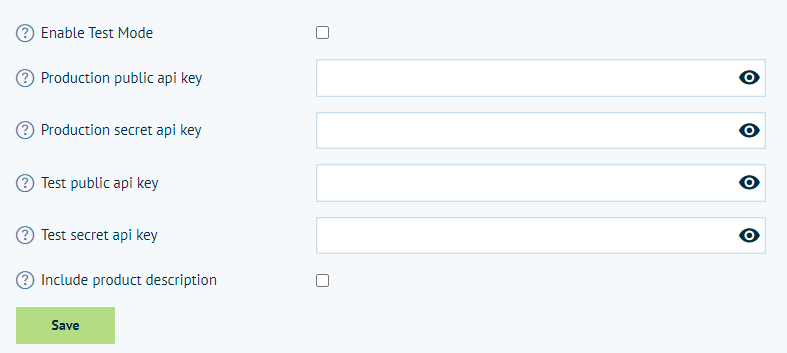
the Stripe Publishable key should be pasted into the Production public api key field in the Infigo plugin, and the Stripe Secret key should be pasted into the Production secret api key field.
If your Stripe account is in test mode and you obtained test API keys then you should ensure that you paste the keys into the Test key fields in the plugin. And also ensure that the 'Enable Test Mode' option is enabled. This will allow you to make test transactions without taking payments.
Configure updates back from Stripe to Infigo (Webhooks)
In order to ensure the payment has been successful or in situations where the payment fails we need to setup Webhooks within your Stripe account that will inform Infigo of this information.
To do this, simply selet 'Webhooks' from the left hand menu in Stripe on the same Developers section you were in when you obtained the API keys. Or navigate here.
On this page click on the 'Add an endpoint button'

Populate the following information
Endpoint URL: https://{Infigo storefront URL}/Plugins/StripeWebhook - You can obtain the actual URL from within the Infigo Stripe payment plugin
Description: This is just an optional bit of text that explains what your Webhook that you are setting up does.
Select events to send: Click on this to add the following two events - payment_intent.payment_failed & payment_intent.succeeded (The easiest way to select these is to use the search feature)
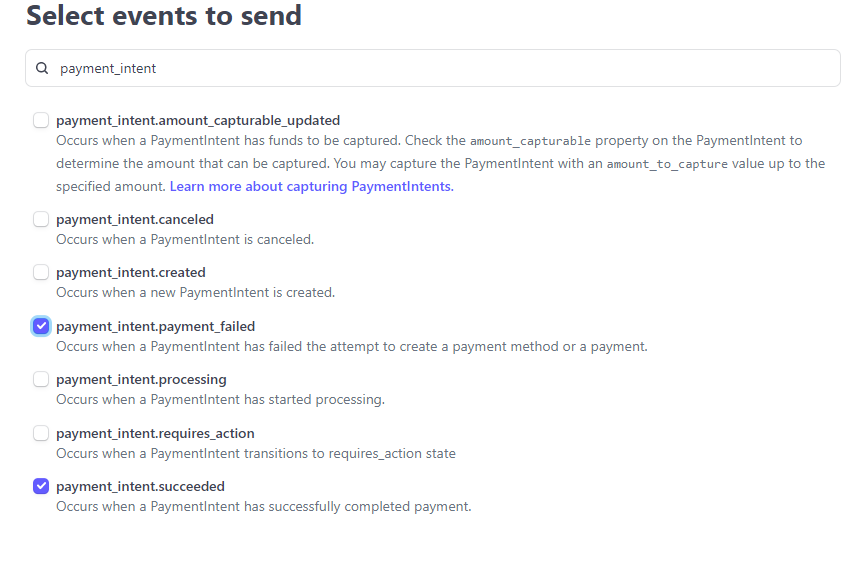
Then click 'Add events'.
Lastly, you can use the inbuilt Stripe Webhook test event button to ensure it is all configured correctly.
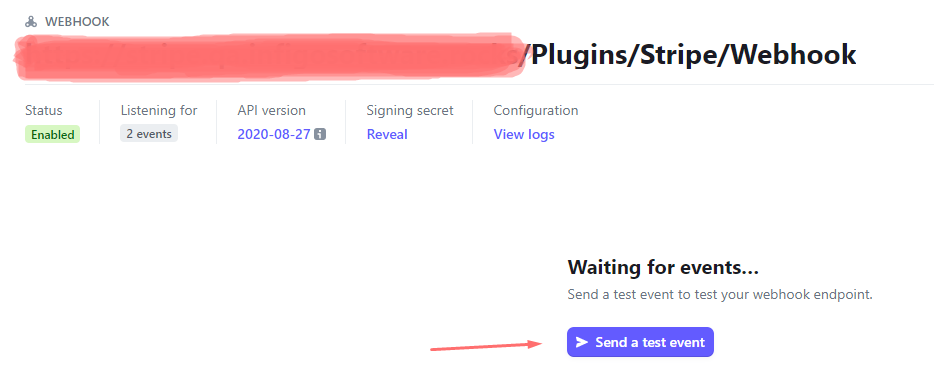
NOTE: Please ensure under the API version that you are using one of the following supported versions of the webhook API:
2020-08-27
2022-08-01
2022-11-15
2023-10-16
2024-04-10
2024-06-20
Enable the Stripe Plugin
Lastly, you can now enable the Stripe payment plugin in your Infigo admin so that it becomes an option to your customers in the checkout. Simply navigate to your payment methods page (/Admin/Payment/Methods) or search for 'Payment methods'. From the list find the 'Stripe' plugin and click 'Edit'. Then check the 'Is active' checkbox and click 'Update'.
The click on the 'Configure' button against the Stripe payment plugin. In the following screen you are asked to paste in the API Keys you obtained in the earlier steps.
If just testing the integration then enabled the 'Test Mode' (Remember to turn this off before you want to go live). If in test mode, then you should use your Test public and secret keys. Otherwise keep 'Test Mode' disabled and paste in your production public and secret keys.
Configuring Payment Methods in Stripe
We recommend reaching out to Stripe directly to support you with any Stripe specific related functionality but the different payment methods that will be made available to your users when making purchases on your Infigo storefront through stripe are all configured within your Stripe account.
To set these up you need to click on the settings icon in the top right corner of your Stripe account.
Then under 'Product Settings > Payments' click on the 'Payment methods' link. This then takes you to the full list of different payment methods that are available to you and ultimately to your customers when you enable them.
You'll notice that some have geographical restrictions and currency restrictions.
When 'turning on' a payment method some are more straightforward than others, and can be activated at the click of a button, others may require you to accept additional terms and conditions and/or provide additional information.
Clicking on the 'Preview' tab at the top once you have selected all the payment methods you want to offer will provide you with an idea of what the user will be presented with when making the payment.
NOTE: If you wish to use Apple Pay, they will require you to carry out a domain verification process of your Infigo. To do this, please create the verification file as per their steps here and then raise a support ticket with our team to implement this for you and to complete the validation process.
Testing recommendations
What we recommend, would be to set up the test mode on a test/training storefront, make a test product with a low value, then from there, you can use this - https://docs.stripe.com/testing#cards these are Stripes test cards, this will allow you to put through test orders and check the set up is working correctly.
Once the test environment is working you will be ready to go! But again, we would recommend that you use the live environment on your test storefront, place a test order with a test product (has to be a minimum value of 30p) and put through an order to make sure set up is working correctly.