Infigo Academy: Batch import customer data
Chapters 0:00 Introduction
0:42 Key details of the customer batch importer
1:35 Obtain an up to date template document
2:27 Populating the CSV template
4:05 Using the batch customer import tool
4:40 Troubleshooting import problems
Overview
Have lots of Customers that you need to create within a storefront? And creating a single customer would just take too much time? No problem, use our Customer Import Tool. Download our CSV template, populate it with your customer details and then simply upload it in the system and we will create, or update your customers.
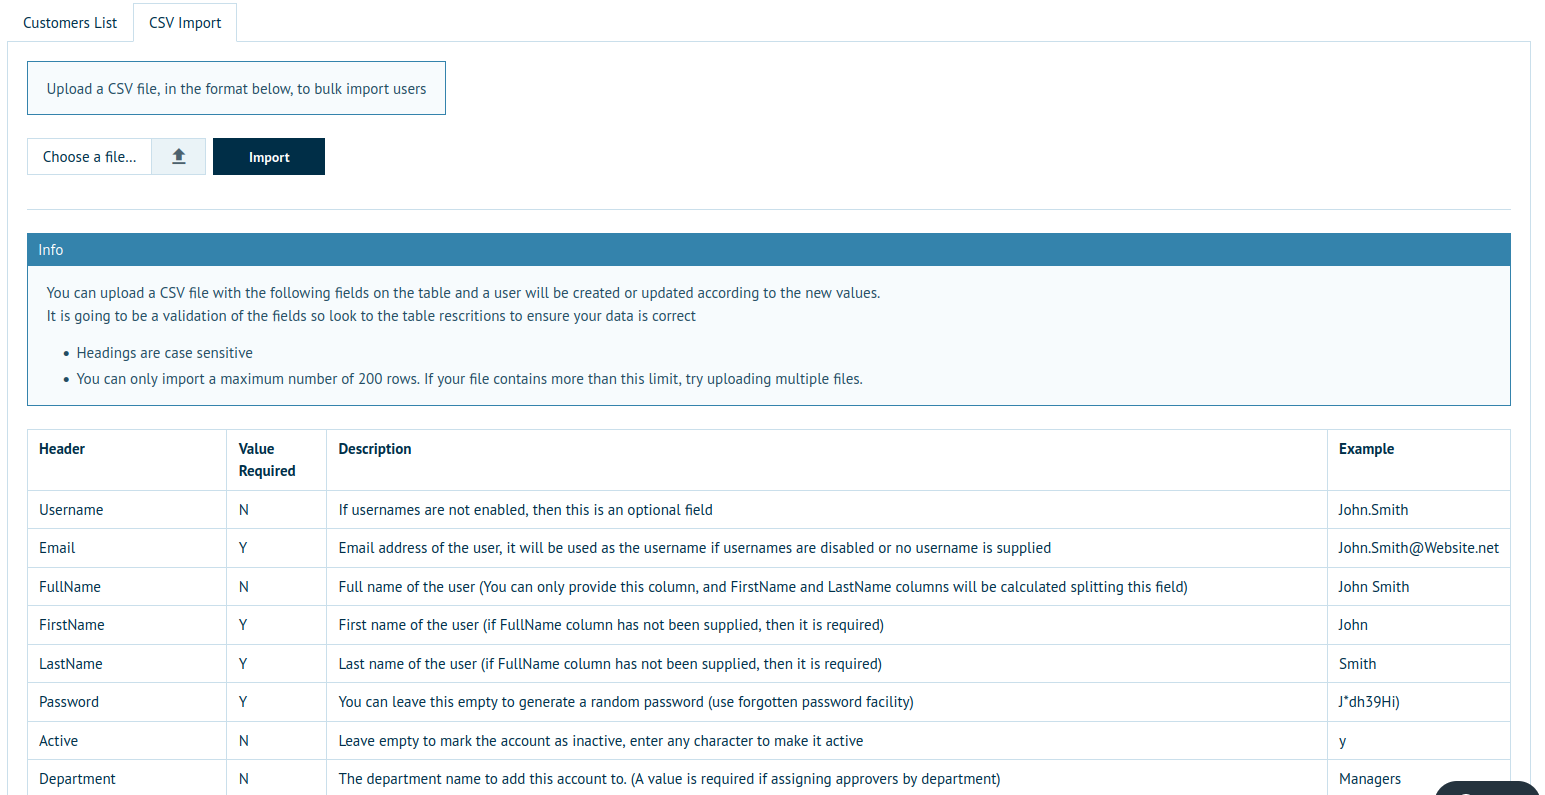
Navigate to Customers > Customer Management in the admin where you will find a tab called 'CSV import'. Click on this tab and you will be presented with all the information you need to import your customer base.
The page itself contains a breakdown of the columns that should be included in the CSV file with a description and example of each. At the bottom of the page it also includes a sample CSV that you can use to populate with your customer data prior to uploading.

Regarding the .CSV upload, various factors, in use on a storefront can directly affect the successful creation or updating of a Customer record during the import. Said factors include:
Using Usernames
Found under Configuration > Settings > Customer Settings, the setting of: ': subsequently allows users to log-into storefronts using the username associated with their account when enabled. However should this setting, be disabled, the full email address is required to be included in the CSV - applies specifically in the instance of Approvers being assigned to the Approver1/2/3 columns.
Registration
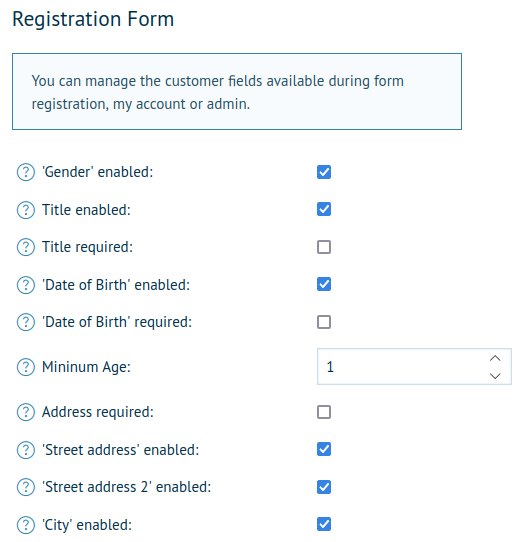
Located under Configuration > Settings > Customer Settings, in the 'Registration Form' section, it is here that fields can be sent to be required (as would be used on the Registration Form) therefore any setting which is enabled under the 'Registration' tab, must be included on the CSV file.
The screen-capture below depicts the settings enabled on an example storefront.

Departments
Should you require the customers in the CSV file to be uploaded into departments, these departments must already exist on the system, otherwise may cause the CSV file to fail and must follow the exact format of how the department is named on the system.
County/Regions
Should you include 'County' in your CSV file (dependant on if this is enabled under 'Registration') it may be required that certain counties/regions may not currently exist on the system and are required to be added prior to the CSV file being uploaded.
This article describes how to add additional counties/regions to the system.
Please Note: The column headers in the CSV file must correspond precisely to how the column headers are formatted in the Customer Import Table and are case-sensitive.
However , if departments are included in your file, the department name must mirror (both in case form and format) the department located in Infigo, as aforementioned.
This applies to all column headers.
Import
On import the CSV will be validated record at a time. If the validation (dependent on the configuration of the storefront mentioned above) passes each record will then check if the customer exists already (either by email address or username depending on the storefront settings) and if no match is found a customer record will be created.
If a matching customer is found then a new customer will not be created and instead the matching customer will be updated with the new details in the CSV file for that record.
For any CSV records that failed the validation an error CSV is generated once the import has completed that will contain information on the records that failed and why.
Example CSV Template:
An example CSV template can be found under Customers > Customer Management in the 'CSV Import' tab and also at the bottom of this article (as an attachment).
Please be aware that all columns present in the example CSV file may not apply, and as a rule of thumb, it is beneficial to consult the CSV table to review what columns can be removed, and thus will still achieve a successful upload.
Please note: if you have used quotation marks ( " ) in the users password, the CSV import will error. If you want to keep the " then you will need to escape the text like so:
If password is: test"*2
then in csv you need to have "test""*2"
...or you can use another special character.