Product Sync
The purpose of this feature is to create and update products in Infigo from printIQ.
This supports both print-on-demand Static PDF products and stock/inventory items.
The concept is that when a product is created or updated in printIQ, a webhook will be triggered from printIQ sending a product payload to your Infigo platform. Infigo will then parse the information channelled through a central "Master" storefront and either create or update the relevant product in the relevant storefront based on information with that request.
The plugin introduces the concept of a blueprint/master product and category to be created and configured so that the display of the products and categories created from printIQ can be controlled to a certain degree. Options like display settings will then be copied over to the new products and categories based on the Master one set.
Setup Process
You need to set up a Master storefront that is used to filter the products from PIQ so that they can be created on their respective storefront. To set this you can either use an existing storefront that is already created on your platform OR you would create a new storefront and set that as the "Master Sync storefront". The benefit of having a separate storefront is that if any of the products are created without the correct category structure in PIQ they would be set up on this separate storefront which would not act as a LIVE storefront. Create the new storefront and make a note of the ID under the manage storefront section OR navigate to the platform level using your Platform Admin account.
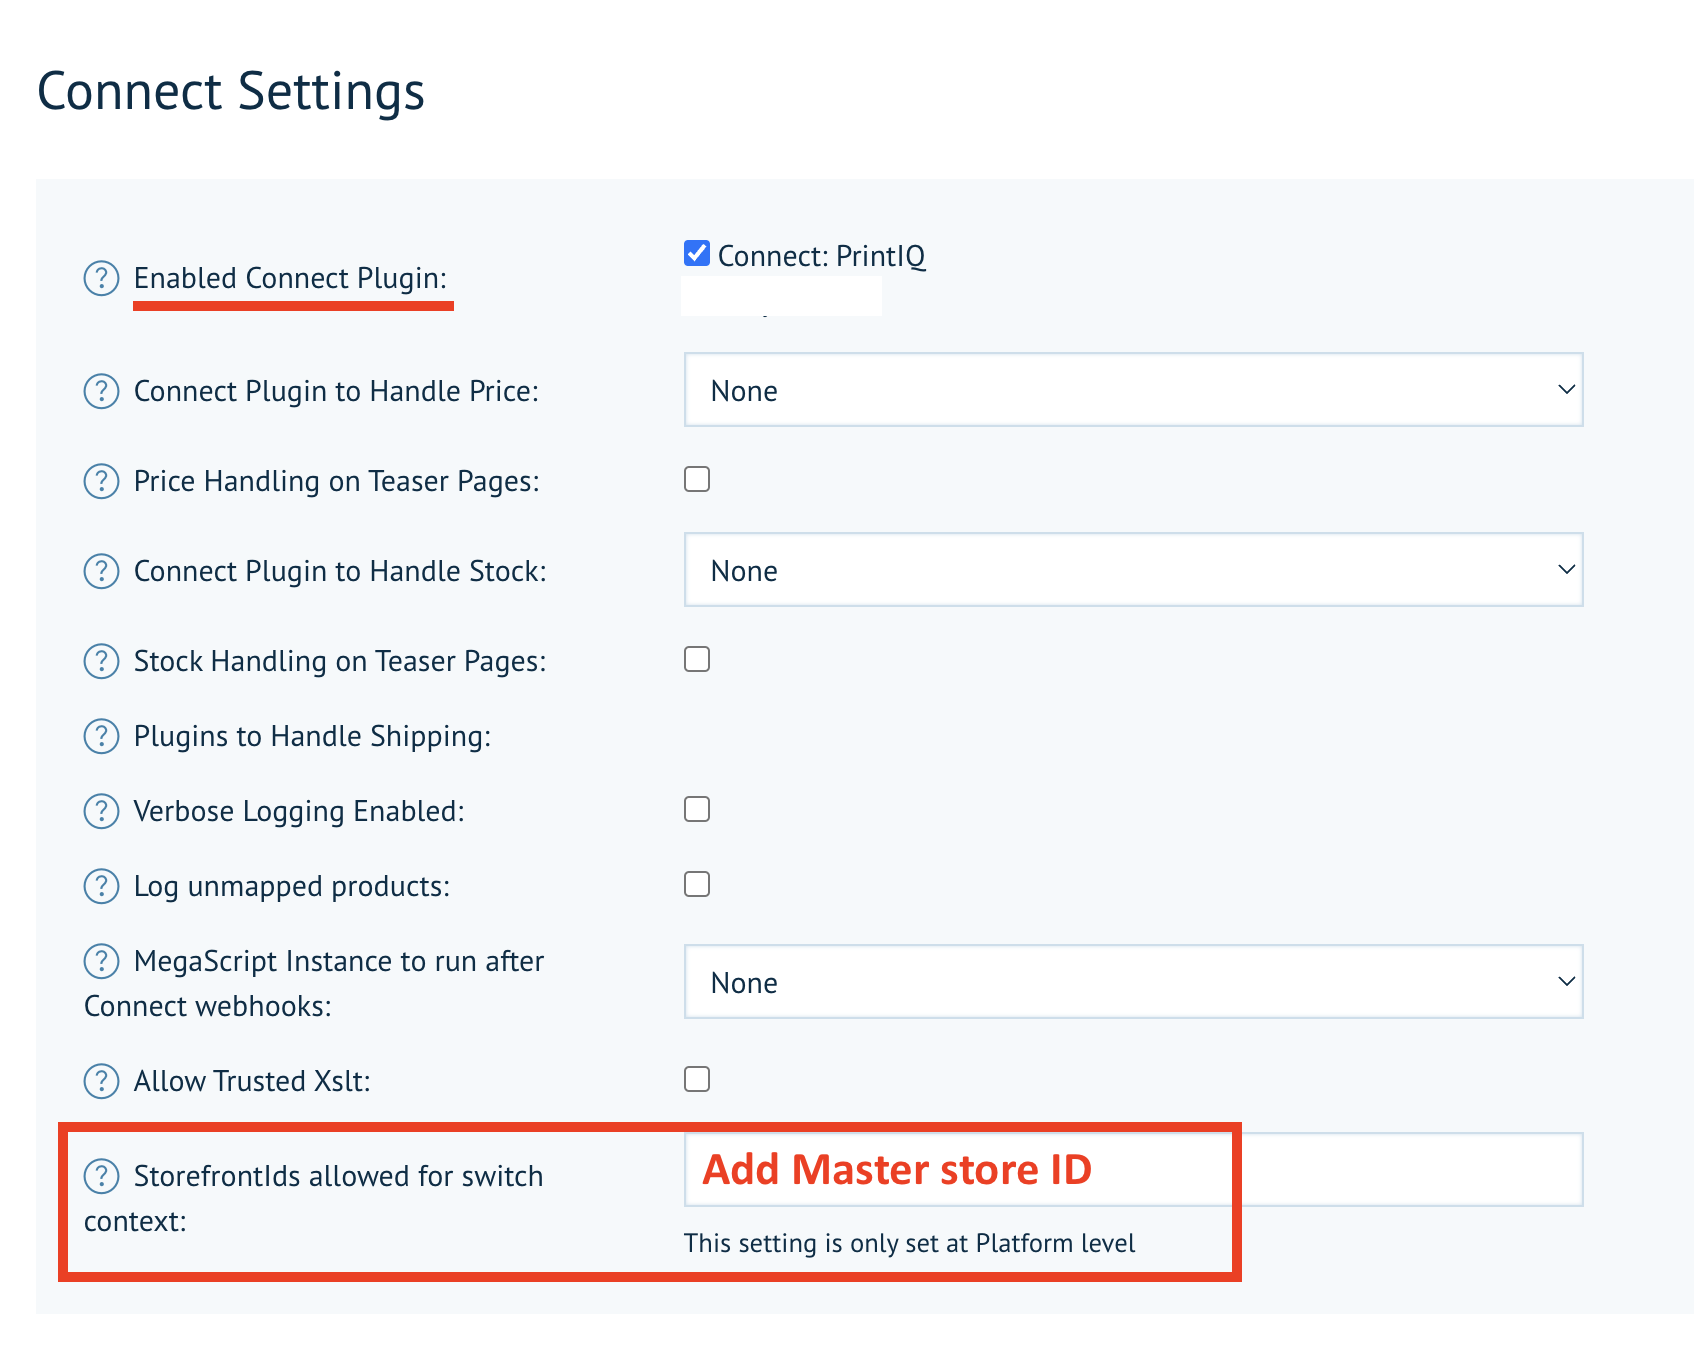
Platform level settings
To set the Master storefront you need to go to the platform level and specify the storefront ID of the new Master storefront you wish to use against the connect settings section and the entry for ":"
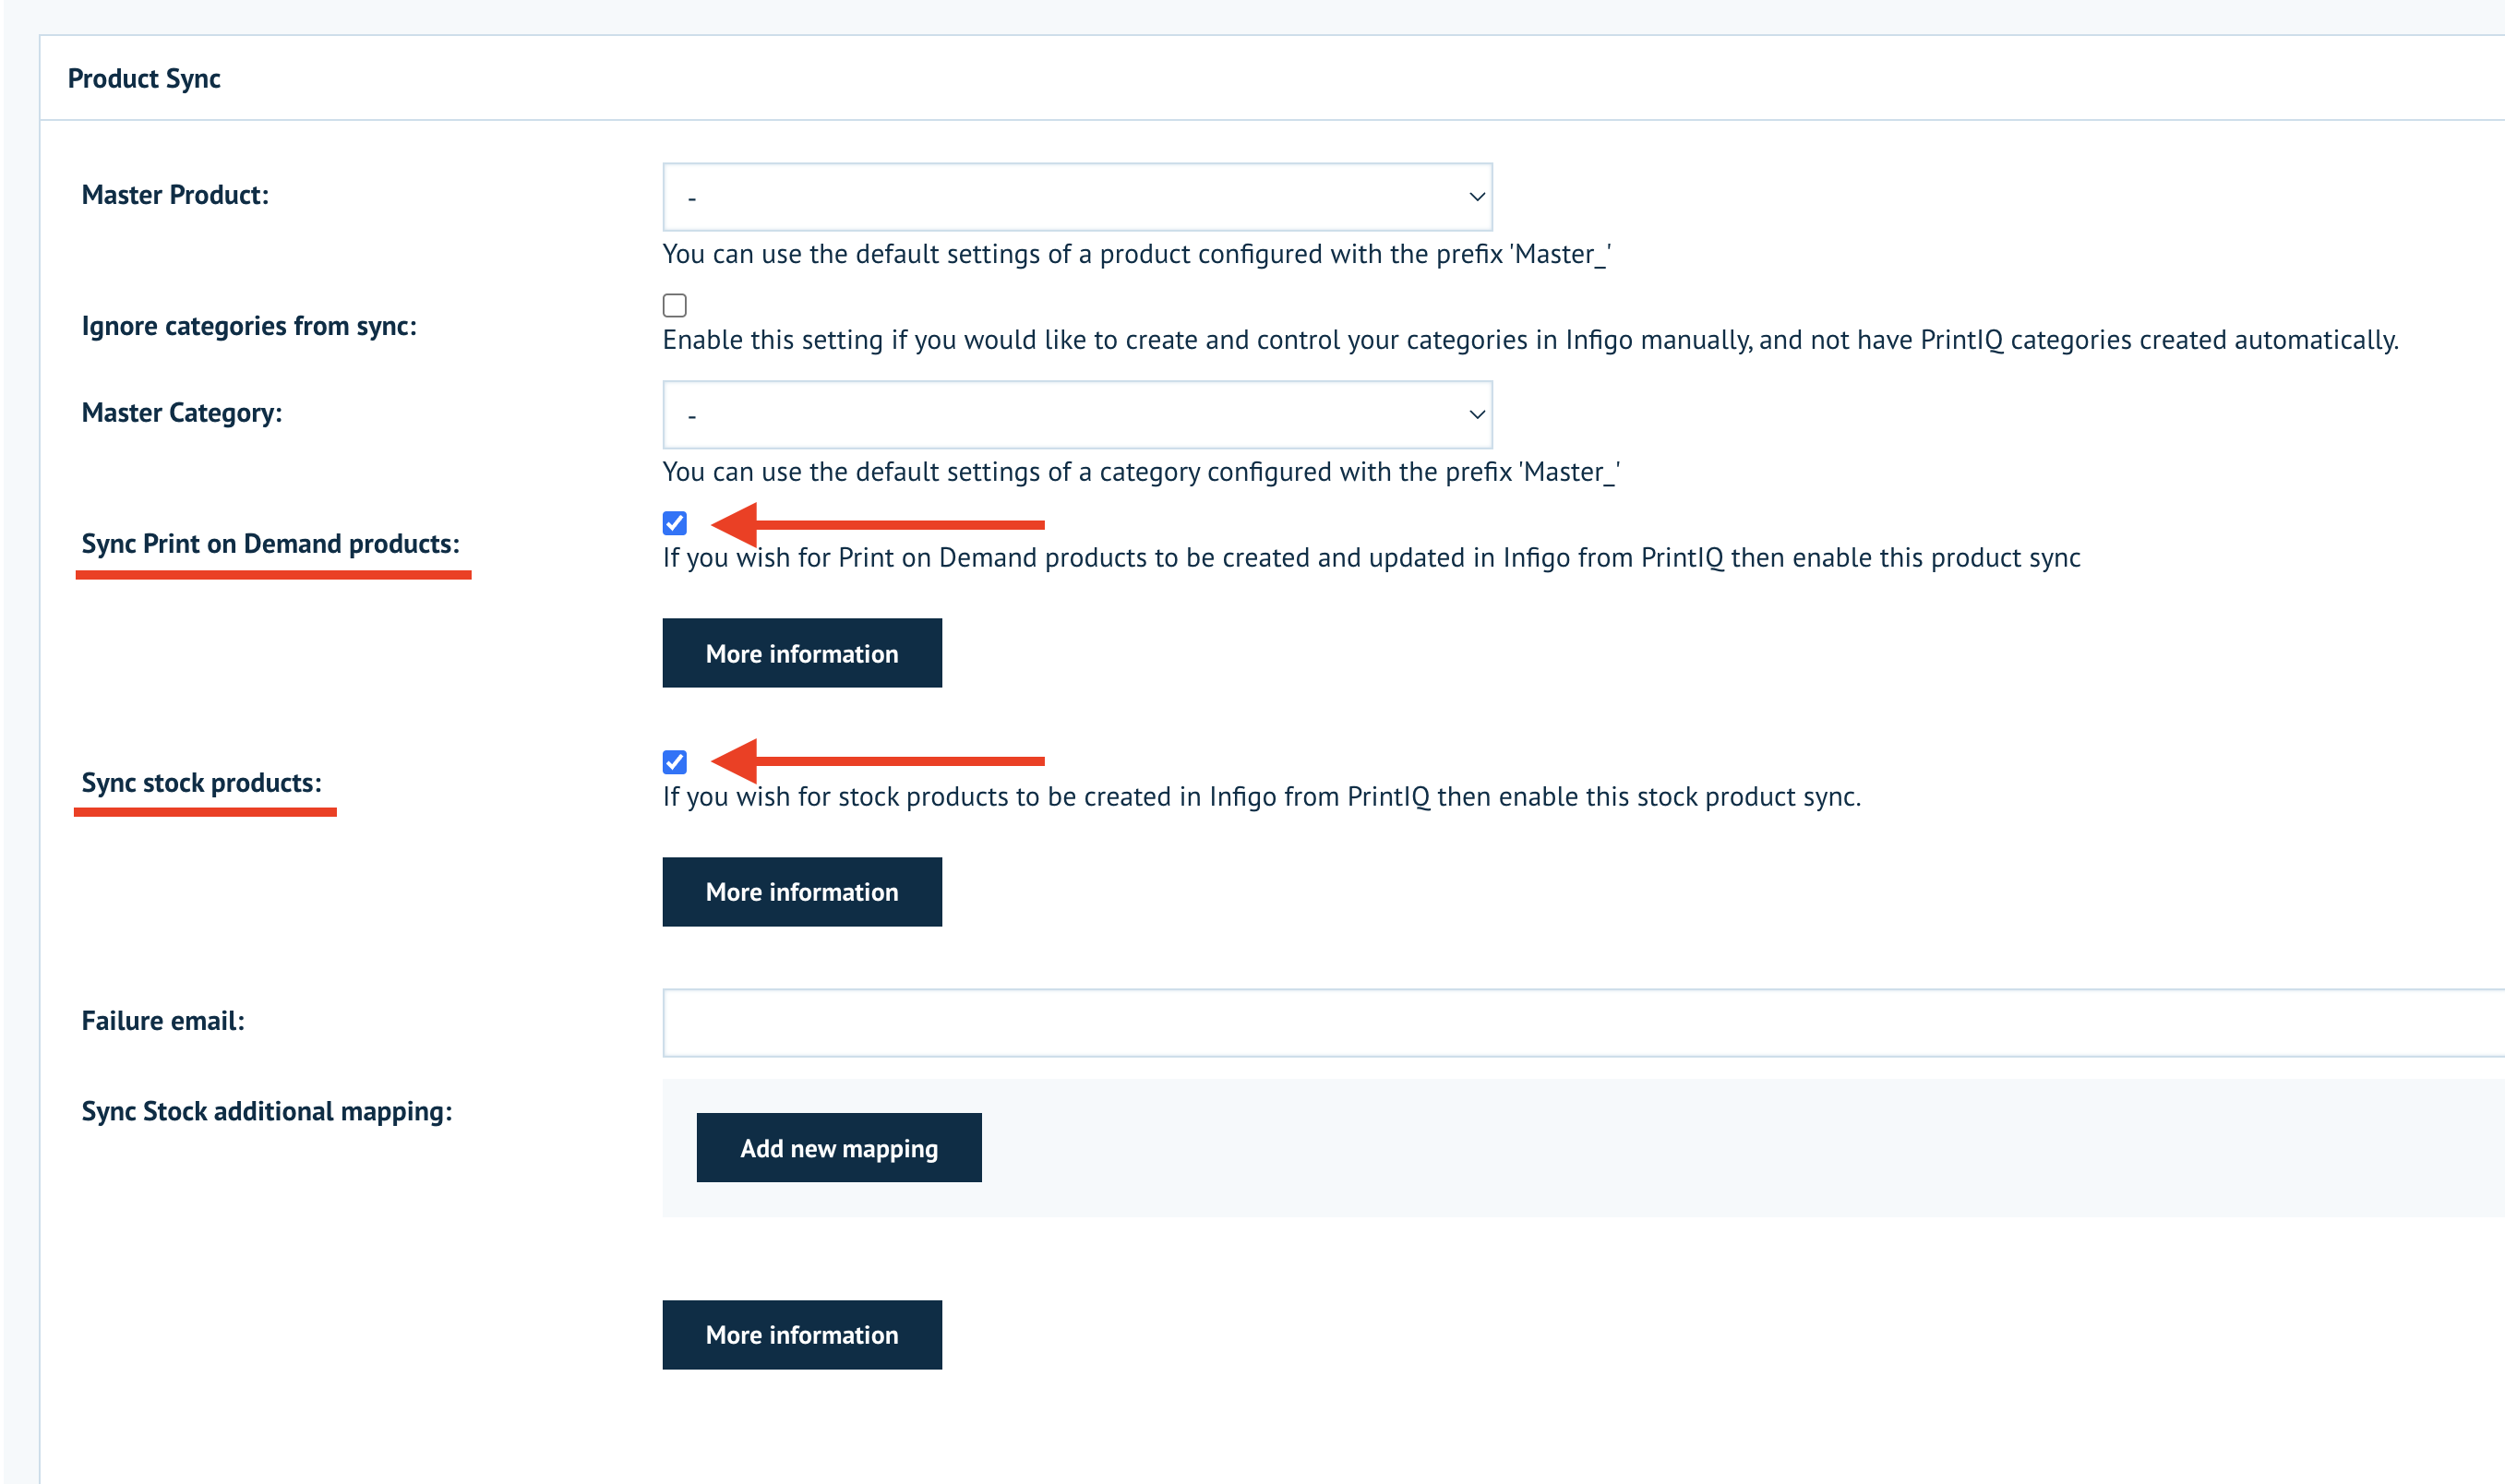
Whilst still at platform navigate to the Connect plugin section and click configure on PIQ plugin - under the section for Product Sync, enable the sync switches for Sync Print on Demand products + Sync stock products
Master Storefront settings
Now set the settings on the Master storefront. Here you will need to ensure that in the PIQ plugin the same General settings for the plugin using the V0 and V1 (Base 64 token) credentials as platform, provided by PIQ are entered.
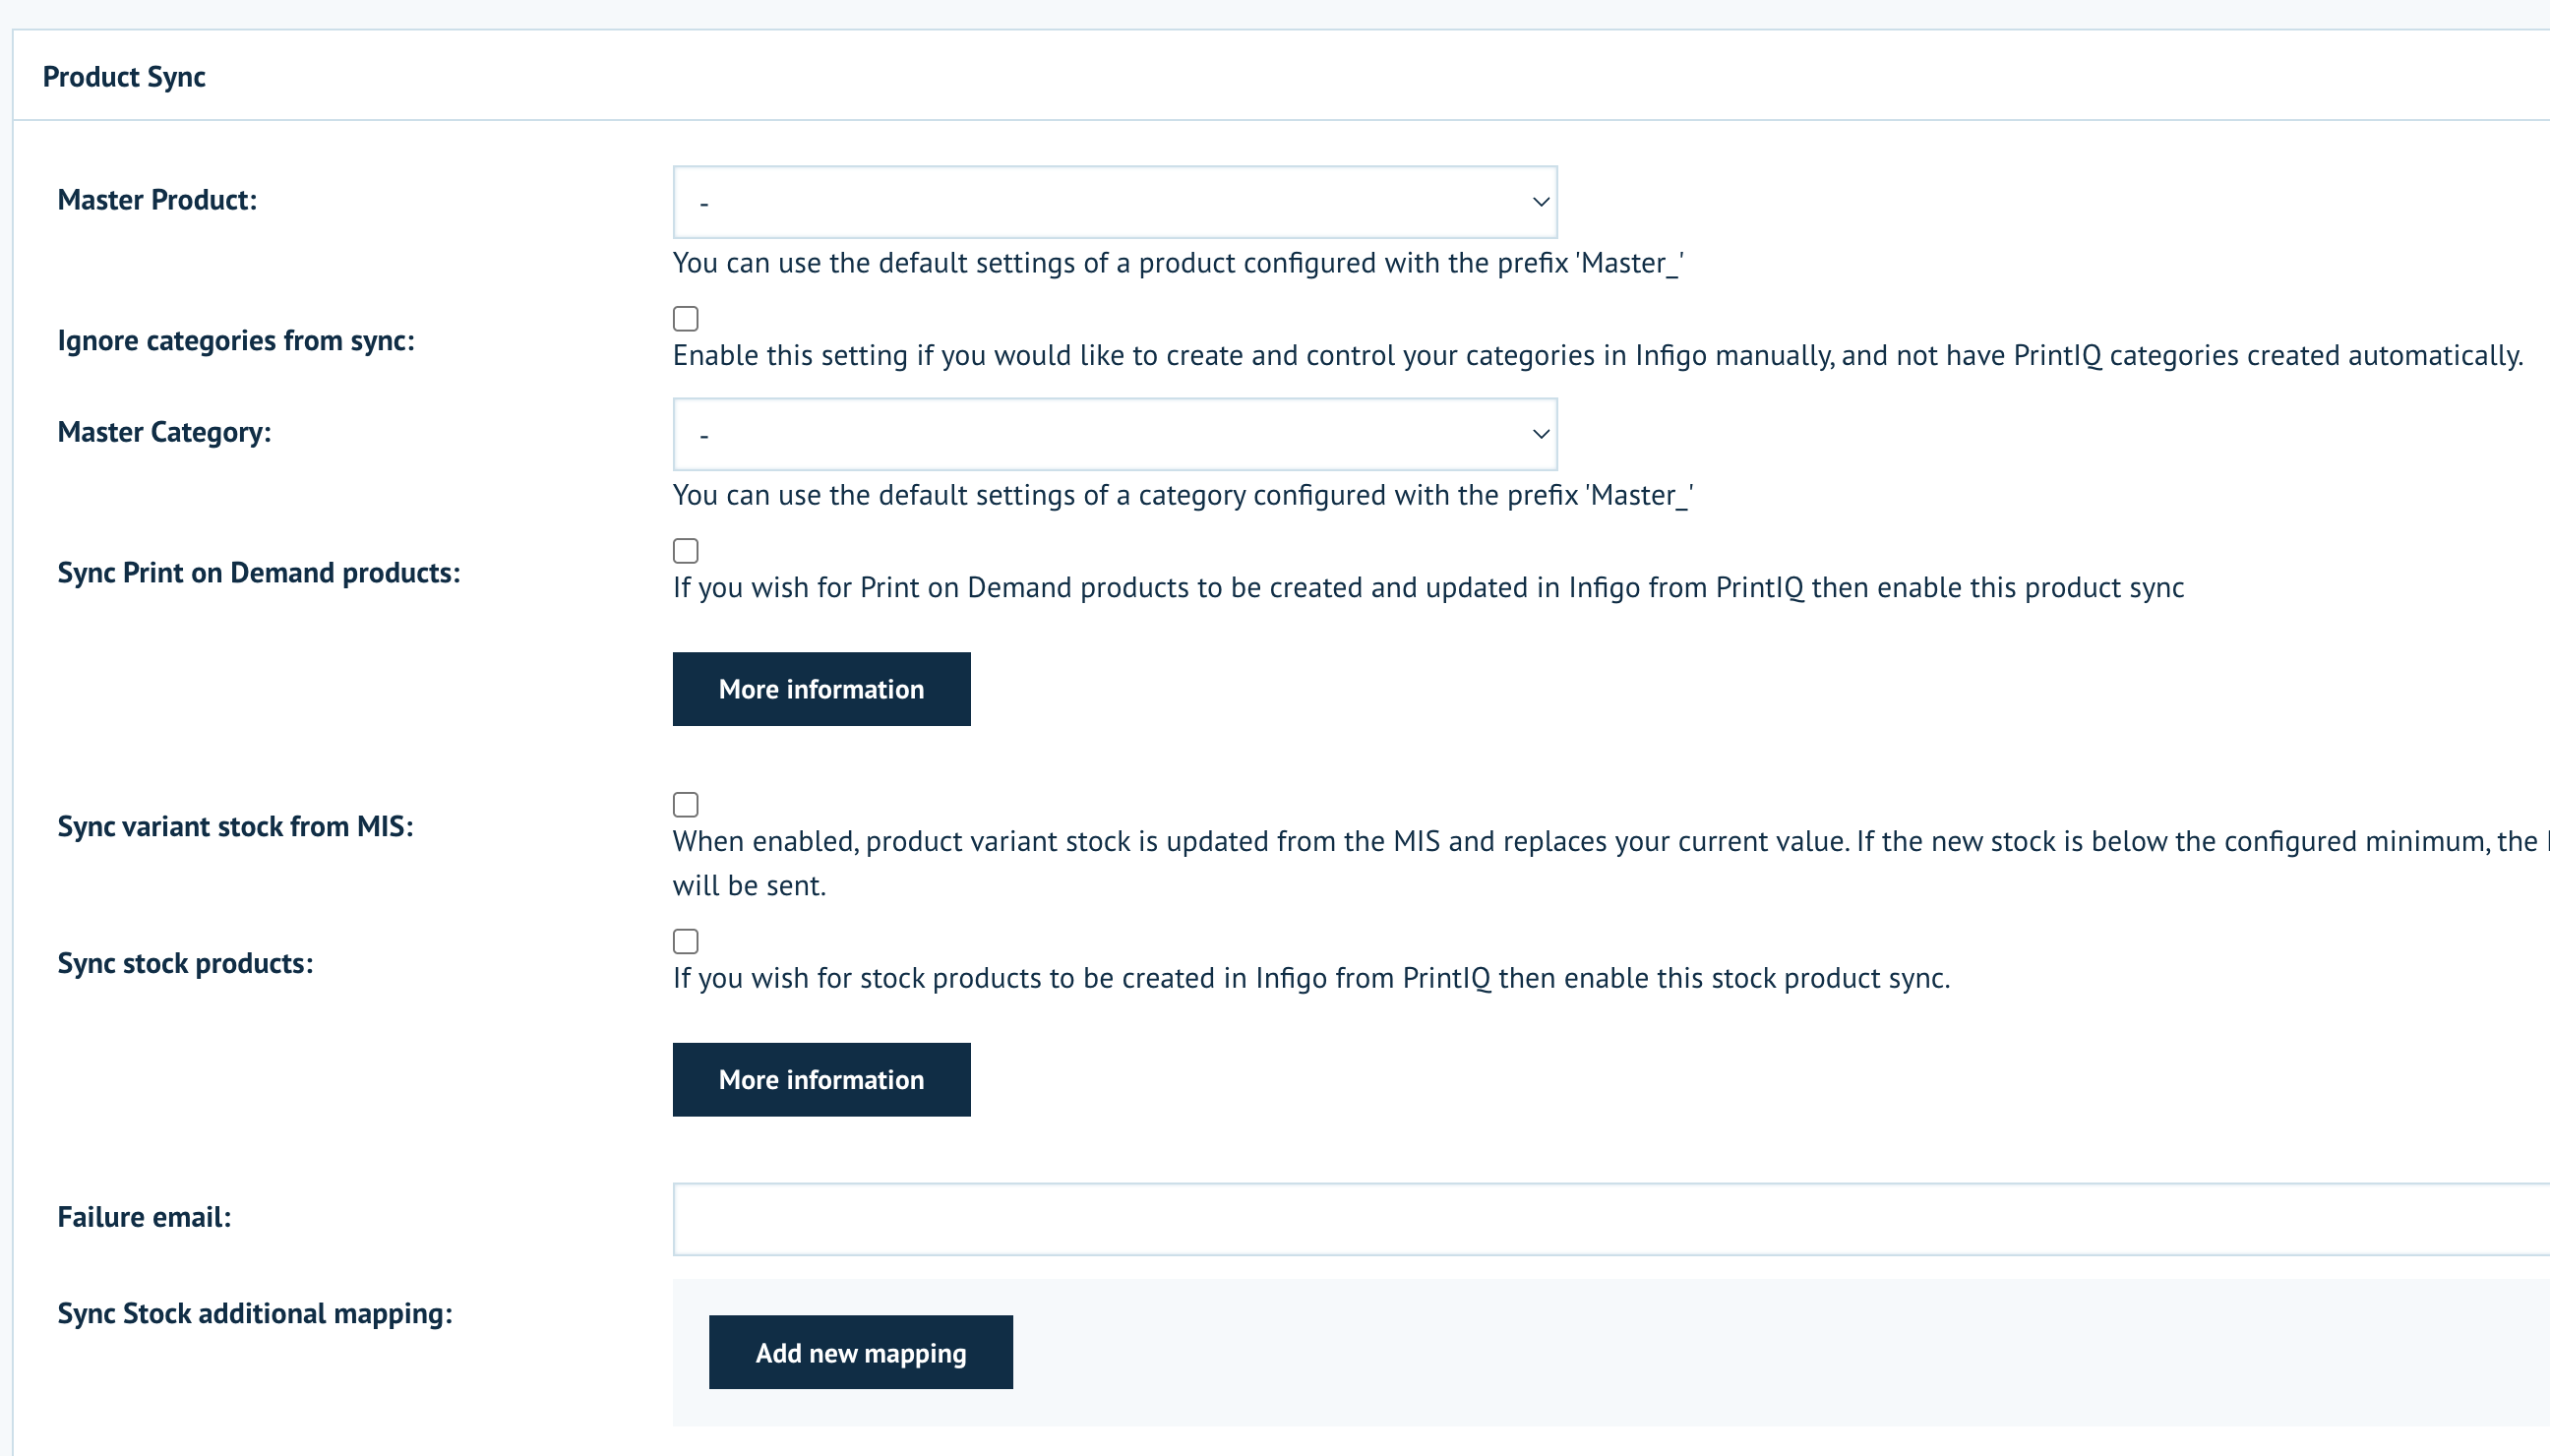
Then under the Product sync section - ensure the settings are empty...
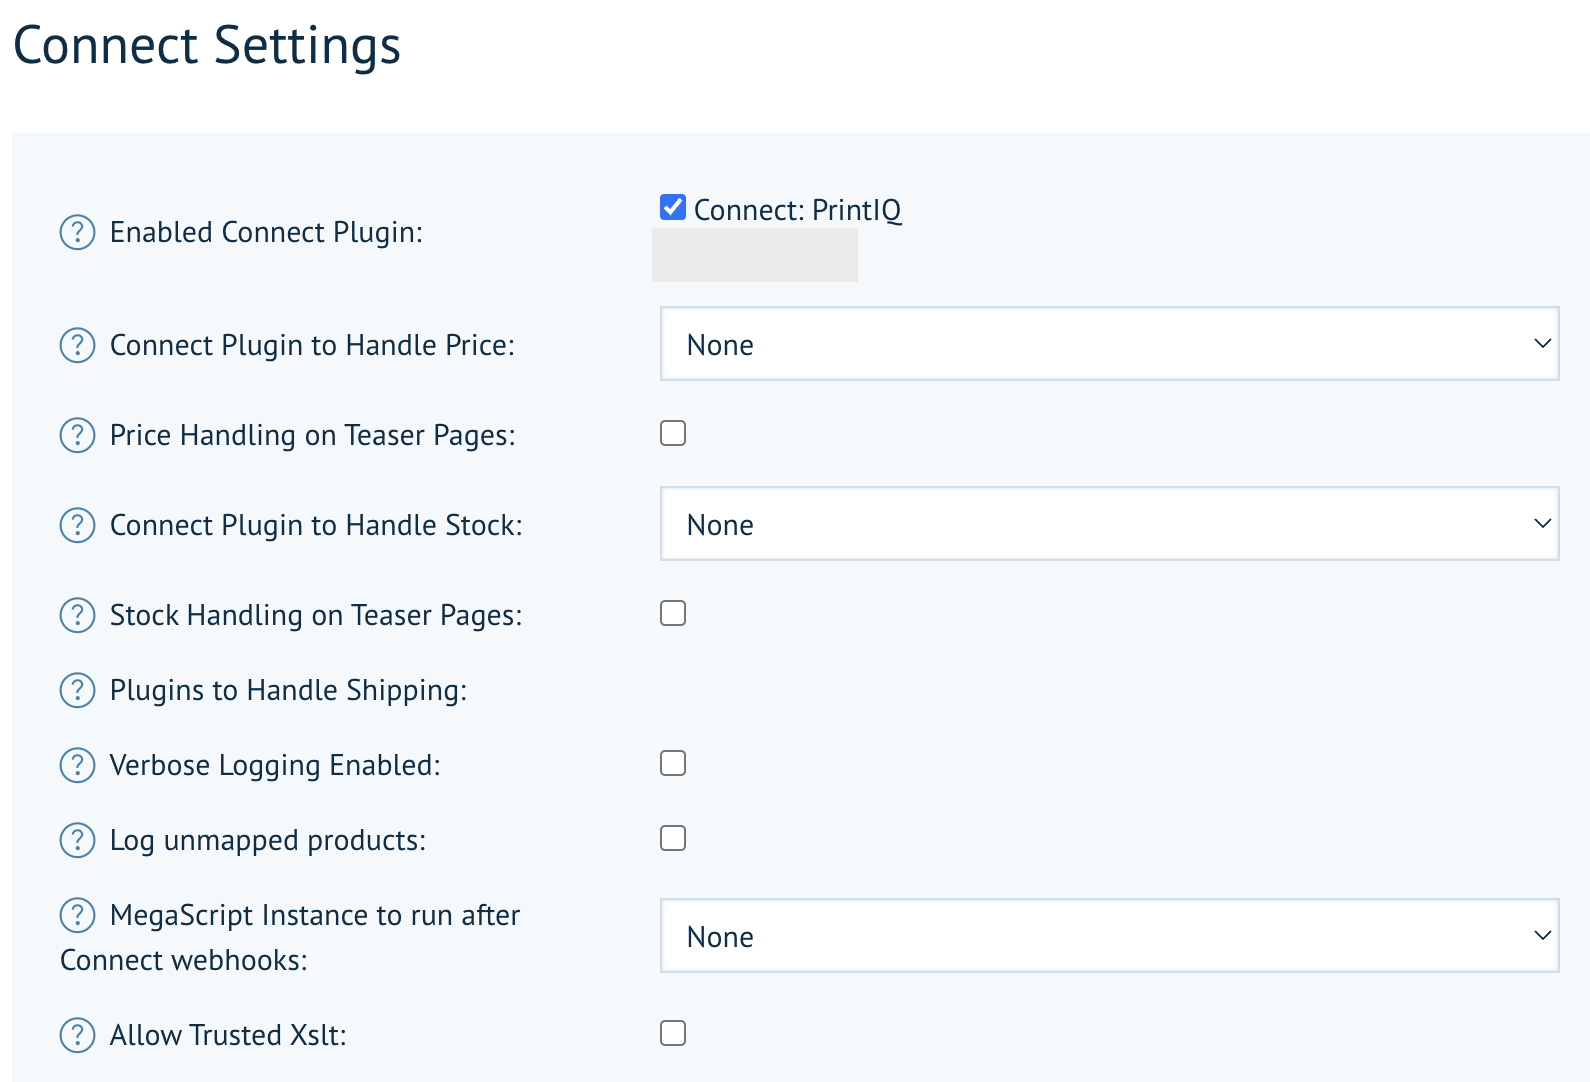
Remember to turn on the plugin under Connect settings (checkbox for PIQ plugin) as per the Platform settings and images above/below.
Storefront level settings
The final part of the setup; you need to enable the print IQ plugin as image above, then go into the PIQ plugin itself and then set the product sync section.
Firstly though create a blank 'Master' product in product management - set that with a prefix naming convention of "Master_" and set it as a stock product.
Do the same for the categories section in admin if syncing category data from PIQ. Again using "Master_" as a prefix.
Then inside the PIQ plugin you should be able to select those options in the dropdown to set the master product/category to be used to as a base template to create the product.category on your storefront.
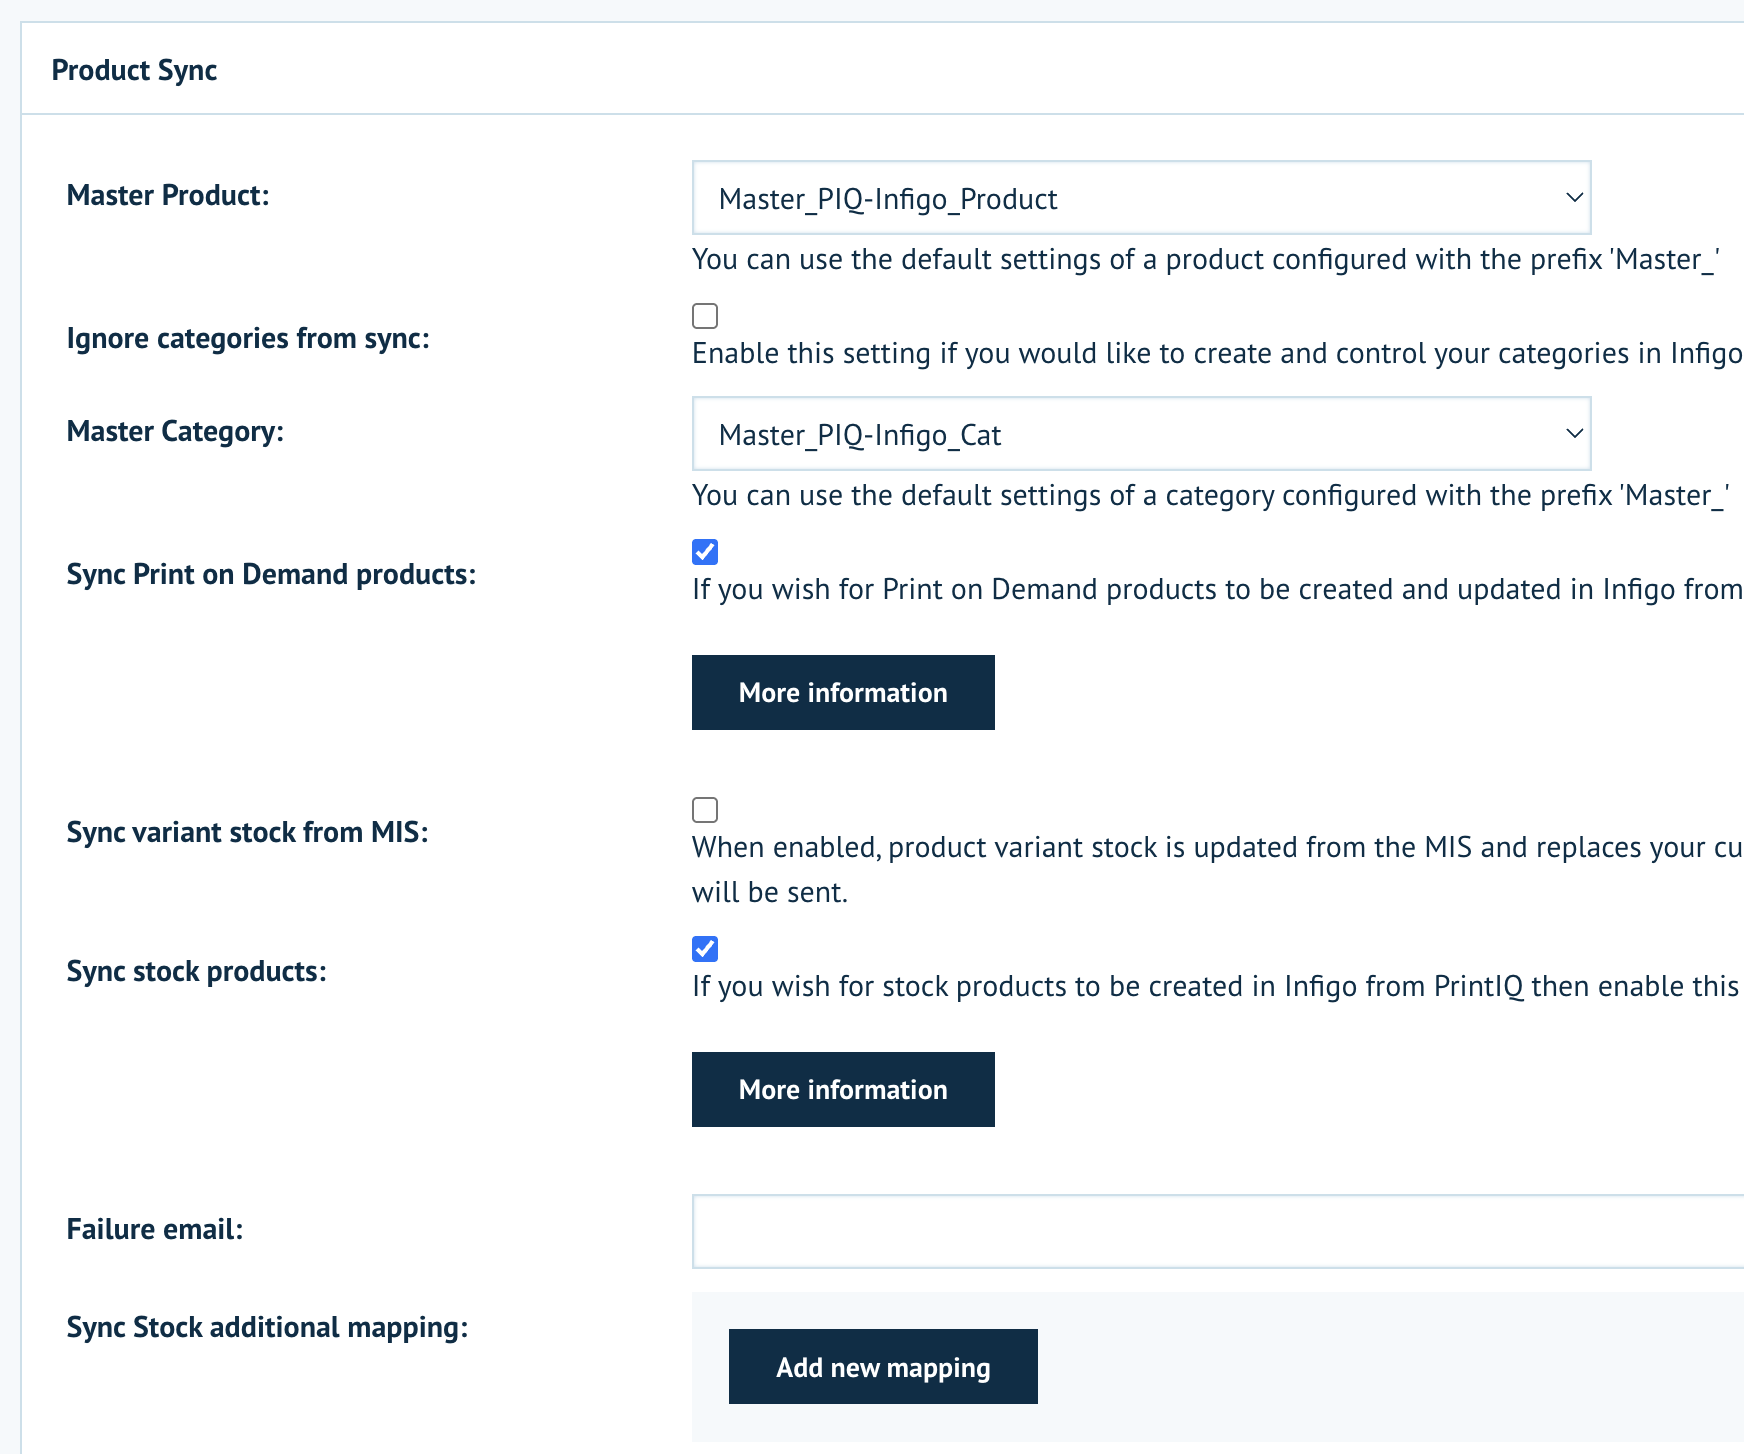
Turn on the sync options as required.
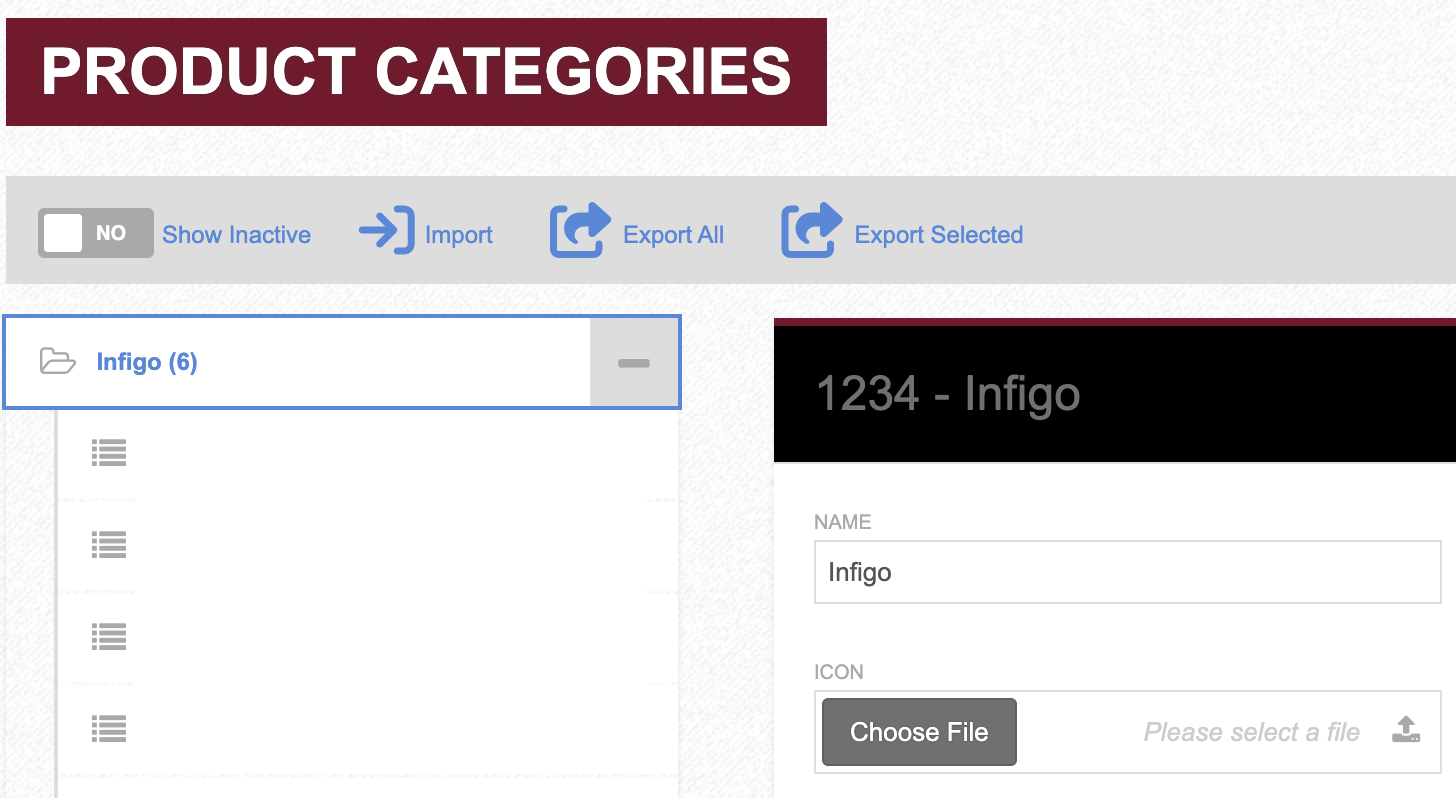
Next step is setting the PIQ Product Category code used for the customer's clients in PIQ. This code has to be set against each storefront's connect link, where the products are designated to go from within the PIQ category hierarchy.
In your PIQ instance each Under the Product Categories section, you should have a list of Customers, and then within those they will have set categories, and set products. That ID (a four digit code) will need to be set against the Infigo Storefront connect link section. It is not the PIQ customer ID.
Example image; "1234"
Navigate to Storefront Management section in infigo admin and select the storefront you wish to map to using the individual customer category codes from PIQ. Click the connect link and add the ID.
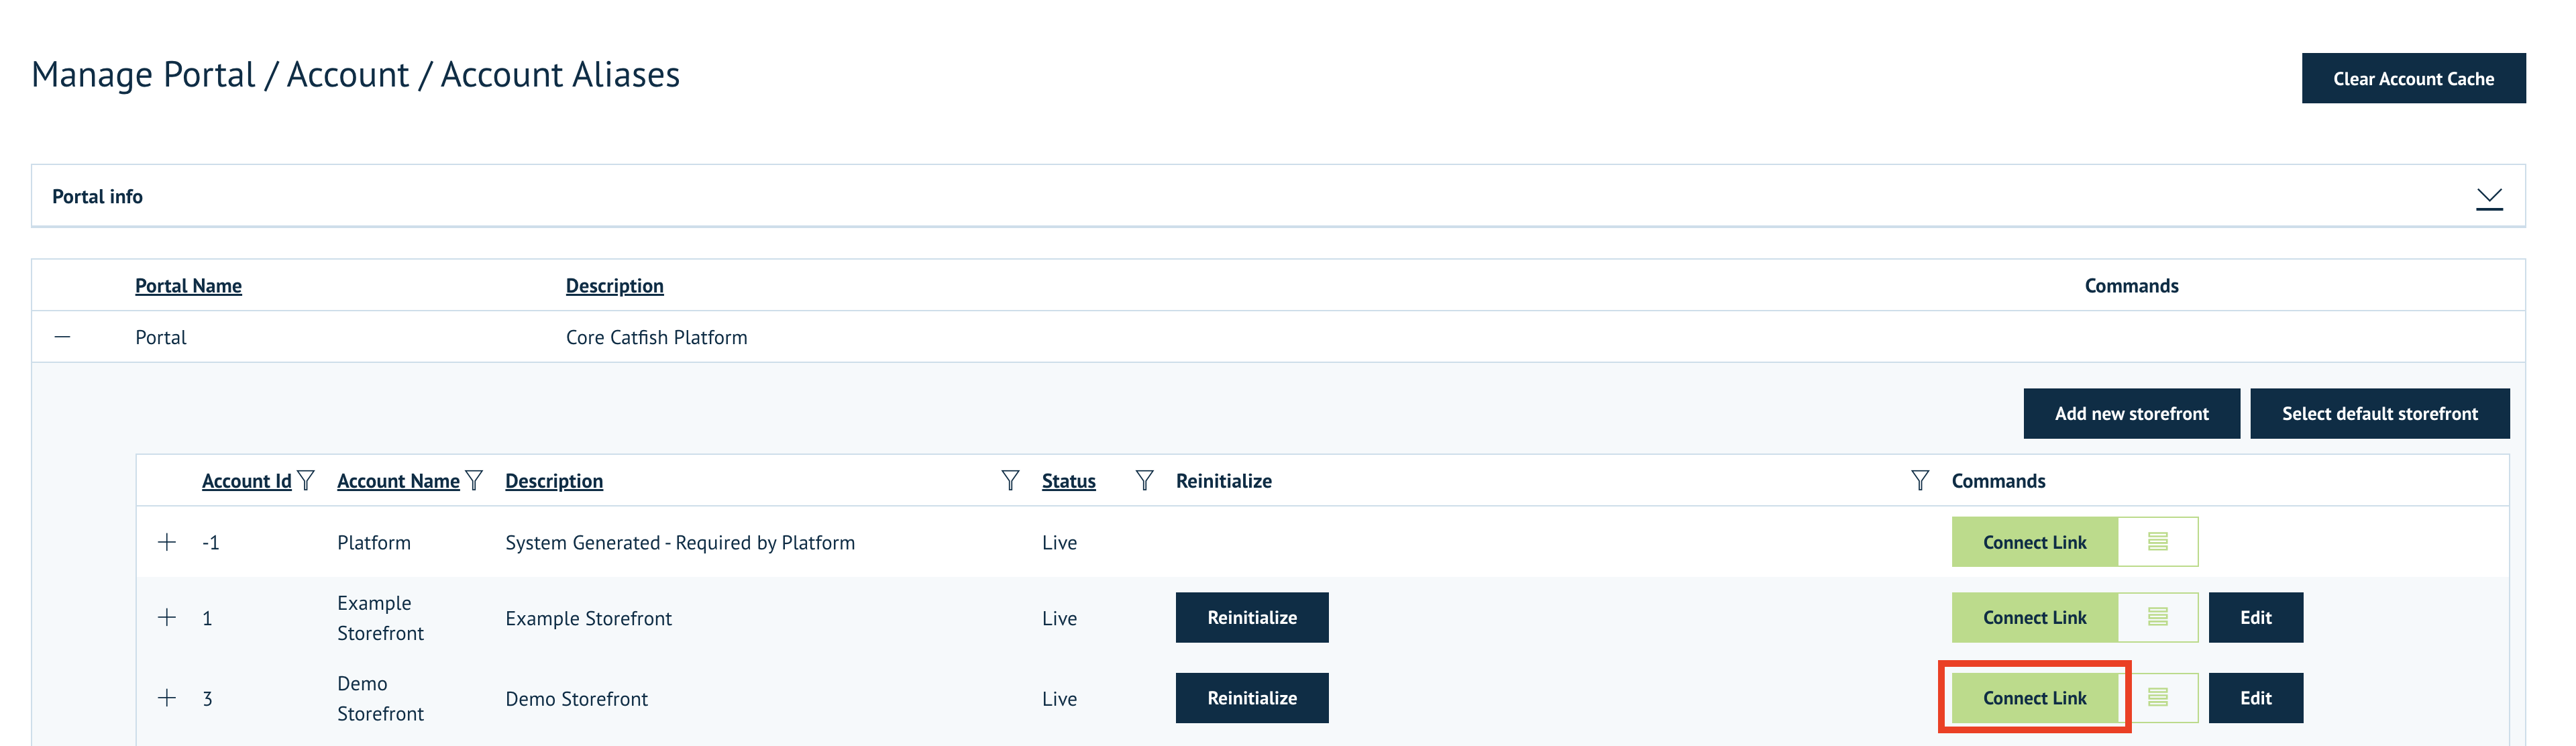
Map the IDs per client ID to each storefront as required.
Important notes
The category structure of the products is passed from printIQ to Infigo as per the table below. It is important that the category structure in PrintIQ is correctly set as this will be represented in Infigo.
It is also important to note that, due to the nature of multiple storefront setups adopted by many users, that the very top-level category in PrintIQ is named the same as the Infigo Storefront External ID. This is used in Infigo to determine which storefront the product is subsequently created and updated on.
Products are created with a free type quantity box for all products in PrintIQ that are set up with a pricing method of ‘Each’. Otherwise, if a quantity exists against a product, we create quantity tiers in Infigo for each quantity and ignore any pricing that is stored in Infigo which restricts the end user from being able to order that product apart from only in those specified set quantities.
Pricing should be held solely in PrintIQ and Infigo requests this via the GetPrice API.
Inventory Products
The below table describes the mapping from the printIQ payload into Infigo for Inventory products, demonstrating the information that is captured and how it is used.
| PrintIQ | Infigo | Comments |
| SIName | Product Name | |
| SIDescription | Product Description | |
| SIActive | IsActive | true = enabled, false = disabled |
| SIAllowBackOrders | BackOrders | true = Allow qty below 0 false = No backorders |
| InventoryItem.IICode | Product External ID | This will be used as the key mapping between the product in Infigo and the product in IQ. When GetPrice is called to obtain a price this is the product code that is passed, likewise when the order is placed. |
| InventoryItem.IICode | SKU | |
| InventoryItem.IISingleUnitWeight | Product Unit Weight | |
| InventoryItem.ItemWidth | Product width | |
| InventoryItem.ItemHeight | Product height | |
| InventoryItem.ItemDepth | Product depth | |
| InventoryItem.ItemDefaultLocation | Item Location | Not supported |
| InventoryItem.ImageFullFilePath | Product Image | Will be displayed on the product landing page and in the product teaser on category pages |
| Categories[] | This section details the category structure that needs to be created/updated related to that product | This object will include an array of categories for the entire tree structure |
| Categories[i].ID | Category External ID | |
| Categories[i].Name | Category Name | |
| Categories[i].ParentID | External ID of parent Category | Used to assign the category to a parent category to create the hierarchy |
| Categories[i].Description | Category Description | |
| Categories[i].ImageURL | Category Image | |
| Categories[i].Level | A numerical representation of the hierarchy of that category | Level 0 is always the value of the category where the product is assigned. Any parent categories are then represented with a negative number for each level up (0 = product category, -1 = parent, -2 = parents parent) The top-level category (i.e. the lower number) would be the storefront (Categories[i].Name = storefront external ID) |
Static Print-On-Demand products
The below table describes the mapping from the printIQ payload into Infigo for Static PDF products, demonstrating the information that we capture and how it is used.
| PrintIQ | Infigo | Comments |
| Name | Product Name | |
| Description | Product Description | |
| QPDActive | IsActive | true = enabled, false = disabled |
| ProductCode | Product External ID | |
| ProductCode | SKU | |
| Weight | Product Unit Weight | Always in grams |
| QPDMinOrderQuantity | Minimum basket quantity | |
| QPDMaxOrderQuantity | Maximum basket quantity | |
| ThumbnailURL | Product Image | |
| PricingItems.SPQuantity | Quantity Tiers | If the pricing method is not set to ‘Each’ for the product in PrintIQ we will create the relevant passed quantity tiers so that customers can only order in those quantities. |
| TreeNodes[] | This section details the category structure that needs to be created/updated related to that product | This object will include an array of categories for the entire tree structure |
| TreeNodes[i].ID | Category External ID | |
| TreeNodes[i].Name | Category Name | |
| TreeNodes[i].ParentID | External ID of parent Category | Used to assign the category to a parent category to create the hierarchy |
| TreeNodes[i].Description | Category Description | |
| TreeNodes[i].ImageURL | Category Image | |
| TreeNodes[i].Level | A numerical representation of the hierarchy of that category | Level 0 is always the value of the category where the product is assigned. This will also act as the storefront filter to determine which storefront that product should be created/sync’d on. The lowest level must match the Storefront External ID. |
| ArtworkURL | Dictates if a static PDF product should be created (if there is a valid URL set) or not (if the value is empty/null) | |
NOTE: If the Print IQ product contains multiple sections and therefore multiple PDFs we will not pull these into Infigo and treat the product as a inventory stock item. Only when the artwork is a single section, single PDF static product we will create a static PDF product in Infigo.