Overview
You can utilise the PrintLocation option in Infigo to send products to a 3rd party supplier that you do not fulfil or print. The general concept is that you create a PrintLocation to map certain products to so these can then be manually downloaded by the 3rd party supplier or it is also possible for them to use Infigo Sync to auto download the files as their end making the process seamless.
Setup
There are a number of sections that need to be setup here to enable this feature.
- Create a PrintLocation
- Create Hotfolders with PrintLocation for product mapping
- Enable Copy to Hotfolder Email message template for 3rd party notifications
- Create user for 3rd party supplier using PrintLocation user role (optional)
- Get API key for use with Infigo sync utility.
Let us look at the setup of each of these sections.
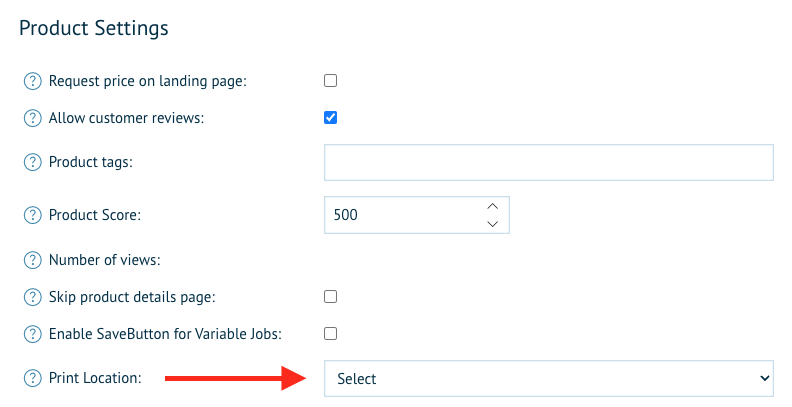
Create a PrintLocation
To add a PrintLocation in admin please read this article here. The important area of detail is to add an email address for the PrintLocation as that will be used to send the notifications to your 3rd party that a job has dropped into a hotfolder within their PrintLocation. Also ensure that the same email is used for the customer being used as the Printlocation downloader role.
Please Note: If the Role (PrintLocationDownloader) does not have access to SPO then please open a support ticket to request this
Create Hotfolder(s) within PrintLocation
To add a Hotfolder in admin please read this article here. You technically just need a single hotfolder but you can add more in if you require further segregation of products into to set hotfolders.
Enable Copy to Hotfolder Email message template
Go to Email message Templates in admin and turn on the Copy To HotFolder - Print Location Owner hotfolder under the Production Management section. This is the email message the system will send the 3rd party supplier when a job drops into any of the hotfolders created. You can amend the email body content as required and add in any extra message tokens permitted on the right hand side. You can additionally copy in any other email account as needed via the BCC field.
Map Customer to PrintLocation
Go to Customer management area in admin and edit your 3rd party customer. Here there is a section under the customer roles tab where you can set the user to a PrintLocation directly. If you have multiple hotfolders within the Printlocation you can map them directly using the details in this guide here.
To enable the Print location dropdown option for end users if you can't see the below go to "Infigo settings" and enable "LimitPrintOpsUsersToPrintLocations"
Create user account for 3rd party
This step is an optional once. This step can be used so the 3rd party supplier can log into your Infigo storefront and manually download their jobs direct from Shared Print Operations (SPO). If you want them to be on auto download then you would go to the next step for setting up Infigo Sync.
Go to Customer management section and edit/create a user account for your 3rd part supplier. Give them the registered AND PrintLocationDownloader roles. You will also need to select agains their user account the PrintLocation from the Print Location dropdown. This means when they login to SPO they will ONLY see the products in their designated PrintLocation.
(optional)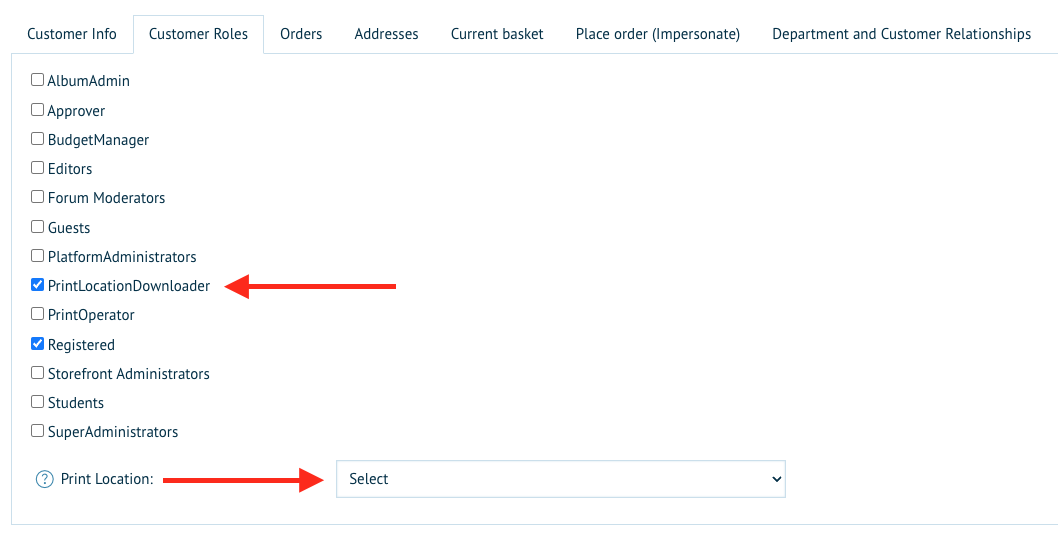
API key for setting up Infigo Sync
In this article we outline setting up Infigo Sync fully. You will need to contact the Helpdesk to get an API key to setup the Infigo Sync utility against a new/sperate PrintLocation.
Please note; It is not possible to send individual job tickets, packing slips and Invoices to different print locations. This is not a supported feature.