Picture of 🚀 Storefront Styling Tips & Tricks 🚀

🚀 Storefront Styling Tips & Tricks 🚀

Read our handy storefront styling tips and tricks!

Displaying Basket Count Visibility Next to the Basket Icon on Your Storefront

Configure Basket Count Visibility

Occasionally, users may notice that the basket counter does not appear on the main button when items are added, especially on the desktop view. In some cases, the counter seems to show only when the view is adjusted or zoomed in, causing confusion about the status of basket contents.

This behavior is not a bug but a configurable setting within your system. By adjusting the header settings, you can ensure that the basket count is visible across all device views.

The following guide explains the use cases, key settings, and step-by-step instructions to enable the basket count feature effectively.

Use cases

  • Ensure users see an indication of items in their basket at all times.
  • Create a consistent shopping experience across desktop and mobile views.
  • Boost customer confidence by clearly displaying the basket status.

Key settings in Infigo

  • Editable Content Header Settings: Infigo Admin > Editable Content - Edit Details > Header
  • Basket Count Option: Click the cog in the top-right corner and change 'Show Basket Count' to Both

Step-by-step guide

  1. Log in to your Infigo Admin panel.
  2. Navigate to the Editable Content section and select the Header configuration.

  1. Click the cog icon located in the top-right corner of the header settings.

  1. Find the 'Show Basket Count' setting and change the option to "Both".

  1. Save your changes to update the settings.
  2. Clear Cache from the admin area

  1. refresh your site to confirm that the basket counter is now visible on all devices and zoom levels.

Related links

For additional guidance, head over to the Infigo Academy or contact our Customer Support team.


Displaying a Specific Product Image by Default on the Product Page

By default, Infigo displays the first image (position 0) in the product image gallery when a user lands on a product detail page. This is the standard behaviour across all storefronts and cannot be changed through configuration alone.

Some users may wish to override this behaviour in specific scenarios—such as when a visitor arrives from a Google Merchant listing—and instead display a different image (e.g. image in position 1) by default. While this is not supported natively, there are workarounds available.

This article outlines what is and isn’t possible within the platform, and what options are available for customisation.

Use cases

  • Show a different product image when a user lands on the product page from a Google Shopping ad
  • Use the first image for homepage/category thumbnails but skip it on the product detail page
  • Highlight a specific product variant visually without changing the product structure

Key settings in Infigo

  • Product Image Order: Managed in the product setup area; the image in position 0 is always shown first by default
  • Hide Primary Image on Homepage/Category: Found under Admin > Catalogue > Products > [Product] > Images; allows hiding the first image on listing pages only

Step-by-step guide

  1. Navigate to Admin > Catalogue > Products and select the product you wish to edit.
  2. Go to the Images tab to view and manage the image order.
  3. Ensure the image you want to show by default is in position 0—this is the only image that will display first on the product detail page by default.
  4. If you want to hide the first image on homepage or category pages, tick the Hide on Listing Pages checkbox (if available).
  5. To override the default image shown on the product page based on referral source (e.g. Google Merchant), a custom JavaScript solution is required. This is not supported out of the box and would need to be scoped as a paid development.
  6. Contact the Infigo team via your Customer Success Manager or Support to discuss a custom implementation if needed.

Related links

For additional guidance, head over to the Infigo Academy or contact our Customer Support team.

Embedding Videos on Product Pages

Embedding Videos on Product Pages

This article explains the challenges of embedding videos on product pages using the legacy 'Video Embed Code' field and outlines alternative approaches to achieve consistent and precise placement on modern storefronts.

The legacy field was initially designed for custom themes and may not render the video as expected in modern templates. While the embed code itself is valid, it might not display on the live product page if the field is not supported by the current theme.

For better control and consistent positioning, we recommend using Content Templates or Editable Content Blocks to embed videos either globally or on a per-product basis.

Use cases

  • Embedding a video that should appear directly underneath the order countdown on a product page.
  • Displaying the same promotional video on every product page using a global content block.
  • Inserting unique videos for individual products via a product-specific content template.

Key settings in Infigo

  • Video Embed Code: Found on the Product Edit page; a legacy option that may not render on modern storefront templates.
  • Additional Description: An alternative field for embedding content, though its placement can be limited.
  • Editable Content Block: Accessible via the Layout Manager, such as the Product Landing Page Global Content block, for consistent placement across products.
  • Product-specific Content Template: Allows manual insertion of custom HTML (including iframes) for individual products.

Step-by-step guide

  1. Confirm that the legacy Video Embed Code field contains a valid YouTube iframe embed code.
  2. View the live product page to check if the video appears; if not, this field may no longer be supported by your current theme.
  3. If the video is missing, try inserting the code into the Additional Description field, keeping in mind that its placement might not be optimal.
  4. For a more controlled solution, create an Editable Content Block via the Layout Manager (e.g., the Product Landing Page Global Content block) and paste your video embed code there.
  5. Alternatively, for individual product needs, set up a Product-specific Content Template and add the iframe directly into the HTML block.
  6. Preview and adjust the display settings until the video appears in the desired location on the page.

Related links

For additional guidance, head over to the Infigo Academy or contact our Customer Support team.

Hiding the Tier Pricing Table with Custom CSS

Hiding the Tier Pricing Table with Custom CSS

This article explains how the tier pricing table functions and how it can be hidden on your storefront when needed. The tier pricing table is shown when multiple tier prices are set, the “Use Quantity Based Pricing” setting is disabled, and there are no product attributes with price adjustments.

At present, there is no built-in system setting to hide the tier pricing table. Instead, you can use a custom CSS snippet to prevent the table from displaying on product pages. Please note that applying this snippet will hide tier pricing across all products.

This guide provides an overview of the scenarios in which you might want to hide the table, describes the key settings affecting its display, and offers step-by-step instructions for implementing the custom CSS change.

Use cases

  • Allowing users to freely enter a quantity with dynamic pricing calculations.
  • Simplifying product pages by removing the tier pricing table.
  • Ensuring a consistent storefront appearance for products that use tier pricing.

Key settings in Infigo

  • Tier Pricing Display: Automatically shown when multiple tier prices are present.
  • Use Quantity Based Pricing: Located in the product pricing configuration; must be disabled for the tier table to appear.
  • Product Attributes with Price Adjustments: Any such attributes will prevent the tier pricing table from displaying.

Step-by-step guide

  1. Confirm that your product has multiple tier prices set up.
  2. Check that the Use Quantity Based Pricing setting is disabled in the product configuration.
  3. Ensure there are no product attributes with price adjustments applied.
  4. To hide the tier pricing table, navigate to the CSS section in your admin area and add the following snippet:
    .tier-prices.catfish-classes.interpolation.orderLineTotal { display: none; }
  5. Save the CSS changes and review your storefront to verify that the tier pricing table is hidden across all products.

Related links

For additional guidance, head over to the Infigo Academy or contact our Customer Support team.

How to Remove Hints from the MegaEdit Loading Screen

When launching a MegaEdit product from the storefront, users may see a temporary loading screen that displays rotating hints. These hints are designed to assist users with editing, but in cases where editing is disabled, they may be unnecessary or confusing.

This article explains how to disable the display of these hints on the MegaEdit loading screen for specific storefronts or clients.

Disabling the hints can help streamline the user experience, especially in locked-down workflows where editing is not permitted.

Use cases

  • Locked-down MegaEdit products where users cannot make changes
  • Streamlining the user journey by removing unnecessary UI elements
  • Custom branding or simplified interfaces for specific clients
  • Reducing confusion for users unfamiliar with editing tools

Key settings in Infigo

  • MegaEdit Loading Screen Logo: Go to Admin > Editable Content > MegaEdit Loading Screen Logo

Step-by-step guide

  1. Log in to the Infigo Admin area.
  2. Navigate to Editable Content from the left-hand menu.
  3. Locate and click on MegaEdit Loading Screen Logo.
  4. In the content editor, remove or comment out the HTML elements that display the rotating hints.
  5. Optionally, replace the content with a static image or message if desired.
  6. Click Save to apply your changes.
  7. Test the product on the storefront to confirm the hints no longer appear.

Related links

For additional guidance, head over to the Infigo Academy or contact our Customer Support team.

How to Update the Login Page Welcome Text in Infigo

You can customise the welcome message on your storefront's login page by editing the relevant language string in the Infigo admin area.

This is especially useful if you manage multiple storefronts and want to differentiate them for your users.

The welcome message is controlled by a specific language resource, and changes must be made individually for each storefront and language version in use (e.g. English vs English US).

Understanding how to correctly filter and locate the language string will ensure a smooth editing experience.


Use cases

  • Customising the login page message to reflect the storefront’s brand or purpose
  • Clarifying which portal a user is accessing when multiple storefronts exist
  • Localising the login message for different languages or regions


Key settings in Infigo

  • Languages: Admin > Configuration > Languages
  • Language Resources: Admin > Configuration > Languages > Edit Resources (for the selected language)
  • Resource NameAccount.Login.Welcome


Step-by-step guide

  1. Log in to your storefront as an admin.
  2. Navigate to Admin > Configuration > Languages.
  3. Click View String Resources next to the language you want to edit (e.g. English or English US).
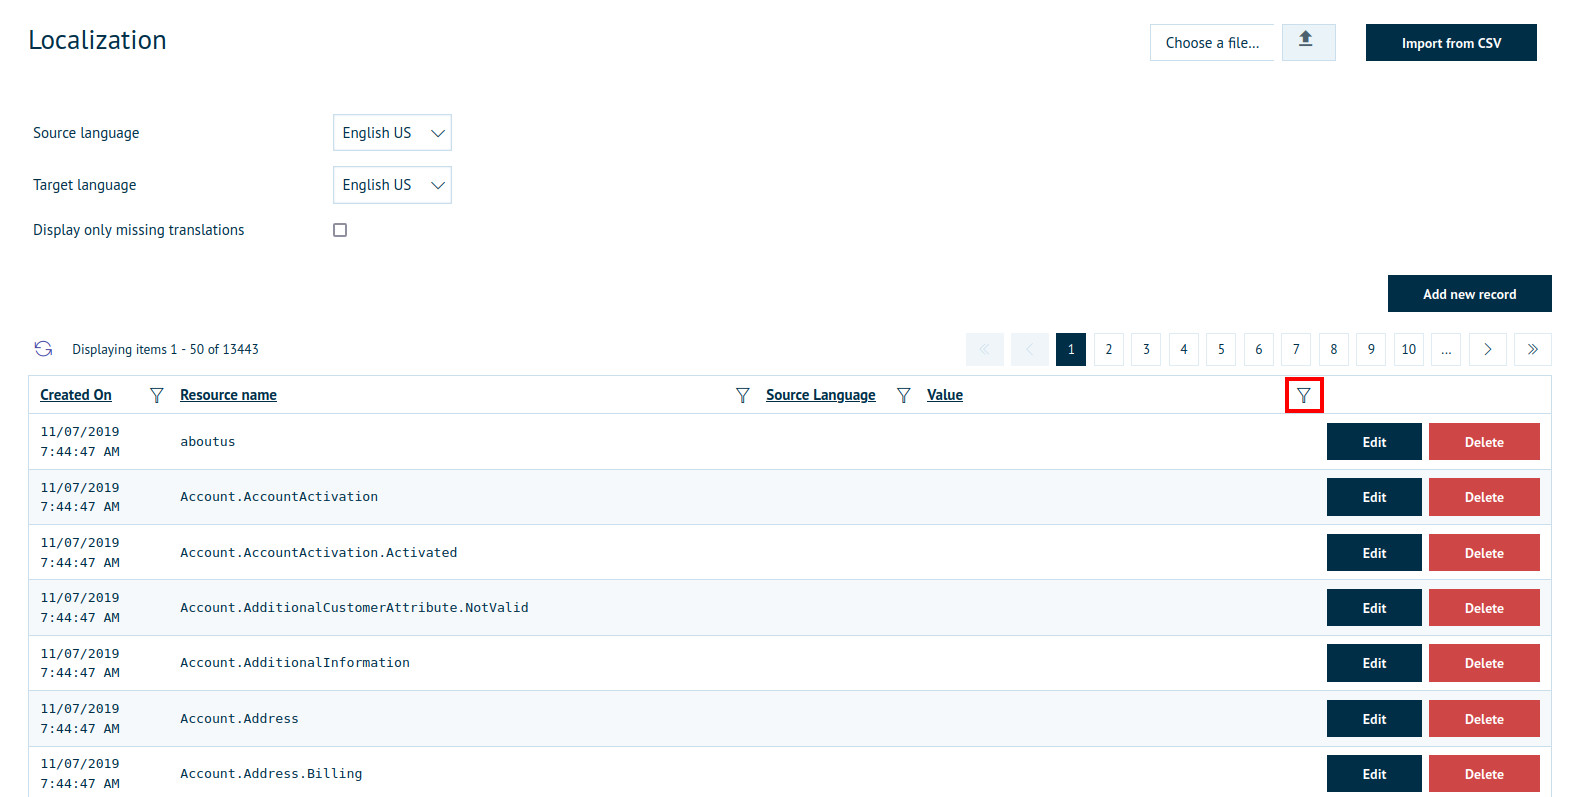
  4. In the Language Resources table, locate the Resource Name column.
  5. Click the small filter icon on the far right of the Resource Name column header (not the filter next to the Source Language).
  6. Enter The resource name or part of it (for example Account.Login.Welcome) in the filter box and press Enter.
  7. Click Edit next to the result and update the text as needed (e.g. “Welcome to the Corporate Portal”).
  8. Click Update to apply your changes. 
  9. Repeat the process for any other storefronts or languages as required.

Related links

For additional guidance, search the Infigo Academy or contact our Customer Support team.

Improving Cart Preview Thumbnails for Custom Products

This article explains why some custom product thumbnails displayed in the cart appear low resolution and how to resolve the issue. Customers may notice that products created with the custom editor display a blurry or distressed preview image when viewed in the cart summary.

The problem is isolated to customizable products while standard products continue to show high-resolution images. This discrepancy can lead to unnecessary concerns about print quality among end users.

The resolution involves updating a specific setting in the custom product configuration area. Once adjusted, the higher resolution preview will match that of standard products and improve the presentation for all storefronts.

Use cases

  • When customers view their cart and click on a product thumbnail that appears blurry.
  • When end users raise concerns about the print quality of customizable products.
  • When storefront managers need to ensure all preview images are of consistent, high quality.

Key settings in Infigo

  • Cart/Wishlist Thumbnail Image Size: Located in Admin > Settings > Media. This setting normally affects standard products.
  • MegaEdit Product Settings > Default Product Configuration > Cart Image Width: The key setting for customizable products. Changing this value improves the resolution of cart preview thumbnails.

Step-by-step guide

  1. Log in to your Infigo admin dashboard and navigate to Admin > Settings > Media. Verify the current value of the Cart/Wishlist Thumbnail Image Size.
  2. Note that modifying the Cart/Wishlist setting may affect standard products but does not resolve the issue for customizable product thumbnails.
  3. Go to MegaEdit Product Settings and select Default Product Configuration.
  4. Locate the setting labeled Cart Image Width. If it is set to a low value (for example, 200), update it to a higher value (such as 1500) to increase preview resolution.
  5. Clear all caches to ensure the new setting is applied.
  6. Impersonate a user and check the cart summary to confirm that the product thumbnails now display in high resolution.

Related links

For additional guidance, head over to the Infigo Academy or contact our Customer Support team.

Modifying the Login Page Layout

This article explains how to access and change the layout of your login page through the storefront admin area. With full storefront access, you can modify the presentation by using the layout manager.

If you find that changes are not reflected on the login page, ensure that any output caching is disabled. Disabling the cache can help display the layout manager and show your modifications in real time.

Remember, accessing the admin area and manually navigating to the login page is essential. By following these steps, you can quickly make and preview adjustments to the login page layout.

Use cases

  • Customizing the visual design of your login page
  • Troubleshooting when layout changes do not appear
  • Ensuring the most up-to-date version of the page is displayed

Key settings in Infigo

  • Storefront Admin Account: Log in through the admin area to access layout settings
  • Output Cache: Disable output caching to allow the layout manager to display modifications

Step-by-step guide

  1. Log in to your storefront using your admin account credentials.
  2. Disable the output cache setting, if active, to ensure that changes are visible immediately.
  3. Manually navigate to the login page by adding '/login' to your storefront URL.
  4. Access the layout manager from the admin area to make the desired changes to the login page.
  5. Review your changes and refresh the page to confirm that the new layout is applied.

Related links

For additional guidance, head over to the Infigo Academy or contact our Customer Support team.

Modifying the Payment Window Tax Label

This article explains how to change the tax label displayed on the Stripe payment window from 'VAT' to 'Tax'. The change is managed through the localization settings in the admin interface.

By updating the language string in the Localisations area, you can ensure that the correct label appears across all supported languages, such as English-US and English-GB.

Follow the step-by-step guide below to update the language string, clear the cache, and verify the changes in your payment window.

Use cases

  • Updating tax labels to meet regional terminology requirements.
  • Ensuring consistency across different payment configurations.

Key settings in Infigo

  • Localisations - Languages: Access the Languages section in the admin interface.
  • Resource Name: Locate the language string 'Plugins.Stripe.Checkout.VAT.Title' for both English-US and English-GB.

Step-by-step guide

  1. Log in to your admin panel and navigate to the Localisations area, then click on Languages.
  2. Search for the resource name 'Plugins.Stripe.Checkout.VAT.Title'.
  3. Update the label from 'VAT' to 'Tax' for each relevant language version (e.g., English-US and English-GB).
  4. Save your changes and clear the system cache.
  5. Run a test to confirm that the Stripe payment window now displays 'Tax' correctly.

Related links

For additional guidance, head over to the Infigo Academy or contact our Customer Support team.

Updating the Custom Logo Link

When the logo on your website is linked to an outdated URL, it is usually because the custom setting for the logo link still points to the old address.

This article explains how to update the Custom Logo Link by using the Editable Content section within your administrative dashboard.

Following the step-by-step instructions below will ensure that the logo click directs users to the correct URL.

Use cases

  • Updating the destination URL for your website's logo.
  • Ensuring customers are directed to the most current homepage or landing page.

Key settings in Infigo

  • Custom Logo Link: Located in the Header Editable Content under the Editable Content section of your admin panel.

Step-by-step guide

  1. Log in to your administrative dashboard.
  2. Navigate to the Editable Content section. This is typically found under Admin > Editable Content.
  3. Look for the field labeled 'Custom Logo Link'.
  4. Update the URL in the field to the desired destination.
  5. Save your changes to ensure the new URL is applied.

Related links

For additional guidance, head over to the Infigo Academy or contact our Customer Support team.

Updating the Logo Link via Appearance Settings

This article explains how to update the link associated with the logo displayed in the left-hand corner of your site when you have updated your website URL.

If you have already updated most URL settings but the logo link remains unchanged, you will need to access the Appearance Settings section to make this change.

Follow the step-by-step instructions below to locate the setting in your admin panel and update the logo link so that it correctly reflects your new site URL.

Use cases

  • Changing the logo link after updating your website URL.
  • Ensuring that the logo directs visitors to the correct homepage or landing page.

Key settings in Infigo

  • Appearance Settings: Access this via the Admin Dashboard under Theme Settings to update your logo and its associated link.

Step-by-step guide

  1. Log in to your Admin Dashboard.
  2. Navigate to the Appearance Settings section (often found under Theme Settings).
  3. Locate the option to update the logo. From here, you can either upload a new image or change the existing logo's link.
  4. Enter the new URL that your logo should point to and save your changes.
  5. Refresh your storefront to verify that the updated logo link is active across your site.

Related links

For additional guidance, head over to the Infigo Academy or contact our Customer Support team.

Using Two Column Layouts for Product Descriptions

In Infigo, product descriptions can be displayed in multiple areas of the product page using different editor types and layout configurations. This article explains how to create a two-column layout for product descriptions, allowing you to display content on both the right and left sides of the product image area.

By using a custom content template and configuring the product display settings, you can control where each section of your product description appears. This is especially useful for creating visually balanced layouts or separating key information into distinct areas.

This guide also covers how to resolve common styling issues, such as missing padding or unexpected white space, and how to test safely before applying changes to live products.

Use cases

  • Displaying a short summary on the right and detailed information on the left below the product image
  • Creating a visually balanced layout for marketing or promotional content
  • Separating technical specifications from general product descriptions
  • Testing layout changes on a staging or test storefront before going live
  • Improving readability and user experience on product pages

Key settings in Infigo

  • Content Templates: Admin > Content Templates
  • Additional Description Editor: Admin > Products > Edit Product > Additional Description Editor
  • Display Settings: Admin > Products > Edit Product > Display Settings
  • Apply Default Styling: Within the WYSIWYG block settings in the Content Template Editor

Step-by-step guide

  1. Log in as a Platform Admin and navigate to Content Templates.
  2. Open the existing 'Two Column (Platform)' template to view its structure and settings.
  3. In a separate browser, log in as a Storefront Admin and go to Content Templates on your storefront.
  4. Click Add New and replicate the structure of the platform-level template, including HTML markup and block settings.
  5. Under the Settings tab, check the box for Product to make the template usable on product pages.
  6. Save the new template.
  7. Go to the product you want to update and set the Additional Description Editor to Content Template Editor.
  8. Assign your new two-column template.
  9. Add a WYSIWYG block to Column 1 for content that should appear on the left below the product image.
  10. Leave Column 2 empty if you don’t want content on the right side below the add-to-basket area.
  11. Ensure Apply Default Styling is unchecked in the WYSIWYG block to avoid padding issues.
  12. Adjust the Display Settings of the product to control where the Full Description appears (e.g., set to 'Picture section bottom' to place it below the image).
  13. Save your changes and preview the product page.

Related links

For additional guidance, head over to the Infigo Academy or contact our Customer Support team.

Hiding the Add Barcode Button in Products

This article describes how to remove the 'Add barcode' button from the top of a product editor while keeping the barcode functionality intact. The solution applies to individual products where the barcode updates in real time.

Using the Barcode Fields script configuration in the admin area, you can easily hide the button by adding a small snippet of code. No changes to the barcode functionality or form fields are needed if you are already using the InVent form fields.

This guide provides step-by-step instructions and highlights key settings within the admin interface to help customize the product display in a clear and efficient manner.

Use cases

  • Customizing the product editor for a cleaner user interface.
  • Hiding unnecessary buttons to reduce user confusion.
  • Maintaining real-time barcode functionality without extra UI elements.

Key settings in Infigo

  • Barcode Fields Script Configuration: Access this setting in the product's admin panel under the barcode fields section.
  • Config Pop-up: Open the configuration pop-up to modify the settings.

Step-by-step guide

  1. Log in to the admin panel and navigate to the desired product.
  2. Locate the Barcode Fields script settings for that product.
  3. Open the configuration pop-up where the barcode script settings are defined.
  4. Add the following snippet to the configuration: { ShowButton: false }
  5. Save the configuration changes.
  6. Reload the product editor to confirm that the 'Add barcode' button is no longer visible.

Related links

For additional guidance, head over to the Infigo Academy or contact our Customer Support team.

Incomplete
🔎
Indexing articles…
    Select a tip or trick