🚀 Storefront Configuration Tips & Tricks 🚀

Read our handy storefront styling tips and tricks!

Editing Shared Address Book Entries at Checkout


When using shared address books in Infigo, it's important to understand how address editing works during the checkout process. Even if an address book is set to be visible to everyone, changes made to addresses at checkout may not be saved unless specific settings are enabled.

This article explains the conditions required for address edits to be saved during checkout, and how shared address behaviour affects visibility across users.

By ensuring the correct configuration, you can allow users to edit and save address details as needed during the order process.

Use cases

  • Allowing customers to edit shipping addresses during checkout
  • Using shared address books across multiple users or teams
  • Supporting one-time address entries for ad-hoc deliveries
  • Ensuring address changes are retained during the checkout process

Key settings in Infigo

  • Always show address form in checkoutAdmin → Configuration → Checkout Settings
  • Allow customers to edit their existing shipping addresses during checkoutAdmin → Configuration → Order Settings → Default Billing Address
  • Allow customers to use one-time addresses during checkoutAdmin → Configuration → Order Settings → Default Billing Address

Step-by-step guide

  1. Log in to the Admin area of your storefront.
  2. Navigate to Configuration → Checkout Settings.
  3. Enable the setting Always show address form in checkout.
  4. Go to Configuration → Order Settings → Default Billing Address.
  5. Enable the following options:
    • Allow customers to edit their existing shipping addresses during checkout
    • Allow customers to use one-time addresses during checkout
  6. Save your changes.
  7. Test the checkout process to confirm that address edits are now being saved.

Related links

For additional guidance, head over to the Infigo Academy or contact our Customer Support team.

Enabling Approval Navigation in the My Account Area


When the Approval Workflow is active, customers expect to see an easy-to-use navigation option in the My Account section to review pending order approvals. In some cases, the expected dropdown may not appear even though the approval process is functioning.

This article provides guidance on verifying and enabling the necessary setting to ensure that the Approval navigation populates correctly for users. It also explains alternative ways to access the approval page if the dropdown is missing.

Use cases

  • Customers trying to review pending approval requests from the My Account section.
  • Administrators needing to ensure that the storefront navigation for approvals is correctly displayed.

Key settings in the Platform

  • Show Approval Links: Located in the Editable Content > Header section within the platform administration panel. This setting must be enabled to display the approval dropdown in the My Account area.

Step-by-step guide

  1. Log into the platform's administration panel.
  2. Navigate to the Editable Content section and open the Header settings.
  3. Locate the Show Approval Links option and set it to Yes.
  4. Save the changes and refresh the storefront. The approval dropdown should now appear under the My Account section.
  5. If the dropdown still does not appear, try clearing your browser cache or reviewing the configuration to ensure the setting was saved correctly.

Related links

For additional guidance, head over to the Platform Academy or contact our Customer Support team.

Fixing Incorrect Approval Email Links


This article explains why your order approval emails may contain an incorrect store URL and how to resolve the issue. The problem typically occurs when the store URL in the Workflow Settings is misconfigured.

If the Workflow Settings contain an outdated or incorrect URL, automated emails will include non-functional links. In addition, if the default placeholder (such as 'teststore') appears in the URL, it indicates that the specific storefront name was not correctly updated in the configuration.

By following the steps outlined below, you can update your Workflow Settings to ensure that approval emails direct you to the correct page. This guide is designed to prevent future occurrences of this issue.

Use cases

  • An order approval email directs you to a URL that results in an error.
  • The URL displays a default or placeholder storefront name instead of the actual store name.

Key settings in Infigo

  • Store URL: Located in the Workflow Settings under the admin panel.
  • Custom Binding: Ensure your storefront custom binding is correctly set if you are using a non-standard URL.

Step-by-step guide

  1. Log in to your Infigo admin panel and navigate to the Workflow Settings section.
  2. Locate the field for the Store URL and check its current value.
  3. Update the Store URL to the correct value, for example:
    • https://yourstore.example.com
    • or your custom binding (e.g., yourstore.example)
  4. Save your changes in the Workflow Settings.
  5. Generate a new order approval email to ensure the updated URL is used; note that previously sent emails will still contain the old link.
  6. Test the approval link to confirm it directs to the correct page.

Related links

For additional guidance, head over to the Infigo Academy or contact our Customer Support team.

Fixing Incorrect Out-of-Stock Messages


Sometimes product pages display an out-of-stock error for certain sizes even when inventory is available. This issue may occur when the system still holds inventory amounts as on hold, causing a mismatch between actual stock and what the customer sees.

In some cases, the inventory for product variations is not properly updated when orders are placed. This can result in product variants showing available stock in the backend, yet the storefront displays an out-of-stock message.

A common resolution is to clear the on-hold inventory amounts via the admin interface. Once cleared, the product page should accurately reflect available stock and allow orders to reduce inventory as expected.

Use cases

  • Product pages showing an out-of-stock message despite available stock.
  • Inventory counts not reducing after customer orders are placed.
  • Discrepancies between stock information in the admin panel and the storefront display.
  • On-hold inventory amounts affecting attribute combination stock settings.

Key settings in Infigo

  • Product Variant Inventory: Accessible via Admin > Product Variant Edit to review stock levels and attribute combinations.
  • On-Hold Inventory: Located within the inventory management section where on-hold amounts are recorded for products that have shipped.
  • Order Management: Check if orders are correctly decrementing the inventory and managing on-hold stock.

Step-by-step guide

  1. Log in to the admin panel and navigate to the Product Variant Edit page for the affected product.
  2. Review the stock levels for each product size, paying close attention to the on-hold inventory amounts.
  3. If the on-hold value is causing the error, use the delete button to clear the on-hold amount for the specific variants (e.g. XS and 2XL).
  4. Save your changes and refresh the product page to verify that the out-of-stock message is no longer displayed.
  5. If the issue persists, confirm whether your inventory is managed manually or via an external MIS system to further troubleshoot the discrepancy.
  6. Contact Customer Support for additional guidance if necessary.

Related links

For additional guidance, head over to the Infigo Academyor contact our Customer Support team.

How to set up per kilo shipping rates in Infigo


Infigo's default 'Shipping by Weight' provider calculates shipping costs based on defined weight brackets. Each bracket has a fixed price, which applies to any order whose total weight falls within that range.

However, some businesses may require a more granular approach—such as charging a specific rate per kilogram within each bracket (e.g. €2 per kg from 0–10 kg, €1.50 per kg from 10–20 kg). This type of calculation is not supported by default but can be achieved through a custom shipping script.

This article explains the default behaviour, how to configure weight brackets, and what to do if you require per-kilo pricing.

Use cases

  • Charging €2 per kg for orders weighing between 0–10 kg
  • Charging €1.50 per kg for orders weighing between 10–20 kg
  • Applying a dynamic rate based on the exact weight of the order
  • Offering more accurate shipping costs for heavy or bulk orders
  • Meeting carrier pricing models that charge per unit of weight

Key settings in Infigo

  • Shipping by WeightAdmin > Configuration > Shipping > Shipping Providers > Configure 'Shipping.ByWeight'
  • Weight UnitsAdmin > Configuration > Measures > Weights
  • Primary WeightAdmin > Configuration > Measures > Weights > Set Primary Weight Unit

Step-by-step guide

  1. Go to Admin > Configuration > Shipping > Shipping Providers.
  2. Click Configure next to Shipping.ByWeight.
  3. Define your weight brackets (e.g. 0–10 kg, 10–20 kg) and assign a fixed price to each bracket. Note: This price is not calculated per kilo—it is a flat rate for the entire bracket.
  4. To ensure the correct unit is being used, go to Admin > Configuration > Measures > Weights.
  5. Confirm that KG is set as the Primary Weight. If not, update it accordingly.
  6. If you require per-kilo pricing within brackets (e.g. 15 kg × €1.50 = €22.50), contact Infigo Support to request a custom shipping script.
  7. Provide your desired pricing logic and weight ranges so a quote can be prepared for the custom development.

Related links

For additional guidance, head over to the Infigo Academy or contact our Customer Support team.

Importing Products with Images


This article explains how to import a large number of products along with associated images using the Upload Folders feature. It covers the requirements in your CSV file and the necessary steps to ensure that product images are correctly mapped and removed from the upload area once imported.

When importing products to your storefront, you need to have your images stored in the Upload Folders area. The CSV file that you import must include a column named ProductImage that references the exact file name of each product image.

This guide outlines the process, common use cases, the key settings inside the system, and step-by-step instructions to help you successfully manage your product imports without having to repeatedly ask the same questions.

Use cases

  • Importing a large catalog of products for a new storefront.
  • Adding product images efficiently as part of a bulk upload process.
  • Managing and updating product image assets via a centralized upload area.

Key settings in the system

  • UploadFolders access: Ensure that the user role has permission to access the UploadFolders area.
  • ProductImage column: In your CSV import file, include a column named ProductImage with the exact file names of your images.
  • Upload Location: During the import process, select the correct upload location where the images are stored.

Step-by-step guide

  1. Upload all your product images to the UploadFolders area.
  2. Prepare your CSV file ensuring it includes a ProductImage column with the file names corresponding to the uploaded images.
  3. Start the import process by selecting the appropriate upload location that matches where your images are stored.
  4. Once the CSV is imported, the system will map the images to the respective products and remove successfully mapped images from the UploadFolders area.
  5. If issues arise during the import, verify that the file names in your CSV are accurate and that you have the correct access permissions.

Related links

For additional guidance, head over to the Infigo Academy or contact our Customer Support team.

Irregular Shaped Frames with Hebrew Support in the Infigo Editor


This article explains the current limitations for using irregular shaped frames with Hebrew text in the Infigo editor. The text on a curve functionality is a popular feature for creating dynamic designs, but it is not supported with Hebrew at this time.

Customers have observed that while this feature works well for many languages, the option to display text on a curve does not function when Hebrew is selected. Previous communications mentioned potential future support; however, recent updates confirm that this functionality is not under active development for Hebrew.

In this guide, you will find an overview of the feature, key settings within the Infigo editor, and a step-by-step process for creating irregular shaped frames for supported languages. Use this resource to determine the best approach for your creative projects.

Use cases

  • Design projects needing dynamic text effects using curves.
  • Creating visually engaging layouts in languages supported by the editor.
  • Exploring creative frame designs within the supported language interface.

Key settings in Infigo

  • Frame Tool: Found in the main editor toolbar under frame options.
  • Text Curve Functionality: Available for languages with full support; note that this does not apply to Hebrew.
  • Language Compatibility: Check the Language Settings section in the editor to see supported languages. Hebrew is currently excluded.

Step-by-step guide

  1. Launch the Infigo editor and open your project.
  2. Select the Frame Tool from the editor's toolbar.
  3. Choose an irregular shape from the available frame options.
  4. Add your text and adjust the curve settings for supported languages.
  5. If your text is in Hebrew, note that the curve effect will not be applied due to current language support limitations.

Related links

For additional guidance, head over to the Infigo Academy or contact our Customer Support team.

Resolving Sitemap URL and Namespace Errors


This article explains how to address common sitemap issues such as invalid relative URLs and missing XML namespaces. These issues typically occur when sitemap entries are not fully qualified and proper namespace definitions are missing.

When a sitemap contains relative URLs (for example, a URL like /FAQs) or an incorrectly declared XML namespace, search engines like Google may reject the sitemap submission. It is important to ensure that all URLs are fully qualified with the complete domain and that the XML is correctly structured.

The primary cause of these issues can be linked to the handling of canonical URLs and language culture settings in the system. In particular, blog posts or FAQ pages may show unqualified URLs if a canonical URL is specified incorrectly. Updating or removing the canonical URL can allow the system to automatically generate a fully qualified URL.

Use cases

  • Submitting a sitemap to Google Search Console and encountering URL errors
  • Blog posts or FAQ pages showing relative URLs in the sitemap
  • Errors related to missing or incorrect XML namespace declarations

Key settings in Infigo

  • Canonical URL: Located in the blog post or page editor under the SEO settings
  • Sitemap Generation: Verify settings in the Sitemap plugin to ensure correct URL formatting
  • Language Culture: Check the settings that affect how URLs are rendered based on language or location

Step-by-step guide

  1. Log in to your admin panel and navigate to the affected blog post or FAQ page.
  2. Locate the SEO section where the canonical URL is set.
  3. Ensure the canonical URL is a fully qualified URL (e.g. https://www.example.com/FAQs) rather than a relative URL.
  4. If you choose to remove the canonical URL, the system will automatically generate a full URL for you.
  5. Save your changes and regenerate your sitemap.
  6. Resubmit the updated sitemap to Google Search Console.
  7. Monitor the Search Console for any further errors.

Related links

For additional guidance, head over to the Infigo Academy or contact our Customer Support team.

Resolving the Invalid Platform URL Error


When creating a new storefront, you might encounter an error stating that the Platform URL is not correctly configured. This error usually occurs because the URL is missing the required protocol (https://) at the beginning of the address.

This guide explains why the error occurs and provides step-by-step instructions to update your Platform URL setting so that it includes the necessary https:// prefix.

Following these instructions will resolve the error and prevent it from reoccurring, ensuring that storefront creation works seamlessly for all platform administrators.

Use cases

  • Error encountered during storefront replication when logged in as platform admin.
  • Instances where the Platform URL was entered without the https:// prefix.

Key settings in Infigo

  • Platform URL: Located in the Administration > Settings > Platform Configuration section.

Step-by-step guide

  1. Log in to your platform as an administrator.
  2. Navigate to the Administration section and select Settings.
  3. Go to the Platform Configuration settings where the current URL is displayed.
  4. Ensure that the URL begins with the protocol https:// (for example, https://yourdomain.infigosoftware.com/).
  5. Update the URL if necessary and save the changes.
  6. Test the storefront creation process to confirm that the error is resolved.

Related links

For additional guidance, head over to the Infigo Academy or contact our Customer Support team.

Restricting Checkout to a Single Item


This article explains how to restrict customers to only one line item per order using the Maximum basket items setting available in the Cart Settings. This configuration is ideal for scenarios where you want to limit purchases and simplify the checkout process.

When this setting is enabled, customers can only add one distinct product to their basket. Although the system may still display a success notification when an additional item is attempted, only one item will appear in the cart.

Recent updates have addressed some messaging concerns by displaying a brief notification on the cart page if the maximum item limit is reached. This guide details how to configure these settings and offers additional tips to ensure a smooth customer journey.

Use cases

  • Enforcing single-item purchases during limited-time offers or promotions.
  • Restricting purchases of high-value or sensitive products to avoid bulk orders.
  • Simplifying the checkout process by limiting shopping cart complexity.

Key settings in Infigo

  • Maximum basket items: Located in the Cart Settings, this option allows you to define the maximum number of distinct items a customer can add to their cart.
  • Checkout Requirements: Found under Checkout Settings, this area lets you add custom rules to the checkout process to reinforce purchase limitations.

Step-by-step guide

  1. Log in to your Infigo administration interface.
  2. Navigate to the Cart Settings section.
  3. Locate the Maximum basket items setting.
  4. Set the value to 1 to restrict the cart to a single line item.
  5. Save your changes and test the storefront to ensure the setting behaves as expected.
  6. If additional restrictions are required, visit the Checkout Requirements under Checkout Settings to configure custom checkout rules.

Related links

For additional guidance, head over to the Infigo Academy or contact our Customer Support team.

Sending Test Emails from the Correct Account in Email Message Templates


This article explains how to ensure that emails sent via Message Templates use the correct email account configuration. It focuses on the process of selecting an email account and the importance of saving template changes to update the settings.

Sometimes, although the new email account is properly configured and even selected from the dropdown within a template, the system might still send emails using an old account if the template is not saved after making changes.

Following the steps below will ensure that your email templates are using the desired email account, making your testing and production emails consistent.

Use cases

  • Testing email delivery from newly configured email accounts.
  • Double-checking that changes in a template are correctly applied before sending live emails.

Key settings in the Admin UI

  • Email Account Configuration: Accessible via the Email Accounts screen, where default and additional email accounts are set up.
  • Email Template Settings: Located on the Email Message Templates screen, where you select the email account to be used for each template.

Step-by-step guide

  1. Navigate to the Email Message Templates screen for the template you wish to test in the Admin UI.
  2. Select the desired email account from the dropdown menu.
  3. Click the [Save and Continue] button to apply the changes. This step is crucial to update the template with the new email account.
  4. Wait for the page to refresh to confirm that your changes have been saved.
  5. Send a test email to verify that the message is sent from the correct email account.
  6. Check your 'Message Queue' in the admin area to verify the Sender Email used is correct.

Related links

For additional guidance, head over to the Infigo Academy or contact our Customer Support team.

Shipping Address Preselection at Checkout


This article explains the behavior of the address selection during checkout. The system is designed to automatically use a saved default billing or shipping address if available, even if the option to preselect the first address is turned off.

When a customer has no default address set, the system can preselect the first available address from either the user record or the address book if the setting is enabled. However, if a default address (typically a billing address) already exists, the system will continue to display that address.

This design aims to reduce user errors and streamline the checkout process. Nevertheless, it might lead to unintentional selections when an address is not actually the customer’s intended choice.

Use cases

  • A customer without a default billing or shipping address, where preselecting the first saved address can guide the checkout process.
  • A customer with an existing default address, leading the system to automatically display that address during checkout.

Key settings in Infigo

  • Preselect first address: Located in Configuration > Settings > Customer Settings. This setting is intended for accounts without a default address.

Step-by-step guide

  1. Verify whether the customer record contains a default billing address. If one exists, the system will continue to display that address.
  2. If no default address is set, ensure that the Preselect first address option is enabled so the system automatically selects the first available address.
  3. To test changes, clear browser and system caches, then navigate back to the checkout process.
  4. If the behavior is not as expected, consider removing or updating the default address in the customer record to see the effect.
  5. If a placeholder such as 'Please choose a shipping address' is desired instead of a preselected option, note that this is not currently supported when a default exists. You may consider submitting a feature request.

Related links

For additional guidance, head over to the Infigo Academy or contact our Customer Support team.

Understanding Order Quantity Limits


This article explains why you might receive a warning message when trying to add a specific quantity of a product to your cart. The error may occur even if your requested total is below the maximum allowable quantity.

The system enforces a set maximum order quantity for each product. If you already have some units in your cart, the remaining amount you can add is reduced to ensure that the total does not exceed the limit.

In some cases, a different limit may appear if you are logged in as another user who already has additional units in their cart. Clearing previous selections can help resolve the issue.

Use cases

  • A customer adds units to their cart and receives a warning when trying to exceed the maximum order limit.
  • A customer trying to add a new quantity finds that the allowed amount is lower due to existing units in the cart.
  • An instance where impersonation or multiple sessions lead to higher than expected values already in the cart.

Key settings in Infigo

  • Maximum Order Quantity: Found in the product configuration under Order Settings.
  • Cart Contents: Displayed on the shopping cart page to show current units in the order.

Step-by-step guide

  1. Review the product details to identify the maximum order quantity set for that item.
  2. Check your cart to see how many units are already added for that product.
  3. Calculate the remaining number of units you can add by subtracting the current cart total from the maximum allowed.
  4. If the allowed addition seems lower than expected, confirm that you are not logged in as another user with additional units in the cart.
  5. If needed, clear the cart and start a new order to avoid any conflicts.

Related links

For additional guidance, head over to the Infigo Academy or contact our Customer Support team.

Downloading Original PDFs from Infigo within Shared Print Operations


This article explains how to download the original customer PDF files using the Infigo interface. It addresses concerns about insufficient image data in the final output PDF by confirming that the original file is available for review.

Users can verify whether the image data is complete by accessing the order details in the Shared Print Operation (SPO) portal. The final output PDF in the Product section is the original file for the order.

Follow the steps below to locate and download the original PDF file. This guide ensures that you can quickly resolve similar queries in the future.

Use cases

  • Verifying complete image data in order PDFs
  • Accessing original customer PDFs for quality review

Key settings in Infigo

  • Search Orders: Located in the SPO portal to find specific orders by order number
  • Product Section: Found within the order details where the final output PDF is available for download

Step-by-step guide

  1. Log in to the SPO (Shared Print Operation) portal.
  2. Enter the order number (e.g., 9716) in the search bar.
  3. Select the order from the search results to view the order details.
  4. Scroll down to the Product section where the final output PDF is listed.
  5. Click to download the original PDF file for review.

Related links

For additional guidance, head over to the Infigo Academy or contact our Customer Support team.

Confirm Delete in Shopping Basket


When a customer decides to remove their job(s) from the shopping basket, you can now display a confirmation dialog to the end user in order to prevent accidental job deletion.

To enable this feature, login with your Administration account

Then navigate to Configuration -> Settings -> Basket setting -> Locate "

Click Save, and now the deletion functionality in the basket will force a confirmation prompt. 

Discount Requirement on Basket Total


This is a completely new discount type. It is one that allows you to apply a discount to a basket total when the user has over a specified amount.


For example,
If shopping basket total is over £200 apply discount 1
This only works on the subtotal (not including delivery or tax)


Setup

Contact us about installing the plugin on your platform. Once installed you are free to setup the discount. Navigate to Promotions > Discounts and create a new discount. Give it a relevant name, set the type to ‘Assigned to order subtotal’, configure the discount amount, start end date etc. as you wish then click ‘Save and Continue Edit’.


Setting up the discount

In the admin page, navigate to Promotions > Discounts.

Click 'Add new' (top right)

Give the Discount a name that is relevant (maybe include the product you are applying it to for your own reference)

From the drop down choose your discount type.

Choose whether you want to discount a static cost or a percentage of the price.

mceclip0.png

Click 'Save and Continue Edit', then navigate to the Requirements tab and set the requirement type to ‘Customer’s basket value is x.xx’ and then lastly set the basket total threshold (this is the amount that will trigger the discount should their basket total go over that figure)


Save the requirements

Storage Control Settings for Baskets / Carts and Saved Projects


We have clean-up functionality to various job elements aimed at keeping surplus job information to a minimum whilst saving space on your system.

These updates primarily control the expiration of baskets, saved baskets and saved projects, and have been placed in a new Storage Control section of your Order Settings along with some existing related settings.

To support these warning settings above, there are email templates: 

These settings ensure you do not get a backlog of defunct data on your Storefront, by ensuring a timely clean-up.

Configuring MiniBasket for Accurate Line Item Count


When multiple quantities of a single product are added, the default display reflects the cumulative quantity. Enabling the proper setting ensures that the mini-basket counts each product line item once regardless of its quantity.

Follow this guide to configure your basket settings easily so that customers see a clear and accurate count of items in their basket.

Use cases

  • One product with a high quantity displays as a single line item instead of the total quantity.
  • Multiple products with varying quantities reflect the accurate number of line items.

Key settings in Infigo

  • Total Product Count Ignores Quantity: Located within the Basket Settings under the Product Count Options. Hover over the setting for an explanatory tooltip to confirm its purpose.

Step-by-step guide

  1. Log in to the Infigo admin interface.
  2. Navigate to the Basket Settings section.
  3. Locate the Total Product Count Ignores Quantity option.


  1. Hover over the tooltip to read a detailed explanation of the setting.


  1. Enable the setting to have the mini-basket display the number of unique line items instead of the cumulative quantity.
  2. Save your changes and test the mini-basket display on your storefront.

Related links

For additional guidance, head over to the Infigo Academyor contact our Customer Support team.

Switching between Email and Username to login


Infigo allows customers to set "Username" to login instead of their "Email Address".

First log-in as a Storefront Administrator then go to Configuration > Settings > Customer Settings


In Customer Settings tab, "Usernames Enabled" and "Allow customers to change their usernames" must be checked. Having these boxes checked, click on save and continue.

"Allow customers to change their usernames" check box allows existing or new customers to change their username as they wish.

Screenshot_2022-08-23_at_16.37.10.png


Once you have applied the changes to settings, Infigo allows you to change the username.

Adding a custom binding to your storefront


This article will help explain the process of how to add a new URL to your storefront. If you also plan on obtaining an SSL to secure your site, we have to complete the binding first. You can read this article on the steps for implementing an SSL if you would like to obtain a certificate for your new domain. 

Please note, that implementing a new binding will accrue the following charge:

UK: £15 + VAT / USD $18 / €18 / AUD $30 / CAD $26

Pre-Requisites

Prior to raising a ticket for us to configure a domain binding for you, you will need to have purchased your domain so that you can configure your DNS.

A majority of our customers purchase their domains through GoDaddy or 123Reg, but please use whichever service you prefer.

What We Need

When raising a ticket for configuring a new domain, please be sure to provide the following:

  1. Current Storefront URL (e.g. yourCompany.infigosoftware.com/storefrontName)
  2. New domain URL.

The Process

  1. After raising a support ticket with the above information, a support team member will raise a formal task to our development team to implement this new domain against the storefront requiring this binding.
  2. When the binding has been applied to your site, it will be part of the the next release. We deploy every 2 weeks and the agent will inform you of when you can expect your binding to be live on your storefront. Note: This task will need to be raised to the development team a few days prior to one of our releases otherwise it will have to be included in the next release.
  3. Once released, the support team will provide you a CNAME record to point this new domain towards. Note: This must be configured in your DNS. This is not a task Infigo can carry out as it is something you need to do with your hosting provider. 


Please Note:


This process can take up to 2 weeks to complete.

Adding Hotjar to Your Infigo Storefront


Hotjar is a powerful tool designed to track and analyze user behavior on your website. By capturing heatmaps, session recordings, and user feedback, Hotjar enables businesses to improve their website's usability and customer experience. This guide explains how to integrate Hotjar into your Infigo storefront to monitor user interactions effectively.

For additional information and detailed tutorials, the Infigo Academy offers extensive resources on a wide variety of topics. Visit the Infigo Academy to search and browse our content.


2. Contents

  1. Overview
  2. Contents
  3. Key Points and Takeaways
  4. Key Settings
  5. Step-by-Step Guide to Adding Hotjar
  6. FAQs
  7. Alternate Search Terms

3. Key Points and Takeaways

  • Hotjar can be integrated into Infigo storefronts by adding its tracking script to the appropriate section in the Infigo platform.
  • The integration involves no coding experience and can be completed in minutes.
  • The script must be added to the PageHeadContainer section under "Infigo Settings."

4. Key Settings

PageHeadContainer

  • Path: Infigo Settings → Scroll to the PageHeadContainer section.
  • Explanation: This setting allows you to insert custom scripts, such as the Hotjar tracking code, into your storefront's HTML <head> section. This is crucial for tracking user behavior across the site.

5. Step-by-Step Guide to Adding Hotjar

Problem:

You need to add Hotjar to your Infigo storefront to gather user behavior insights but are unsure how to implement the tracking code.

Solution:

  1. Retrieve Your Hotjar Tracking Code:
    • Log in to your Hotjar account.
    • Navigate to your dashboard and copy the tracking script provided for your project.
  2. Access Infigo Settings:
    • Log in to your Infigo admin dashboard.
    • Go to Infigo Settings.
  3. Locate the PageHeadContainer Section:
    • Scroll through the Infigo Settings page until you find the PageHeadContainer section.
  4. Insert the Hotjar Script:
    • If there is existing content in the PageHeadContainer, ensure you do not overwrite it. Instead, add your Hotjar tracking script within the <script> tags:

      html
      <script> // Existing content remains untouched // Add your Hotjar script below [Your Hotjar Tracking Code] </script>
  5. Save the Settings:
    • Once the script is added, save your changes.
  6. Verify the Integration:
    • Return to Hotjar and check the installation status to ensure the script is running correctly.

6. FAQs

Q: What happens if there is already a script in the PageHeadContainer?
A: Ensure you do not delete the existing script. Add your Hotjar tracking code within the <script> tags in a new line.

Q: Do I need coding knowledge to do this?
A: No, the process involves copying and pasting a script provided by Hotjar.

Q: Can I test if Hotjar is working immediately?
A: Yes, log in to Hotjar, and it will confirm whether the script has been successfully installed.

Q: What if I cannot locate the PageHeadContainer section?
A: Contact Infigo support or refer to the Infigo Academy for further guidance.


For additional information and detailed tutorials, the Infigo Academy offers extensive resources on a wide variety of topics. Visit the Infigo Academy to search and browse our content.

Changing used weight and dimension units on a Storefront or Platform


Infigo Storefronts default to particular weight and dimensional units, however these can easily be altered with the changes seen Storefront or Platform wide.

To change these settings on the Platform level, ensure you are logged in to your Platform Administrator account and have the Platform level selected.


To change these settings on a Storefront level, either select a single Storefront from this same list, or log in to a Storefront using your Storefront Administrator account.


Changing Weight Units

In Infigo admin, search for the Measure Weights area


This screen will show you a selection of defined weight units, including:

  • Ounces (ounce)
  • pound (lb)
  • kilogram (kg)
  • gram (g)

Look for a value reading true in the Is Primary Weight column to identify what your system is currently using.

To change the weight unit, click the Select button in the Mark as Primary Weight column.

This change is immediately actioned across your system. For example:


Changing Dimension Units

In Infigo admin, search for the Measure Dimensions area

This screen will show you a selection of defined dimensional units, including:

  • inches
  • feet
  • metres
  • millimetres
  • centimetres

Look for a value reading true in the Is Primary Dimension column to identify what your system is currently using.

To change the dimension unit, click the Select button in the Mark as Primary Dimension column.

This change is immediately actioned across your system. For example:

Exporting Customer List from Your Storefront


This article explains how to export a complete list of customers from your storefront using the reporting tool available in the Infigo platform.

Follow the simple step-by-step guide to navigate to the reporting section, download the Customer Report, and select your preferred date range and file format.

These instructions ensure you can routinely access customer data for analysis, marketing, or record keeping without having to repeatedly ask for support.

Use cases

  • Export customer data for targeted marketing campaigns.
  • Perform data analysis for business insights.
  • Maintain an up-to-date customer database for record keeping.

Key settings in Infigo

  • Insights > Reports: Access this section via the main navigation menu.

Step-by-step guide

  1. Log in to your Infigo account and navigate to the Insights > Reports section.
  2. Select the Customer Report from the list of available reports.
  3. Choose your desired date range and file format for the export.
  4. Download the report to obtain the complete list of customers.

Related links

For additional guidance, head over to the Infigo Academy or contact our Customer Support team.

Hide All Pricings on a Storefront


You can hide all storefront pricing by enabling the setting "Hide all pricing on the storefront" in Configuration > Settings > General Settings > Hide all pricing on the storefront:

When this setting is enabled then all pricings for a storefront will be hidden.

This includes pricings on product pages as well as in the basket/cart and during checkout like in the examples below:

Stock product

Mega Edit Product

Basket/Cart


Alternatively, if you'd like to hide the price for individual products please see: Hide Pricing with CSS – Infigo Help Desk (zendesk.com)

How to Change Text / Wording on your Storefront


Almost every piece of text contained within Infigo has what's known as a language string attached to it. The language string is basically a set of characters (letters, numbers etc.) which the system "reads" and uses to populate most text fields.

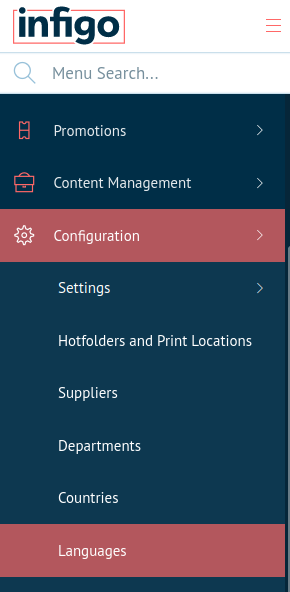
If you navigate to Configuration > Languages you will see that Infigo supports multiple languages, all of which have string resources which you can view by clicking their respective View string resources button.

mceclip0.png

mceclip1.png

(click here to see full image)

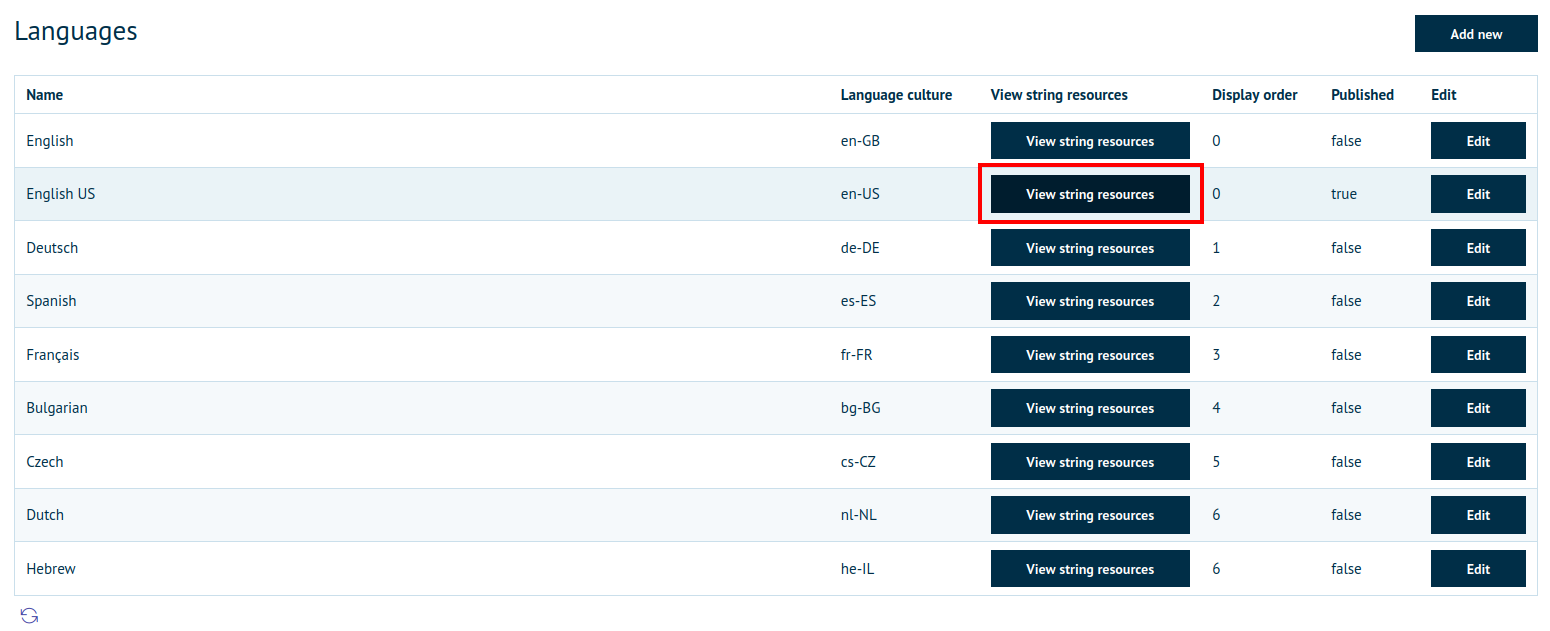
Once you click on "View string resources" for the language you wish to edit, you will come to a page which lists every language string used on your storefront. In the screenshot below, and for the purposes of this example, I have selected "English" as this is the language I primarily use on my storefront.

NOTE: Its important that you always set the Source language to English (not English US) as this is the language bundle that contains ALL of the default language strings. So when you perform a search its wise to start your search by filtering the Source Language column which will be all the system English language strings.

Note: Each language has its own set of language strings and as such, changing the string for one language will not affect the strings for another.

mceclip2.png

(click here to see full image)

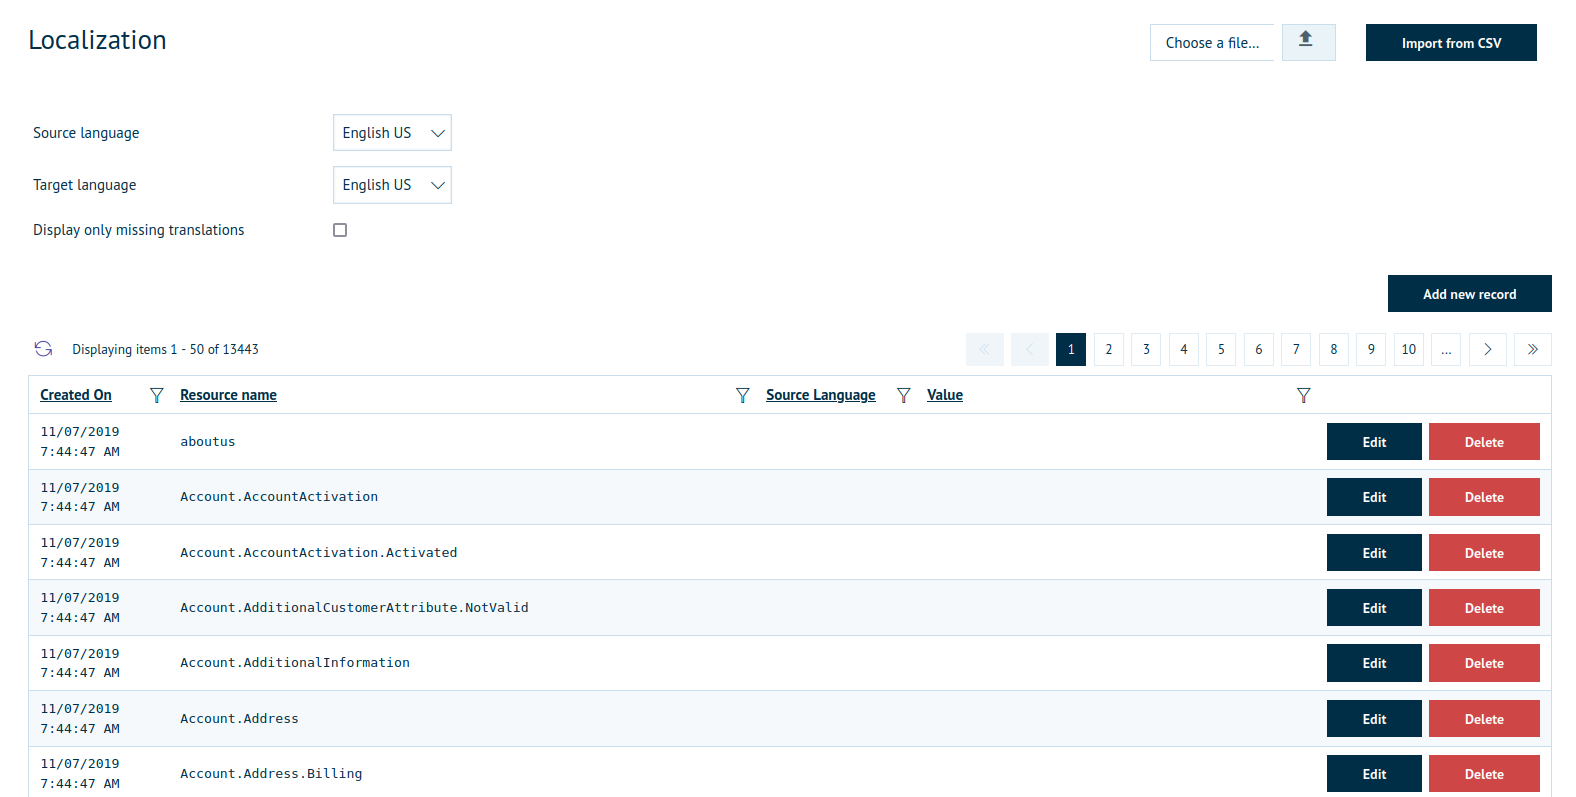
As you will be able to see, there are a lot of language strings present and all of these can be edited or removed entirely. 

For this example, I will be changing the "Log out" link at the top of my storefront's page, as shown below.

mceclip3.png

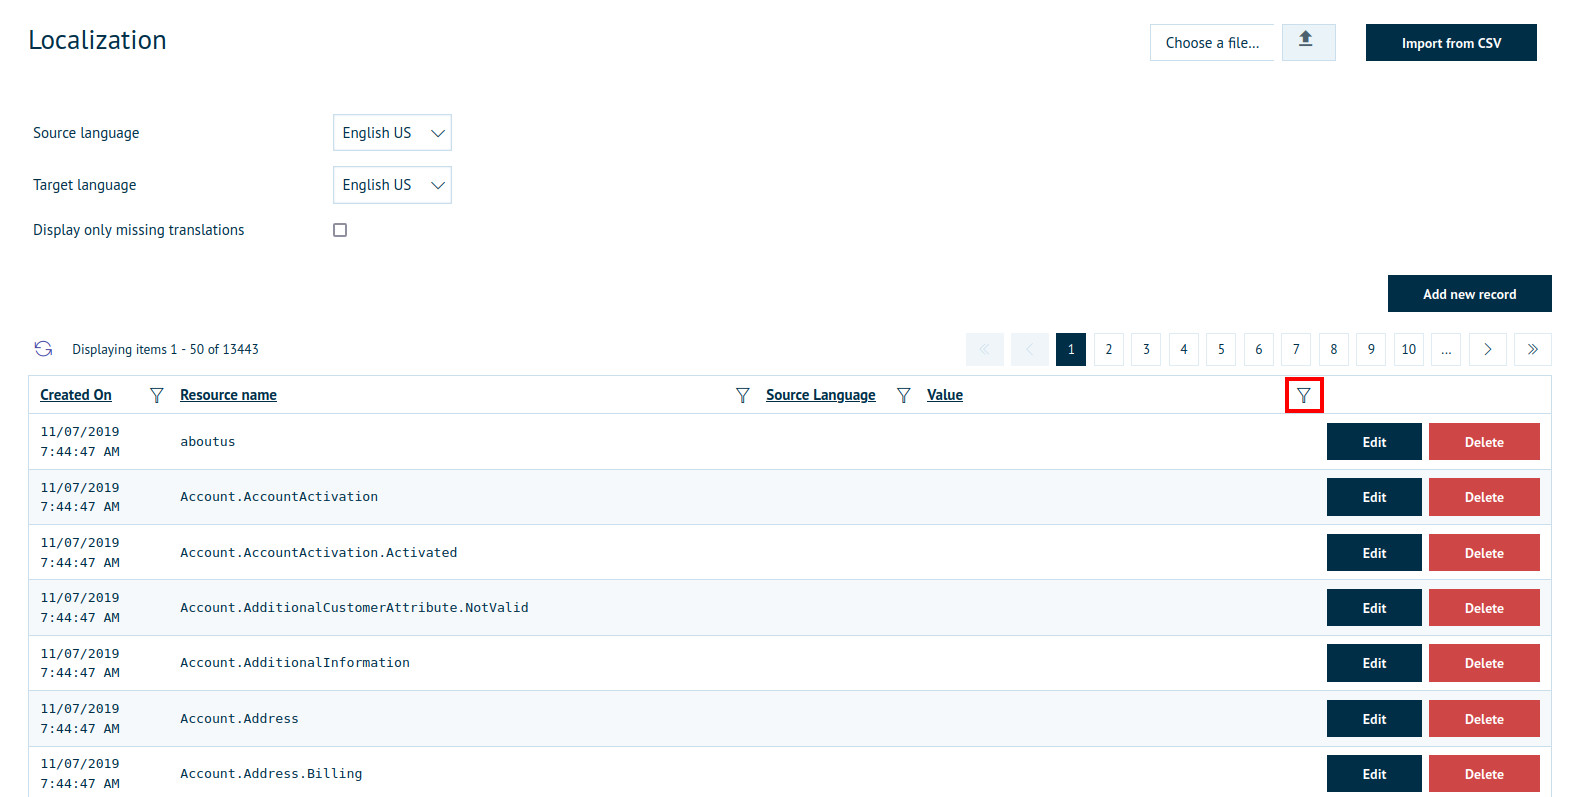
Rather than look through the many pages of language strings, I am going to search for the one I need by filtering the results by language strings which have a value that matches "Log out". In order to do this, you need to click on the filter icon I have highlighted in the following screenshot.

asdasdasd.jpeg

(click here to see full image)

Note: Whilst it is possible to filter by Resource Name as well as Value, it is often easier to search by the value as this is what you will see and what you will be changing.

Once you have clicked this button, the following menu will appear:

mceclip4.png

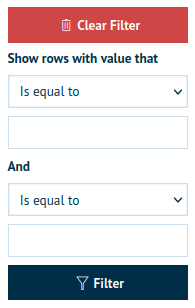
The first dropdown list contains the following filter types:

mceclip5.png

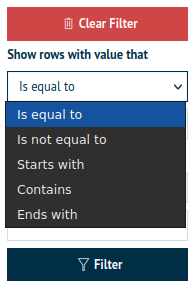
Is equal to - This will return any language strings whose value perfectly matches what you put in the field below it. If there is a single character different, including a missing space, then the result will not be returned. For example, if I were to enter "Log out" then it would return the language string I am looking for. However, if I were to enter "Logout" it would not return anything as there is not a language string with a value matching "Logout".

Is not equal to - This option does the exact opposite to the previous one, it will return every string with a value that does not perfectly match what you enter in the field below. For example, if you were to enter "Log out" it would return every language string except for the one relating to "Log out".

Starts with - This will return all strings with a value which starts with what you enter in the field below. For example, if you were to choose this option and enter the letter "A" it would return all language strings that start with A.

Contains - This will return all language strings whose values contain the entered characters at any point in their value. This means that if you were to enter "Log" or "out" then the language string relating to "Log out" will return.

Ends with - This will return all language strings whose values end with what you enter into the field. For example, if you were to enter "." it would return all strings whose values end with a full stop.

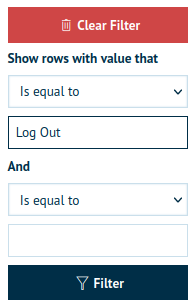
As I know the exact text of the string I am looking for, I will be searching the value using the Is equal to option, and entering "Log out" into the field, as shown in the screenshot below.

mceclip6.png

Now, if you click Filter, it will return all results which match the filtration criteria I have just set, as shown in the following screenshot.mceclip8.png

(click here to see full image)

Now all you need to do is click "Edit" and change the value of the field to whatever you want it to be. For this example, I will be changing it from "Log out" to "Sign out" and save my changes by clicking "Update"

mceclip9.png

(click here to see full image)

Note: Whilst it is indeed possible to change the Resource Name of the language string, it is not advised to do so as this could interfere with the system and cause the string to not load correctly.

As you can see in the following screenshot, the text has now changed from "Log out" to "Sign out"


How to Edit and Manage Reward Points Adjustments in Your Storefront


This guide explains how to effectively manage, edit, and delete reward points adjustments in your storefront using Infigo’s web-to-print platform. Whether you need to correct a mistake, audit changes, or manage permissions, this article provides step-by-step instructions. It also highlights critical scenarios where recalculations are required and points out restrictions that ensure system integrity.

For additional information and detailed tutorials, the Infigo Academy offers extensive resources on a wide variety of topics. Visit the Infigo Academy to search and browse our content.


2. Contents

  1. Overview
  2. Contents
  3. Key Points and Takeaways
  4. Key Settings
  5. Scenario-Based Guide
    • Scenario 1: How to Edit Reward Points
    • Scenario 2: How to Delete Reward Points
    • Scenario 3: Auditing Reward Points Changes
  6. FAQs
  7. Alternate Search Terms

3. Key Points and Takeaways

  • Editing Reward Points: Adjusting points or messages automatically recalculates subsequent balances. Adjustments related to placed orders are locked.
  • Deleting Reward Points: Soft-deleting entries recalculates balances, keeps historical data for deleted entries.
  • Auditing: Every action (add, edit, delete) is logged, with timestamps and user details for transparency.
  • Permissions Management: A new Admin ACL protects reward points access and ensures that only authorized users can manage them.
  • Negative Balances: Balances can go negative, but reward points cannot be used for payment until a positive balance is restored.
  • Insights Integration: All adjustments and audit data sync with Insights for reporting.

4. Key Settings

1. Enable Reward Points Management

  • Path: Admin Area → Configuration → Settings → Reward Points
  • Explanation: Ensure these settings are configured to allow editing and deleting of reward points.

3. Editing Reward Points Per Customer

  • Path: Admin Area → Customers > Customer Management > Edit [Any customer] > Reward Points tab
  • Explanation: This area is where reward points are applied and tracked within Infigo on a customer level.

5. Scenario-Based Guide

Scenario 1: How to Edit Reward Points

Problem: An incorrect message or points value was added to a customer’s reward points history.
Solution:

  1. Navigate to the Customer's Edit page and select the Reward Points tab. (Admin Area → Customers > Customer Management > Edit [Any customer] > Reward Points tab)
  2. Click the Edit button next to the reward points entry.
  3. Adjust the message or points value:
    • Message Edit: Directly update the text.
    • Points Edit: Changing points recalculates subsequent balances automatically.
  4. Save the changes.
    • Note: Edits to points associated with orders are restricted.
  5. Verify the updated balances in the reward points history.

Scenario 2: How to Delete Reward Points

Problem: A reward points entry was added incorrectly and needs removal without deleting it from the database.
Solution:

  1. Navigate to the Customer's Edit page and select the Reward Points tab. (Admin Area → Customers > Customer Management > Edit [Any customer] > Reward Points tab)
  2. Click the Delete button next to the entry.
  3. Confirm the deletion. The entry will now appear grayed out.
  4. Use the “Show Deleted” checkbox to toggle visibility of deleted entries.
  5. Verify subsequent balances have been recalculated.

Note: Reward points adjustments tied to placed orders cannot be deleted.


Scenario 3: Auditing Reward Points Changes

Problem: A store admin needs to track who made changes to reward points and when.
Solution:

  1. Open the Reward Points tab in the Customer Edit page.
  2. Look for the following audit columns:
    • Created On: Date of the original entry.
    • Updated On: Last modification date.
    • Customer/Creator: Name or API token of the user who made the change.
  3. Navigate to the Activity Log to view detailed entries, including the old and new values and recalculation details.


6. FAQs

Q1: Can reward points have a negative balance?
Yes, balances can go negative, but reward points cannot be used for payment until the balance becomes positive again.

Q2: Can reward points for placed orders be edited or deleted?
No, reward points adjustments linked to orders are locked to maintain transactional integrity.

Q3: How do I check recalculated balances after editing?
Recalculations are visible immediately in the Reward Points tab. Ensure all updates reflect correctly after editing or deleting an entry.

Q4: What does soft-deleting a reward points entry mean?
Soft-deleting retains the record in the database by graying it out, with visibility controlled based on the “Show Deleted” filter.


For additional information and detailed tutorials, the Infigo Academy offers extensive resources on a wide variety of topics. Visit the Infigo Academy to search and browse our content.

How to Enable a Shipping-Specific Email Address for Storefront Orders Using the New “Contact Details for Order Notifications” Setting


This article addresses the scenario where a user on the public storefront wants to define an email address specifically for the shipping address during checkout. While this functionality can be configured from the Infigo Admin backend, allowing customers to enter a shipping-specific email directly on the storefront ensures smoother operations and improved reporting and notification capabilities.

For additional information and detailed tutorials, the Infigo Academy offers extensive resources on a wide variety of topics. Visit the Infigo Academy to search and browse our content.


2. Contents

  • Overview
  • Contents
  • Key Points and Takeaways
  • Key Settings
  • Scenario-Based Guide
    • Scenario 1: How to enable email address entry for shipping when placing an order
  • FAQs
  • Additional Resources

3. Key Points and Takeaways

To ensure the shipping address email is used for notifications instead of the customer’s main profile email, you should:

  1. Set “Contact details for order notifications” to Billing or Shipping address details.
  2. Enable “Address email address required.”

These adjustments ensure the email field appears and is required when adding a new shipping address. This setup also ensures that the email specified in the shipping address is used for notification and reporting, rather than defaulting to the customer’s main email.


4. Key Settings

Setting 1: Contact Details for Order Notifications

  • Path: Infigo Admin > Customer Settings > Contact details for order notifications
  • Explanation:
    This dropdown replaces the old boolean setting customersettings.usecustomeremailforcorrespondence.
    • Customer details: Uses the customer’s main profile email for notifications.
    • Billing or Shipping address details: Uses the email defined in the billing/shipping address during checkout.

To ensure that the shipping email is actually used, select Billing or Shipping address details.

Setting 2: Address Email Address Required

  • Path: Infigo Admin > Customer Settings > Address Email Address Required
  • Explanation:
    Enabling this setting makes the email field mandatory when a user adds or edits an address. By requiring an email for each shipping address, notifications can be sent specifically to that address.

5. Scenario-Based Guide

Scenario 1: How to enable email address entry for shipping when placing an order

Problem:
Customers want to provide a shipping-specific email address during checkout, but the storefront currently does not show or require an email field for shipping addresses.

Solution:
Follow these steps:

  1. Log in to the Infigo Admin panel.
  2. Navigate to Customer Settings to locate the relevant configurations.
  3. Set “Contact details for order notifications” to Billing or Shipping address details.
    • This ensures that notifications draw the email from the shipping (or billing) address instead of the customer’s main profile.
  4. Enable “Address email address required.”
    • This setting makes the shipping address email field mandatory whenever a customer adds or edits a shipping address.
  5. Save your changes.
  6. Test the storefront:
    • Go to the public storefront as a customer.
    • Add a new shipping address during checkout.
    • Verify that the email field is now visible and mandatory.
    • Complete the order and confirm that notifications use the shipping email address.

6. FAQs

Q1: What happens if “Contact details for order notifications” is set to “Customer details”?
If you set this dropdown to Customer details, the notifications will use the customer’s main contact email, and any shipping-specific email address will not be used for order emails.

Q2: Why is it important to enable “Address email address required”?
Enabling this setting ensures every shipping address includes an email, allowing for accurate communication and reporting. Without this requirement, users may skip the email field, resulting in missing or incomplete notification information.

Q3: Can this be configured on a per-storefront basis?
Yes. These settings are configurable per storefront in the Infigo Admin panel, which means you can have different behavior across multiple storefronts if needed.

Q4: Is this change retroactive for existing addresses?
No. Existing addresses will not be updated automatically. If you need an email for an older address, you or your customers may need to edit it manually.

How to Implement Accessibility Features on Your Storefront Using Accessible


This guide explains how to use Accessibe, a third-party accessibility tool, to enhance your storefront's accessibility features. Accessibe provides automated solutions such as screen reader compatibility, keyboard navigation enhancements, and user-adjustable accessibility profiles.

Please note that Accessibe is not a supported feature within Infigo, and this article is intended to provide general information on integrating third-party accessibility solutions. If you choose to implement Accessibe, you are responsible for testing and maintaining the script on your storefront.

For additional information and detailed tutorials, the Infigo Academy offers extensive resources on a wide variety of topics. Visit the Infigo Academy to search and browse our content: Infigo Academy.


2. Contents

  1. Overview
  2. Contents
  3. Key Points and Takeaways
  4. Key Settings
  5. Step-by-Step Guide
  6. FAQs
  7. Alternate Search Terms

3. Key Points and Takeaways

  • Accessibe Overview: Accessibe provides automated tools for improving website accessibility, such as screen reader optimization and keyboard navigation adjustments.
  • Infigo Support: Accessibe is a third-party tool and not a supported feature within Infigo.
  • Script Placement: Add the Accessibe script to the Page Footer Container in Infigo settings for application across storefront pages.
  • MegaEdit Compatibility: Applying the script to MegaEdit pages may cause issues. It is advised to avoid this unless absolutely necessary, in which case the script can be placed into an Editable Content block for testing purposes.
  • User Responsibility: Users are responsible for testing and maintaining the Accessibe script on their storefront.

4. Key Settings

  • Page Footer Container:

    • Path: Infigo Settings > PageFooterContainer
    • Explanation: Place custom scripts like Accessibe here to apply them to all storefront pages.
  • MegaEdit Content End (Optional, highly recommended to implement on a test storefront first):

    • Path: Content Management > Editable Content > MegaEdit Custom Content
    • Explanation: If you need to test Accessibe on MegaEdit pages, you can input the script here. Be aware that this may cause the editor to malfunction, and its use is not recommended for production environments.

5. Step-by-Step Guide

Step 1: Obtain the Accessibe Script
Log in to your Accessibe account and retrieve the script provided for your website.

Step 2: Access Infigo Admin Settings

  1. Log in to your Infigo Admin Dashboard.
  2. Navigate to Infigo Settings > Page Footer Container.

Step 3: Add the Accessibe Script

  1. Paste the Accessibe script into the Page Footer Container field.
  2. Save your changes.

Step 4: Test Accessibe on Your Storefront

  1. Open your storefront in a browser and verify that the Accessibe interface appears and functions as expected.
  2. Test its features, such as screen reader compatibility and keyboard navigation, to ensure proper implementation.

Step 5: MegaEdit Compatibility Considerations

  • Avoid applying the Accessibe script to MegaEdit pages, as this may cause the editor to lock up or malfunction.
  • If you must test Accessibe with MegaEdit, input the script in the MegaEdit Custom Content field within Editable Content settings.
  • Test thoroughly in a non-production environment to assess the impact on functionality.

6. FAQs

Q: What is Accessibe, and how does it help?
A: Accessibe is a third-party tool that enhances website accessibility with features like screen reader compatibility and keyboard navigation adjustments.

Q: Is Accessibe supported by Infigo?
A: No, Accessibe is not a supported feature within Infigo. This article provides guidance for integrating third-party tools, but implementation and maintenance are the user’s responsibility.

Q: Can Accessibe be used with MegaEdit pages?
A: It is recommended to avoid applying the Accessibe script to MegaEdit pages, as it may cause functionality issues. If absolutely necessary, you can test it by inputting the script in the MegaEdit Custom Content field in the Editable Content page.

Q: How do I maintain Accessibe on my storefront?
A: As Accessibe is a third-party tool, you are responsible for maintaining the script, testing its functionality, and ensuring compatibility with updates.


For additional information and detailed tutorials, the Infigo Academy offers extensive resources on a wide variety of topics. Visit the Infigo Academy to search and browse our content: Infigo Academy.

How to Install a New Language to your Storefront


You need your Infigo storefront to display in a language that is not currently installed or active. You go to Admin > Configuration > Languages (sometimes referred to simply as the “Languages” list) and see the language listed as inactive or with an “Install Language” button—but you’re unsure how to enable it so it appears live on your storefront.


2. Installing and Activating a New Language

  1. Log in to your Infigo Admin Area.

    • Make sure you have the correct admin permissions to modify language settings.
  2. Access the “Languages” List.

    • Navigate to Admin > Configuration > Languages (naming may vary slightly depending on your Infigo version).
  3. Check if the Language Is Already Installed.

    • If the language is not installed, you should see a button labeled “Install Language” next to it.
  4. Install the Desired Language.

    • Click “Install Language” for your desired language. This queues the language pack for installation.
  5. Wait for an Infigo Deployment.

    • After clicking “Install Language,” the platform typically requires a scheduled deployment to finalize the language installation.
    • Tip: You’ll usually see a note at the top of the Languages page informing you that the new language will be available after the next deployment.
  6. Verify Installation & Publish/Enable.

    • After the deployment, check back in Admin > Configuration > Languages. Your new language should show as installed.
    • Click "Edit" next to your desired languge and set the "Published" option on the subsequent screen.
    •  

3. Troubleshooting & Common Questions

  1. “Install” Button is Not Clickable or Language Shows as Not Installed

    • Ensure you have admin permissions to modify languages.
    • Try logging in as a platform administrator.
    • Verify that a deployment hasn’t already been queued. Sometimes the button remains inactive while the process is pending.
  2. Language Still Not Available After ‘Install’

    • Wait for the next scheduled deployment or overnight sync.
    • If it still doesn’t appear a few days later, contact Support or verify the deployment schedule.
  3. Language Resources Are Missing or Partially Translated

    • Some languages might have partial translations depending on the completeness of the language pack.
    • You can manually adjust resource strings via Admin > Configuration > Languages > Edit Resources to fill in missing phrases.


4. Further Learning & Support

  • Infigo Academy
    Access step-by-step tutorials, video walkthroughs, and more advanced topics on language configuration at:
    https://academy.infigo.net/academy/c/51/browse-all

  • Need More Help?
    If you still encounter issues, reach out to Infigo Support with screenshots or a detailed description of the error.


Summary

Changing or adding a new language in your Infigo storefront is a straightforward process:

  1. Go to Admin > Configuration > Languages.
  2. Click “Install Language” next to the desired language.
  3. Wait for the system deployment or overnight sync to complete.

Following these steps ensures your store is accessible to customers in their preferred language.

Resolving the Invalid platform URL Error When Creating a Storefront


If you encounter the error message 'Invalid platform URL. The platform URL is not correctly configured.' while creating a new storefront in Infigo, it is likely due to an incorrectly formatted URL within General Settings. This article explains how to resolve the issue by ensuring the correct format is used.

The Platform URL must include the full protocol prefix (i.e. https://) to be accepted by the system. This requirement was introduced following a platform update to improve URL validation and security.

Once the correct format is applied, the error will no longer appear and you will be able to create new storefronts successfully.

Key settings in Infigo

  • Platform URL: Navigate to Configuration > Settings > General Settings > Storefront URL

Step-by-step guide

  1. Log in to your Infigo Admin account with Platform Admin privileges.
  2. Switch storefront and choose the Platform level
  3. Go to Configuration > Settings > General Settings > Storefront URL.
  4. Ensure the URL includes the full protocol prefix. For example, instead of yourstore.infigosoftware.com/, it should be https://yourstore.infigosoftware.com/.
  5. Click Save to apply the changes.
  6. Retry creating the new storefront. The error should no longer appear.

Restricting Storefront visibility through Departments and Access Control


Access control has been added to Infigo to allow Categories and Products to be restricted from view for specific Customers.

The Access Control system checks these against a Customer's Role or Department.

Generally Customers viewing the site will have the same Role (Registered) and therefore it makes more sense to base this visibility on Department.


Creating a Department

Login to the Storefront as an Administrator.

Go to Configuration > Departments

Click "Add new record" to add a new Department

mceclip0.png


Give the department a Name, Description, Cost Code, PL Code. The most important thing here is Department Name.

Save your Department.


Assign Users to Departments

Expand the Department using the + on the left of the Department name.

From the list, tick each user you wish to assign to this Department, then click "Save Changes".

mceclip1.png


Access Permissions

As default, a Storefront has Access Permissions switched off.

Go to Configuration > Settings > Access Permission Settings

mceclip2.png

Switch on Access Permission Enabled

The Default Is Allowed switch determines whether the site shows All Categories when you are not in a Department or none.

Default Is Allowed = True means that all Categories show up if users are not in a Department

Default Is Allowed = False means that all Categories are hidden until a user is assigned to a Department that can use them.

Include Children in Category Access = When enabled we will check the subcategories and the products inside a category to determine the access to a specific category.

It is best practise to make sure that Default Is Allowed is set to false and that you specifically allow departments access to what you would like them to be allowed access to as this will prevent further access. 

For example, if you have a department "Department A," you have the categories "Category A" and "Category B," and you only want customers in Department A to see products in Category A, you would take the following actions:

Set Default Is Allowed to False

Create a rule allowing Department A to access Category A (this will include the products within the category).

Since Default Is Allowed is set to False, the customers in Department A will only be able to see Category A and its products, so they will not have access to Category B.

Deny Guest Accounts should always be ticked as true.


Setting Department Permissions

From the Admin menu, go to Catalogue > Access Permission > Setup Access Permissions

The top of the page confirms your Storefronts Access Permission settings (detailed above)

Below this you can select the Role or Department you wish to assign a restriction/access to.

mceclip3.png

Once you select a department, a secondary menu appears asking you what area of the site you wish to target. General site use would be covered from either Products or Categories.


mceclip0.png


Select a target, and click Load.

This loads all possible options for the site. Each option has a tick box to 'apply' access to, and once ticked, you can the grant access to it or leave unticked to restrict access.


mceclip4.png


Save the mappings when complete.

Impersonate the user or use the Access Permissions test in the same Infigo menu.

Setting Up and Using Reward Points on a Storefront


Infigo allows your customers to earn reward points and use them to get money off of their future orders. You can control when they earn these points, how many points they earn, and set the exchange rate between points and the store currency.

Configuration

Enabling the feature

To enable the reward points feature on your storefront, go to Configuration > Settings > Reward Points > tick the enabled box > click save. 


Configuration

The reward points feature offers the following settings that allow you to configure the feature to behave how you want it to:

Enabled:

This determines whether or not the feature is active.

Exchange rate:

This setting allows you to set the monetary value of reward points

Points for registration:

This sets how many points will be awarded to the user when they register.

Points for purchases:

This sets how many points the user will be awarded for making a purchase.

Awarded order status:

This allows you to control the status which the order must reach before the user is awarded their points. For example, if you set the order to "Complete" then they will be awarded the points when you mark the job as complete. Alternatively, if you set it to "Processing" then they will be awarded the points as soon as payment has been confirmed.

Cancelled order status:

This allows you to set the status used to determine if the points should be removed. By default this is set to "Cancelled" so that if a user cancels their order, they lose the reward points granted by that.


How they work

End users will find Reward Points in their My Account. They'll see how many points they've earned, the monetary value of their points, and the history of orders placed toward those points:


During checkout, the customer will be able to check "Use my reward points" and the monetary value of the reward points will be removed from the order subtotal. If their points cover the entire cost of the order, then payment will not be requested from the user. Otherwise, the user will pay for the rest of the order as normal.


Infigo Admin Users can manage a users' reward points in Customers > Customer Management > Edit the user and to go the Rewards Points tab 

Switching between B2B and B2C storefronts


Infigo allows the administrator to specify whether a storefront is protected by login (B2B) or open to the public to view all the full catalogue (B2C)

The change is a simple adjustment to each storefront.

Admin > Configuration > Settings > Customer Settings

Locate the setting Closed Store: Login Required. Tick this box if you wish to enforce B2B functionality. Leave it unticked if you wish to allow users to browse the store without login.

mceclip1.png

You may also wish to change the registration method. B2B sites generally do not allow registration. From the drop down list Registration Method select Disabled and the registration form will be removed.

Save all changes

Turn off all pricing on a Storefront


It's easy to globally disable all pricing on an Infigo Storefront. This is useful in scenarios where pricing is not a factor for the client of a particular B2B Storefront.

To activate this, navigate to your General Settings area of Infigo admin.

A setting will be available named "Hide all pricing on the storefront".

Activating this will reveal an additional option named "Hide add to basket button whilst prices are hidden". This is useful as an emergency measure, if you need to quickly disable the ability for new items to be placed in the basket and subsequently ordered.

Click Save to confirm the settings change.

This will not delete any of the pricing configuration you have performed on your Storefront, such as product pricing, shipping, taxes, etc. It simply hides it from front-end users whilst the setting is enabled.

What you need to know about the Storefront Status: Test Mode


When creating a new storefront it will be launched in "Test Mode". You will see a reference to this in Storefront Management and when logged in with your Platform Account, you'll see it alongside the storefront name on "Current Storefront". 

Here is an example from one of our Infigo Training platforms: 


Test Mode: 

  • allows you to build your storefront in a "testing" environment before going to live 
  • means you can easily remove test data (orders, users, etc) before moving to live 
  • gives you and your colleagues a clear indication as to which storefronts are live, and which need more work before they're ready for external use. 


Clearing Test Data 

When updating a storefront status to Live, you will be given the option to "Clear Test Data": 

You will be advised on the impact of doing this - "Are you sure you want to clear test data for your account? This will remove all test customers and orders from this storefront, the action cannot be undone.".

If you want to review users before clearing test data... here's how: 

  • go to Customer Management and click Edit on the customer you wish to keep after clearing test data. If the user does not have an admin role then you will have the option to Convert to Live (admin users will be 'live' by default). 
  • if you don't want to keep the user when you change storefront status, then don't convert them to live and they will be removed when you clear test data. 


When you're ready to clear test data (in Storefront Management), you simply click the button on the right hand side. Please make sure you're on the correct storefront before confirming - this change cannot be undone. 

The process will begin after you confirm you are sure you want to clear test data for your account. The process will show in the bottom right corner and once complete you'll get downloads of test orders (for your records). 


Switching Storefront Status to Live

So, you've cleared your test data and now you're ready go change the storefront status to Live.

  • Once again, you need to go to Storefront Management and find the storefront you want to update. 
  • Click on Edit on the right hand side 
  • Choose Live from the Status dropdown and click Live 

  • Then click on Update 


"All Products" header menu item which works with Access Permissions


We have some great help content (articles and videos) which will run through how to build category and subcategory menus using content templates. 


1. Create an "All Products" Parent Category (this would essentially just be a name for a regular category).

2. Go to the Display Settings tab and tick "show category navigation" in this and all child categories you create under this parent. (The hint explains: enabled this to show the category navigation side menu for this category. Please switch the page to a 1 column layout if you're using 2 column layout).  
 

When this is enabled, the user will see all categories they have access to on the left hand side of the page.  


3. If you wanted to fill the empty space on the right hand side of the page (the all products category with with categories based on their access permissions, then you can link the categories to the "all products" category using the Parent Category option within the category like so: 


“Download Fixed PDF” for Multipart Products with Fix Pitstop Profiles


This feature allows you (or your customers) to download a processed or auto-fixed version of each PDF associated with a multipart product before placing an order. Traditionally, you might only see the final output file after checkout, but now you can review, approve, or share the corrected PDF immediately—especially helpful for ensuring print-ready accuracy when multiple parts need to be merged into one document.


1. Access the Product Settings

  1. Log In to Your Admin Area
    • Go to your platform’s admin portal and sign in with your admin credentials.
  2. Locate the Multipart Product
    • From your product list, open the multipart product on which the fix Pitstop Profile operates.


2. Enable the Setting in Multipart Configuration

  1. Open Multipart Configuration
    • Within the product’s settings page, find and click on the Multipart Config.
  2. Enable “Allow download of corrected files”
    • Look for the checkbox or toggle labeled Allow download of corrected files.
    • Select this option to turn it on.
  3. Save Changes
    • Click Save or Apply to confirm your changes.

What This Does
Enabling this setting lets users download any auto-fixed (corrected) PDF. If multiple files are uploaded, the platform can also merge them into a single combined PDF for download.


3. Configure or Verify PDF Fix Profiles (Optional)

If you want the system to automatically correct files when they’re uploaded, you will need to attach an applicable Pitstop Profile.

Further details on this process can be found here.

What This Does
A Fix Profile attempts to correct PDF issues immediately upon upload, so users can quickly see and download a ready-to-go file.


4. Upload & Auto-Fix the Files (User Perspective)

  1. Open the Product Page
    • From the storefront, go to the multipart product you just configured.
  2. Upload PDFs
    • Upload one or more PDFs for each “part” required.
  3. Fix Profile Triggers
    • If the uploaded PDF triggers any errors, the Auto-Fix process runs (if enabled), or prompts the user for manual fixing.
  4. See the Corrected Filename
    • Once fixed, the system appends a suffix like _{FixProfileName}.pdf to show it’s the corrected file.


5. Download the Fixed PDF

  1. Find the Download Button
    • After a successful fix, a Download button appears on the upload success screen.
  2. Verify the Content
    • Open the downloaded file to confirm everything is correct before proceeding.

What This Does
The Download button provides an immediate preview of the “print-ready” file, letting you quickly review or get final approval without waiting until checkout.


6. Proceed to Checkout (If Applicable)

  • After confirming that the PDF is correct, add the product to your cart and check out as normal.

Why This Is Helpful

  • Immediate Proofing: Quickly verify your PDF is print-ready and correctly fixed.
  • Approval Process: Stakeholders can review or sign off on the corrected PDF before placing an order.
  • Easier Management: If you have multiple parts, download one merged file to see the full picture in a single PDF.

A Summary of all Email Message Templates


Infigo allows you to customise the email message block that is sent to Admin / Customers.

This can be found in Content Management > Email Message Templates.

mceclip0.png

The list below briefly details each template's use.

*Please note that the message tokens displayed above each template are NOT all valid against every template.  Example for Approval workflow templates: ONLY Tokens that are denoted by "%Store./%Customer./%Product./%ProductVariant./%Workflow. "  We advise that you place Test orders when you change your message content from the default to ensure that the info returned is accurate for your needs*

Approval Workflow Approved Email - email sent when approver approves a job (sent to customer placing original order)

Approval Workflow Rejected Email  - email sent when approver rejects a job (sent to customer placing original order)
Approval Workflow Resubmitted Email - email sent when customer resubmits a job for approval (sent to approver)
Approval Workflow Submitted Email - email sent to the approver when a job requires approval (once a day send)
Approval Workflow Submitted Instant Email - email sent to the approver when a job requires approval (sent instantly)
Blog.BlogComment  - we currently do not support blogs
Customer.BackInStock - notification that a product that is out of stock is now in stock. so backorders will be fulfilled (sent to customer)
Customer.EmailValidationMessage  - If registration requires validation, the email that is sent to customers to validate themselves
Customer.NewPM - we currently do not support PM
Customer.PasswordRecovery - Sent to a customer when they click the forgotten password link
Customer.WelcomeMessage  - sent to a customer on successful registration
Forums.NewForumPost
Forums.NewForumTopic - We do not currently support forums
GiftCard.Notification - We do not currently support giftcards
NewCustomer.Notification - Sent to store admin when a new customer successfully registers
NewReturnRequest.StoreOwnerNotification  - we do not currently support store returns
News.NewsComment  - We do not currently support forums
NewsLetterSubscription.ActivationMessage
NewsLetterSubscription.DeactivationMessage - Sent to users when signing up or unsubscribing to the newsletter through the newsletter module
NewVATSubmitted.StoreOwnerNotification - We do not currently support customers changing VAT levels
OrderCancelled.CustomerNotification - as described
OrderCompleted.CustomerNotification - as described
OrderDelivered.CustomerNotification - as described
OrderPlaced.CustomerNotification - as described
OrderPlaced.StoreOwnerNotification - as described
OrderShipped.CustomerNotification - as described
PrePayOrderCompleted.CustomerNotification - notification to a customer that an order for prepay top up is complete
Product.ProductReview  - notification to the Administrator of a review placed on a product
QuantityBelow.StoreOwnerNotification - Stock level warning when a products stock drops below a threshold. Sent to Admin
ReturnRequestStatusChanged.CustomerNotification - We do not currently support return requests
Service.EmailAFriend - The email template sent when a customer chooses to recommend to a friend
Wishlist.EmailAFriend - Wishlist not currently supported

Accepting Additional Asset File Types in Multipart Upload Products


Multipart products have always been the “upload-your-file” option in Infigo. Historically, the default configuration only guaranteed support for PDF (and, if a storefront-wide toggle was enabled, common image types).
As of April 2025, the XML schema for the latest iteration of the MultiPart UI recognises type="asset" parts plus an AllowedMimeTypes list, letting you specify exactly which formats the storefront will accept—PSD, AI, EPS, JPEG, PNG and more—without altering the customer interface.


2. Essential XML Elements

Node / Attribute Required? Purpose
<PartConfiguration type="asset" mode="asset" … /> Yes Tells the UI this upload area is a fixed artwork file (“asset”).
<AllowedMimeTypes> Optional Comma-separated extensions and/or MIME strings. If omitted, storefront falls back to its global default (normally PDF + any globally-enabled images).
<Usage type="range" min="…" max="…"/> As needed Sets min/max uploads for this part.
previewModeType="normal"
confirmPreview="False"
Yes Asset parts never generate live previews, so keep preview disabled and confirmation off.

3. Complete Sample Snippet

Paste the block below into the config of your Multipart Configuration (or extend an existing script).


<?xml version="1.0" encoding="utf-8"?>
<Configuration previewModeType="normal" confirmPreview="False">
    <!-- NEW: define an asset part -->
    <Parts>
        <PartConfiguration type="asset" mode="asset" name="upload"/>
    </Parts>

    <!-- Make the part visible to shoppers -->
    <InputItems>
        <InputItem type="part">
            <ItemInfo>
                <InternalName>upload</InternalName>
                <UIName>Upload your artwork (89 mm × 59 mm with 2 mm bleed)</UIName>
                <UIDescription>Accepts PDF, AI, PSD, EPS, JPG or PNG.</UIDescription>
            </ItemInfo>
            <ItemContent>
                <PartName>upload</PartName>
                <Usage type="range" min="1" max="10"/>

                <!-- NEW: extended file-type list -->
                <AllowedMimeTypes>
                    .psd,*.pdf,application/pdf,
                    .jpg,.png,image/jpeg,image/png,
                    .ai,application/postscript,.eps
                </AllowedMimeTypes>
            </ItemContent>
        </InputItem>
    </InputItems>

    <!-- Basket sequence -->
    <Order>
        <OrderItem>upload</OrderItem>
    </Order>
</Configuration>

Need fewer formats? Delete any entry inside <AllowedMimeTypes>.
Happy with PDFs only? Remove the <AllowedMimeTypes> node entirely and the product reverts to the storefront default.


4. Quick Test Checklist

  1. Open the product and start the Multipart UI.

  2. Upload each file type in the list you have provided—UI should accept them.

  3. Try an unlisted type (e.g. DOCX)—UI should block it.

  4. Click Add to Basket; no preview step should appear.

  5. Verify existing PDF-only Multipart products still work.


For further XML guidance, see the Multipart Product Config Builder tool (currently in beta) in the Infigo Academy.

By inserting the single type="asset" part and listing your new AllowedMimeTypes, you unlock wider file support across every Multipart Upload product—no extra UI work required.

Add a new Customer Role


After reading about the system generated customer roles, you can also add your own customer roles. 

1. In admin go to Customers > Customer Roles.

The Customer Roles page is displayed.

mceclip0.png


2. Click on Add new.

The Add customer role page is displayed.

mceclip1.png


3. Enter the following details:

Option Description
Customer Role Info
  • Name* - Enter the name for the customer role.
  • System name* - Enter a system name for the customer role. 
  • Free delivery - Select this option if you want to enable free delivery option for this customer role.
  • Tax exempt - Select this option if the tax is exempted on this customer role.
  • Active - Select this option if you want this customer role to be in active state.
  • Is system role - Set to false by default.

*Please Note these options are required


4. Click Save.

The new customer role will be added, and then can be assigned to any user. 

For access permission changes to new roles, please submit a support ticket explaining what you would like the person to be able to do, and the support team will update the permissions. 

Add Avatar to Variable products


Catfish now allows you to create an image field that can contain an avatar from customers. As a storefront Administrator, Please follow these steps.

1) Open the PDF that requires customer's avatar
2) Create an image field (Example: ProfilePicture)
3) Navigate to Field Information -> Properties
4) Click on Add

5) Define the new Property and match the settings below (Be sure to copy the name "PrepopulateDataFrom" exactly as seen below. With spelling and capital letters).

mceclip0.png

Then add "Avatar" into the "PrepopulateDataFrom" field you just created.

mceclip1.png


6) Now navigate to Image Settings and select the settings seen in the picture below:

mceclip2.png


7) Click OK and save this document. You're file should now support your Avatar.


As Administrator, you also need to make sure the Avatar feature is enabled in Catfish. Navigate to Configuration -> Settings -> Customer Settings and check "


Once this feature is enabled for Front End users, they need to upload their avatar under My Account -> Avatar.


You will know if it worked successfully if you Avatar automatically loads into the image field. 

Add or Edit Purchase Order (PO) Number in Admin Order Details


You can add or edit a PO number to an order after it’s been placed, or clear it if needed. The action button automatically adapts to the state of the field:

  • If the order has no PO number: you’ll see Add PO.

  • If the order has a PO number: you’ll see Edit.

This is useful when a PO wasn’t captured during checkout (for example, if the selected payment method doesn’t require a PO number) but needs to be recorded later for invoicing or procurement.


Use Cases

  • A customer provides a PO number after checkout (e.g., via email) and you need to record it on the order.

  • The selected payment method didn’t require a PO number, but finance needs one for billing.

  • The PO number was entered with a typo and needs correction.

  • The PO requirement changed after order placement, and you need to add or remove it for compliance.


Step-by-Step Implementation Guide

Add a PO number to an order that doesn’t have one

  1. In Admin, go to Sales > Orders and open the order.

  2. In Order Details, find the Purchase Order (PO) Number section.

  3. Click Add PO

  4. Enter the PO number.

  5. Click Save.

    • The PO number is stored on the order.

    • The button changes from Add PO to Edit.

Edit an existing PO number

  1. Open the order in Sales > Orders.

  2. In the PO Number section, click Edit.

  3. Update the PO number.

  4. Click Save.

    • The updated PO number is saved.

Remove a PO number (return to “Add PO” state)

  1. Open the order and click Edit in the PO Number section.

  2. Clear the PO number field.

  3. Click Save.

    • The PO number is removed.

    • The button reverts to Add PO.

Add order line data to packaging slip


Infigo supports the ability to populate a field in your packaging slip with order line specific data.

This data includes both text and images and can be achieved through naming fields in Infigo Designer whilst following a specific naming convention which varies depending on the field.

Attributes

The naming scheme for getting text, and subsequently attributes, from an order line is OrderLineText_X_Y where X is the order line index, with the first order line at index 0 and the order lines which follow incrementing by 1 per line, and Y being used to select which attribute you would like to populate the field with.

For example, if there was an attribute called "Hazardous" which would be used to determine whether a package contains hazardous content, and you wanted to display this attribute for the first order line, you would target it by naming the text field OrderLineText_0_AttributeCFPARAMETERHazardous. This can be shown in the screenshot below.

If you wanted to do so for the second order line then you would use OrderLineText_1_AttributeCFPARAMETERHazardous and continue incrementing the number used in place of X for each order line.

Note: AttributeCFPARAMETER comes from how you pull a specific attribute from the Attributes field. You would normally do this by Attribute:SpecificAttribute but as the names of fields in a PDF cannot contain the character ":" this is worked around by using CFPARAMETER in its place.

Below is an example of both the setup and the output of a packaging slip which I have made following the instructions above.

Setup:

Output:

The order I placed to perform the above test contained two order lines of the same product. The first one had the attribute "Hazardous" set to "Yes" and the second had it set to "No", both of which have successfully pulled through to the output.

As you can see, the output of the third field is "---", this is because I only had two order lines in the order this packaging slip was created for and so I am referencing an order line which doesn't exist, resulting in the placeholder of "---".


Thumbnail Image

To import a thumbnail image onto the packaging slip, you need to create an image field and name it using the naming convention OrderLineImage_X_Y, where X is the order line index and Y is the index of the order line thumbnail you want to get the thumbnail for. If Y is left empty, it will default to the first available thumbnail.

For example, if you wanted to get the thumbnail image for the third item in the first order line you would name the image field OrderLineImage_0_2

Or if you wanted to only get the first available thumbnail for the third order line then you would name the image field OrderLineImage_2. An example of this can be seen in the screenshot below.

Below is an example of both the setup and the output of a packaging slip which I have made following the instructions above. Note: I edited the packaging slip used for the first example so it will contain the same fields that were present in that one.

Setup:

Output:

As you can see in the screenshot above, the image fields I have created have populated with a low-resolution preview of the products I have added to this order. I have not assigned the "Hazardous" field to the products used for this packaging slip so, as you can see in the output, it has filled all three fields this time with the placeholder "---"

Note: The products used in this test only contained "Packaging Slip Test:" followed by the name I used when creating the field to make it easier to identify which field was which.

Add RecordCount Attribute


The RecordCount attribute is implemented to give users transparency on the file they have uploaded; to display the number of records that have been recognised as records from the uploaded file in case of any errors in the file.

There are four steps to adding the RecordCount Attribute to your products:

1. On EVERY product you wish to have a RecordCount attribute add the following configuration to the attributes tab in the Product Variant section (right-click on image and select 'Open image in new tab' in case example is too small).

2. Once the attribute has been added on the product level you need to set up the script. Go to Catfish > Other > Custom Scripts and create new using the green tick and insert the script by clicking 'Edit' and pasting in the below as plain text:

var numItems = 0;
if(Item.IsBatch) {
if(Item.NumberOfRecords > 0)
{
numItems = Item.NumberOfRecords;
}
}
Item.setAttributeValue("RecordCount", numItems);

return Item.Price;


3. Enable the setting Configuration > Settings > Shopping Basket Settings > Show Batch Record Count (see below)

Add Shipping Info to Order Emails with %Order.ShippingInformation%


The %Order.ShippingInformation% email token inserts a customer’s shipping details into order emails.

  • Single address (primary focus of this article): The token compiles the shipping address by pulling from all existing %Order.Shipping...% placeholders. It includes only non-empty values and separates each line with <br/>.

  • Multiple addresses (also supported): When an order ships to multiple addresses, the token outputs a structured, readable summary. The invoice shows human-readable text, while the email includes a grouped HTML table built from the checkout “Info” attribute. Column headers are localizable and the first column header is Product (updated from “Type”).


  • If you need a full, multi-address workflow guide, see:

👉 Shipping to Multiple Addresses (Infigo Academy)


Key Settings

  • Email token%Order.ShippingInformation%
    Adds the shipping details block to the email body.


Use Cases

  1. Standard single-address orders (primary): Include a clear shipping block in “Order Placed” emails when customers ship to one address.

  2. Multi-address orders (optional): Summarize items per product and destination address in a localizable table.

  3. See: Shipping to Multiple Addresses


Step-by-Step Implementation Guide

1) Add the token to your email template

  1. Go to Email Message Templates.
  2. Search for your Order Placed email template.
  3. Edit the template and set it to Active (if not already).
  4. In the list of order tags (alphabetical), find %Order.ShippingInformation%.
  5. Insert it near the end of your email body
  6. Save the template.

2) Test with a shipping address

  1. Impersonate a user (or place a real test order).

  2. Add one or more items to the basket.

  3. Proceed through checkout using a single shipping address.

  4. Place the order.

  5. End impersonation and go to Message Queue.

  6. Open the most recent message for your order and Edit to view the Body.

  7. Scroll to the bottom and confirm you see a neatly formatted shipping block:

    • Address lines are separated by <br/>.

    • Only non-empty values are included (no empty lines).

Adding a custom binding to your storefront


This article will help explain the process of how to add a new URL to your storefront. If you also plan on obtaining an SSL to secure your site, we have to complete the binding first. You can read this article on the steps for implementing an SSL if you would like to obtain a certificate for your new domain. 

Please note, that implementing a new binding will accrue the following charge:

UK: £15 + VAT / USD $18 / €18 / AUD $30 / CAD $26

Pre-Requisites

Prior to raising a ticket for us to configure a domain binding for you, you will need to have purchased your domain so that you can configure your DNS.

A majority of our customers purchase their domains through GoDaddy or 123Reg, but please use whichever service you prefer.

What We Need

When raising a ticket for configuring a new domain, please be sure to provide the following:

  1. Current Storefront URL (e.g. yourCompany.infigosoftware.com/storefrontName)
  2. New domain URL.

The Process

  1. After raising a support ticket with the above information, a support team member will raise a formal task to our development team to implement this new domain against the storefront requiring this binding.
  2. When the binding has been applied to your site, it will be part of the the next release. We deploy every 2 weeks and the agent will inform you of when you can expect your binding to be live on your storefront. Note: This task will need to be raised to the development team a few days prior to one of our releases otherwise it will have to be included in the next release.
  3. Once released, the support team will provide you a CNAME record to point this new domain towards. Note: This must be configured in your DNS. This is not a task Infigo can carry out as it is something you need to do with your hosting provider. 


Please Note:


This process can take up to 2 weeks to complete.

Adding a Product to Infigo


Browsing Products

Login to the storefront you wish to add a product to.

Choose Catalogue > Products > Product Management

mceclip0.png


The Product management page shows all products currently created in your Storefront. You can search for an already created product using the search utility at the top, browse through the list and locate it below, or create a new Product by clicking Add New in the top right.


mceclip1.png


Adding Products

  • Give the product a name which identifies it on the customer site.
  • Short and long descriptions can be used to populate details about the product for customers browsing through.
  • Populating admin comments allows details to be published to a job ticket about the file, but remain hidden from the customer.


mceclip2.png


  • Once completing the form, click Save and Continue in the top corner.
  • Use the tabs along the top to choose Category Mappings.
  • Assigning the product to a Category allows users to browse the categorized list of products easily from the front end website.
  • Add a New Record.
  • Choose a Category from the drop down list. Choose Insert to save your selection. If you have no Category setup, you can follow the guide here to administer Categories.
  • You can add a product to multiple Categories. Simply repeat the steps above, selecting a different Category from the drop down each time.

mceclip3.png


Your product will now appear in the Category list on your website. 

This is the quickest way to add a product. If you would like to adjust the Product further the following links allow you to:

Setting a Product Variant

Add a Variable PDF to a Product

Adding Additional Delivery Instructions/Attribute to Checkout


It is possible to use Infigo to allow your customers to add additional delivery information during the checkout process. This can be achieved through the use of a Checkout Attribute.

To create a checkout attribute, navigate to:

Catalogue > Attributes > Checkout Attributes and click the 'Add new' button

mceclip0.png


You are able to define the checkout attribute in what ever way you wish using the same control types and text prompt method as product attributes, however for this demonstration I will keep the attribute as simple as possible.

mceclip1.png

The only settings you need to change are:

Name: What administrators will be able to see

Text PromptThis is the text that will appear adjacent to the text box

Control Type: You will want to change this to either 'Textbox' or 'Multiline Textbox'. For this demonstration, I will be using 'Multiline Textbox'.

Your settings should look something like the screenshot below, and if they do then click 'Save' and your attribute will be saved. 

mceclip2.png


Once you have saved this attribute, your customers will be able to see a box similar to the one in the screenshot below when they go to checkout.

mceclip3.png

Whatever your customer puts in the text field will be visible in the Sales > Orders page if you click View then go into the Products tab of their order's details, it will appear on any reports produced including this order and will also be included in any emails you may have setup which include the %Order.Product(s)% tag.

Adding Addresses to Departments


This article will explain how to add addresses within departments, so that the addresses are available for all users under that department. 

***

Department addresses can be added by creating the department, expanding it by clicking on the + sign, and then scrolling down to the 'Addresses' section:

mceclip0.png

Click on 'Add Address' and enter the information > click Save.

mceclip1.png


Once you've added all of your addresses go to Configuration > Settings > Customer Settings, scroll to 'Billing and Delivery Address Configuration'​ and enable 'Include department addresses on billing and delivery selections:'

mceclip2.png

This will allow users to see the department addresses, and they will be able to add and access their own addresses.

Adding Custom Fields for Customer Data


When customers register with your storefront, they are presented with preset data fields - if you wish to enable more additional fields there are 3 extra fields that can be used.

Setup

Store Administrators can enable these in admin:

1. Log-in into your storefront using your Storefront Administrator account, then go to Configuration > Settings > Customer Settings.


2. Scroll down to the bottom of the page where "Display Custom fields" is located. Depending on your need, you can check all three extra fields.

mceclip0.png

These will now appear on the front end new registrations tab, the "My Account" details section. and in Admin for the users details.


3. To change the name of the custom fields, go to Configuration > Languages > View string resources

mceclip1.png


4. Click on the filter icon located above the Value table and use the search type "Contains" to look for the custom field strings, type in Custom Field, then click the filter button:

mceclip2.png


5. Now you can change the value of each field as required by clicking Edit.

mceclip3.png

Adding Images in Symphony Product Editor


The 'Add Image' function on Symphony is different depending on whether you are the customer modifying the product (Figure 1) or the administrator creating the product (Figure 2)


(Figure 1: Front-End)

As a customer modifying the product you can insert images from your albums stored in My Account > Album Management or by copying the image URL into the field at the top of the popup

(Figure 2: Back-End)

If you are creating the product then images will need to be added via URL only. The best way to do this would be to upload images to your storefront through Catfish > Email > Email Resource Upload (Figure 3)


(Figure 3: Image Upload)

Once you have selected and uploaded your file right-click and copy the image address (Internet Explorer - Copy Shortcut, Firefox - Copy Image Location) and paste this into the Add Image via URL field. Click Ok and the editor will fetch the image to display on your product

Adding Mask Layers on PDF document via Infigo Designer


Infigo Designer gives you the ability to create image fields that can act as overlay mask where you can overlay an image field with a transparent image on top of the actual image field.

1) Create a transparent .png in Photoshop, which will be used in the masked image field. Please ensure this PNG is 300dpi and the dimensions are the same as the field you are going to place it into.


2) Create the actual image field and position it on the document where it needs to be.


3) To create the mask with the same coordinates (X, Y, Width and Height), copy the image field and Paste (Preserve Position).

a) Copy the image field

b) Paste the image field using Paste (Preserve Position)


P.S: The copied image field is now positioned on top of the image field created at step 2.


3) Once the mask field is copied/created, Use the infigo designer selection tool and double click on the image and navigate to Field Information -> Properties and make sure OverlayMask and readonly are ticked.


4) Upload the mask into the image field under images settings -> Image selections:
1. Use “Select” to locate the mask1 on your machine
2. Once the mask is located click on Embed Now to embed the mask.

Adding Meta Title, Keywords and Description


Metadata is data (information) that provides information about other data.

Metadata will not be displayed on the page but is machine parsable so can be used by browsers, search engines or other web services to understand more about the page they are displaying.

The common meta tags use on web pages and those supported in Catfish are Description and Keywords.

Description:

Sometimes used by search engines as the descriptive black text in the search result listing, meta descriptions can help increase the customer click through in search results but will not necessarily impact rankings directly.

Keywords:

Although Meta keywords ceased to impact rankings in 2009, people still use them, albeit with caution.

Title Tags:

Title tags are still the single most important piece of metadata on the page. 

The best title tags begin with the most relevant keywords, product name, or article name and end with the name of the site


To set these up on your Catfish storefront you have a number of options.

Storefront wide:

Under Configuration > Settings > General and Miscellaneous Settings : SEO settings tab, you have a number of options to configure.

Page title separator is as the name suggests the the character (or series of characters) that you wish to use to separate your page titles.

Default title will appear as the page title on ALL your website pages, so think carefully before adding text here.

Default meta keywords will get appended as the keyword meta data your ALL your website pages.

Default meta description will get appended as the meta description on ALL your website pages.

Home Page Meta Title allows you to set the page title for just your websites home page. A new setting we added recently in order to provide you with more flexibility.

Home Page Keywords are keywords, again that you can setup just for your website homepage

Home Page Description is the description that you can write that will only populate the home page meta description


As well as these default SEO settings, you will also find a SEO tab on your category pages, product pages and topic pages that give you complete control over the meta data that gets used on each of your pages.


To note: If you do not want the same meta data to be used on all your pages then leave the Default entries blank. Enter in the text for your homepage and then ensure that each of your product, category and topic pages have custom entries for Title, Keyword (if you wish to use it) and Description.

HubSpot CRM Integration for Order Tracking


The HubSpot CRM integration allows you to automatically synchronise Infigo customer and order information with your HubSpot environment.
When configured, Infigo uses a MegaScript to connect with the HubSpot API — creating or updating contactsdeals, and related records whenever an order is placed.

This ensures your sales and marketing teams can track live order progress directly in HubSpot without manual data entry, maintaining a single, accurate source of truth between systems.


What’s included

  • new integration workflow between Infigo and HubSpot CRM

  • Ability to create or update contacts, deals, and orders automatically

  • Integration built on MegaScripts, giving you full control over mapping and behaviour

  • Support for affiliate-based deal naming and linking

  • Configurable success and error handling pages


Key settings

  • MegaScript trigger: Set to run On Place Order so HubSpot receives data when orders are confirmed.

  • HubSpot Properties: Define mapping for deal and contact objects (pipeline, deal stage, owner ID, etc.).

  • Affiliates: Links orders to affiliate data for structured deal naming and tracking.

  • Plugin Connection: Managed through Connect: Scripting to tie your MegaScript instance to storefront events.


Use cases

  • Sales automation: Automatically create a HubSpot deal whenever a customer places an order.

  • Customer management: Keep customer and contact details in sync between HubSpot and Infigo.

  • Marketing visibility: Give sales and marketing teams a unified view of order status and pipeline performance.

  • Affiliate tracking: Use affiliate links to group deals or attribute them to sales partners.


Step-by-step implementation

Step 1 – Create the MegaScript

  1. Ask our support team for the needed MegaScript and they will provide this. Then go to Admin → MegaScript Management and click Add New. Create a new script using the MegaScript our support team provided.

  2. Navigate to Admin → MegaScript Instances and create a new instance based off of the script you created above
  3. Choose Trigger on Event and set it to Place Order.

  4. Enter your configuration JSON, including HubSpot connection details, for example:

     
    {
    logLevel: 4,
    pluginSystemName: 'mis.scripting',
    hubSpotProperties: {
    deal: {
    pipeline: 'default',
    dealStage: 'closedwon',
    associationCategory: 'HUBSPOT_DEFINED',
    associationTypeId: 3,
    // hubspot_owner_id: xxx,
    },
    contact: {
    // hubspot_owner_id: xxx
    }
    }
    }
  5. Save the MegaScript.


Step 2 – Connect the MegaScript to your storefront

  1. Navigate to Connect Plugins → Connect Scripting.

  2. Select your storefront and assign the MegaScript you just created to the Place Order event.

  3. Save changes.


Step 3 – Set up affiliate tracking (optional)

  1. Go to Admin → Affiliates and create a new affiliate.

  2. Copy the generated affiliate URL.

  3. Share this URL or use it in campaigns — orders placed through it will automatically link to the affiliate ID.


Step 4 – Test the integration

  1. Place a test order in your storefront.

  2. In HubSpot, verify that:

    • contact is created or updated for the customer’s email address.

    • deal is created in the correct pipeline and stage.

    • The deal name matches your affiliate or customer mapping.

  3. Confirm no duplicate records are created.


Step 5 – (Optional) Customise error handling

  1. Use the success and error configuration options in your MegaScript to display different pages depending on API response.

  2. This helps provide clear messaging to users or trigger internal notifications if synchronisation fails.


Tips & best practice

  • Test your configuration with a sandbox HubSpot account before going live.

  • Keep API credentials secure — do not hardcode keys in plain text.

  • Review HubSpot rate limits if you expect high order volumes.

  • Use MegaScript logging (logLevel 4) for detailed troubleshooting.

Pricing Scripts for Checkout Attributes


Previously, pricing scripts could only be attached to products.
With this enhancement, scripts can now be assigned to checkout attributes, such as delivery options, service levels, or gift-wrapping choices - so that selecting an option during checkout can automatically update the basket total.

This gives greater flexibility in how pricing is handled across the entire checkout process, especially for storefronts that require surcharges, discounts, or conditional fees unrelated to individual products.


What’s included

  • Ability to assign pricing scripts to checkout attributes

  • Live recalculation of basket totals when attribute values change

  • Optional debug/output display via info-type attributes

  • Support for applying both fixed and percentage-based adjustments


Key settings

  • Target Scope: determines where the script will run. Select Checkout Attributes to trigger pricing logic when a checkout field changes.

  • Pricing Script: links your script to a specific attribute. Found under Admin → Checkout Attributes → Edit.

  • Debug Mode: optional setting that outputs live script results in-basket for testing and verification.


Use cases

  • Add a surcharge for “Express Delivery” or “Same-Day Dispatch.”

  • Offer a “Gift Wrap” service for an additional fee.

  • Apply a discount when a customer selects “Eco Packaging” or “Digital Delivery.”

  • Introduce donation or tip fields that modify the basket total automatically.


Step-by-step implementation

Step 1 – Create or edit a pricing script

  1. Go to Admin → Pricing Scripts.

  2. Click Add new or edit an existing script.

  3. Write your pricing logic as required.

  4. Set Target Scope to Checkout Attributes.

  5. Save the script.


Step 2 – Assign the script to a checkout attribute

  1. Navigate to Admin → Checkout Attributes.

  2. Select an existing attribute or create a new one.

  3. In the Pricing Script field, choose your newly created script.

  4. Save the attribute.


Step 3 – Test your configuration

  1. Add any product to your basket and proceed to checkout.

  2. Change the linked checkout attribute (e.g., tick Gift Wrap).

  3. Confirm that basket totals update immediately.

  4. (Optional) Enable debug mode to view live calculation results.

Advanced Customer Name Field Controls for Registration or Updating Account


Administrators now have fine-grained control over whether customers must enter a first and/or last name when registering or updating their account.
This helps storefronts adapt to different market needs, such as B2B sites where company data is the priority or B2C sites that require full personal details.

Highlights

  • Four new settings: first/last name enabled and required
  • Applies on registration and “My Account” pages
  • Simplifies compliance with varied onboarding policies
  • Reduces friction for corporate or anonymous-checkout workflows

How to implement

  1. Go to Admin > Settings > Customer Settings.
  2. Enable or disable the options for First Name and Last Name (both Enabled and Required states).

Save changes and test on the storefront registration and “My Account” pages.

Administrators now have fine-grained control over whether customers must enter a first and/or last name when registering or updating their account.
This helps storefronts adapt to different market needs, such as B2B sites where company data is the priority or B2C sites that require full personal details.

Hebrew Language Support for PitStop XML Reports


Previously, PitStop XML reports could only display English or Latin-based characters, meaning localized messages from pre-flight or profile checks were not always readable.

This enhancement introduces automatic translation support for PitStop XML output — including full Hebrew character support.
When enabled, the system translates the XML text content into the configured language so reports remain clear and usable for non-English operators and clients.


What’s included

  • New XML Translation Support option added to PDF Profile Settings

  • Ability to translate all XML report content, including non-Latin scripts (e.g., Hebrew)

  • Automatic character-encoding handling to prevent corrupted text

  • Integration with external translation services via API key


Key settings

  • XML Translation Support
    Located in Admin → PDF Profiles → Profile Settings.
    Enables automatic translation for PitStop XML report text.

  • API Key
    Required if you use an external translation service.
    Enter this in the same settings area to authorize translations.

  • Language Selection
    Controlled by your storefront’s default language or configured per profile.


Use cases

  • International production environments: Ensures operators in non-English markets can review PitStop errors and pre-flight messages in their native language.

  • Client-facing reports: Present pre-flight feedback in the same language as the customer’s storefront.

  • Localization testing: Validate that generated PitStop XML files retain full readability for right-to-left scripts such as Hebrew.


Step-by-step implementation

Step 1 – Access PDF Profile Settings

  1. Go to Admin → PDF Profiles.

  2. Select the profile you want to modify and click Edit.

  3. Locate the Profile Settings section.


Step 2 – Enable XML translation

  1. Find the XML Translation Support toggle.

  2. Enable the setting to activate translation for PitStop XML reports.


Step 3 – Enter your API key (if required)

  1. If you are using an external translation service, locate the API Key field.

  2. Enter the key provided by your translation service or administrator.

  3. Save changes.


Step 4 – Verify translation

  1. Generate a new PitStop XML report using the modified profile.

  2. Open the report and confirm that all text, including Hebrew characters, appears translated and readable.

  3. Validate that no encoding errors or missing symbols are present.


Step 5 – Test with multiple languages (optional)

  • Switch your storefront’s language to another supported option (e.g. French, German, Hebrew).

  • Run another test to confirm correct translation output for each language configuration.


Tips & best practice

  • Always test new translations in a staging environment before enabling them in production.

  • Keep your API key secure — avoid sharing or embedding it in scripts.

  • Confirm that the PitStop profile name and XML encoding remain UTF-8 to preserve character integrity.

  • When generating client-facing reports, ensure the storefront and PitStop report language align for consistency.

Simplified PDF-Profile Variable Management


Previously, configuring variable sets in PDF Profiles required complex manual editing of XML files or switching between Simple and Advanced modes.
This update replaces those modes with a single, intuitive interface.

Administrators can now upload an existing .evs variable set or paste the variable-mapping JSON directly into the editor.
When you save, Infigo automatically validates the structure and generates the .evs file required by the PDF Profile.

This streamlines setup, reduces XML errors, and makes it much easier to manage variable mapping between products and PDF Profiles.


What’s included

  • New Edit XML Source toggle for advanced users

  • Support for uploading an .evs file directly

  • Ability to paste JSON mapping data into the editor

  • Automatic generation of a valid .evs file on save

  • Built-in validation for uploaded or pasted data

  • Cleaner, single-page workflow for variable-set management


Key settings

  • Edit XML Source:
    Enables direct editing or pasting of JSON/EVS content.

  • Upload EVS File:
    Lets you import an existing variable-set file from your computer.

  • JSON Mapping Area:
    Paste JSON directly; the system will convert and generate the .evs file automatically.

  • Save & Validate:
    Runs internal checks to ensure the structure is valid before applying changes.


Use cases

  • Simplify configuration: Non-technical admins can now set up variable sets without XML knowledge.

  • Reuse templates: Upload existing .evs files from another profile or environment.

  • Speed up development: Copy JSON directly from external tools or documentation to instantly generate .evs files.

  • Reduce human error: Automatic validation ensures all variable data is properly formatted.


Step-by-step implementation

Step 1 – Open or create a PDF Profile

  1. Go to Admin → PDF Profiles.

  2. Select an existing profile or click Add new.


Step 2 – Access the variable-set section

  1. Scroll to the Variable Set / Job Ticket area.

  2. Locate the Edit XML Source toggle.

  3. Switch the toggle on if you want to view or paste mapping data manually.


Step 3 – Choose your preferred input method

Option 1 – Upload a file:

  1. Click Upload EVS File.

  2. Select an existing .evs file from your local drive.

  3. The system validates and loads it automatically.

Option 2 – Paste JSON data:

  1. In the source editor, paste your JSON variable mapping.

  2. Click Save — Infigo will validate the content and automatically generate the corresponding .evs file.


Step 4 – Save and validate

  1. Click Save.

  2. The system runs validation to confirm the structure and generate or update the .evs file.

  3. Check for any validation or conversion messages at the top of the screen.


Step 5 – Test your profile

  1. Assign the PDF Profile to a product.

  2. Generate a test output file.

  3. Confirm that all variable data maps correctly into the resulting PDF.


Tips & best practice

  • Keep a backup of your original .evs files before editing.

  • Use the Edit XML Source toggle sparingly — only when pasting or reviewing mapping data.

  • Always test generated .evs outputs on a sample product before production use.

  • When moving profiles between environments, export the .evs for consistency.

Multipart Preview Now Supports TrimBox and More


Previously, multipart previews were always generated using the MediaBox area of a PDF, which represents the full physical page including bleed and trim areas.
In this release, you can now specify which page box to use when generating multipart previews — providing a more accurate and consistent view of how your artwork will appear after trimming or finishing.

This enhancement benefits production teams that rely on precise on-screen previews to validate layout, bleed, and cropping accuracy before printing.


What’s included

  • New configuration optionpreviewPageBoxOption in multipart product setup.

  • Support for the following PDF page box types:

    • TrimBox – The final trimmed page area.

    • CropBox – The visible portion after cropping.

    • BleedBox – The area including bleed beyond the trim line.

    • ArtBox – The content or artwork area.

    • MediaBox – The full physical page (default).

  • Backward compatibility: defaults to MediaBox if no value is set.


Key settings

  • previewPageBoxOption
    Found in the multipart configuration XML of a product.
    Defines which page box to use when generating the on-screen preview.
    Example values:

    previewPageBoxOption="TrimBox" previewPageBoxOption="CropBox" previewPageBoxOption="BleedBox" previewPageBoxOption="ArtBox" previewPageBoxOption="MediaBox"
  • Preview Rendering Logic
    Determines how the chosen box influences the displayed artwork boundaries.


Use cases

  • Proofing accuracy: Show only the final trimmed content (TrimBox) to reflect the printed outcome.

  • Artwork inspection: Use BleedBox or CropBox to verify margins and bleed.

  • Template verification: Match previews with designer expectations from Adobe or PitStop.

  • Consistency: Ensure preview and print align exactly, reducing prepress errors.


Step-by-step implementation

Step 1 – Edit your multipart product

  1. Go to Admin → Catalog → Products.

  2. Click Edit on the multipart product you want to configure.

  3. Scroll to the multipart configuration area.


Step 2 – Update the configuration XML

  1. Locate or add the previewPageBoxOption attribute in your multipart setup.

<?xml version="1.0" encoding="utf-8" ?>
<Configuration previewPageBoxOption="ENTER VALUE HERE"  previewModeType="minimumdummypages" editorMode="required" confirmPreview="False">
   <Parts>
       <PartConfiguration type="userupload" name="upload" requiredCheckProfile="" optionalFixProfile=""  />
   </Parts>
   <InputItems>
       <InputItem type="part">
           <ItemInfo>
                   <InternalName>upload</InternalName>
                   <UIName>Upload a PDF</UIName>
                   <UIDescription>Upload PDF files for printing</UIDescription>
           </ItemInfo>
           <ItemContent>
                   <PartName>upload</PartName>
                   <Usage type="range" min="1" max="5" />
           </ItemContent>
       </InputItem>
   </InputItems>
   <Order>
      <OrderItem>upload</OrderItem>
   </Order>
</Configuration>

  1. Enter the desired value (e.g., TrimBoxCropBoxBleedBoxArtBox, or MediaBox).

  2. Save your changes.

đź’ˇ If no value is specified, MediaBox will continue to be used as the default for backward compatibility.


Step 3 – Test the preview

  1. Open the product in the storefront.

  2. Generate a preview and inspect the visible area.

  3. Confirm that the preview now matches the expected region of the PDF (for example, trimmed vs. full bleed).


Step 4 – Validate output

  1. Compare the on-screen preview with your production-ready file.

  2. Ensure that what appears in the preview corresponds to the correct box definition.

  3. Adjust as needed for different artwork templates or production workflows.


Tips & best practice

  • Use TrimBox for accurate visual proofing of finished product size.

  • Use BleedBox when validating print-ready files that require bleed margins.

  • Always coordinate with your design or prepress teams to match their PDF export settings.

  • Test multiple files to confirm consistent preview scaling across different formats.

Simplified PDF-Profile Variable Management


Previously, configuring variable sets in PDF Profiles required complex manual editing of XML files or switching between Simple and Advanced modes.
This update replaces those modes with a single, intuitive interface.

Administrators can now upload an existing .evs variable set or paste the variable-mapping JSON directly into the editor.
When you save, Infigo automatically validates the structure and generates the .evs file required by the PDF Profile.

This streamlines setup, reduces XML errors, and makes it much easier to manage variable mapping between products and PDF Profiles.


What’s included

  • New Edit XML Source toggle for advanced users

  • Support for uploading an .evs file directly

  • Ability to paste JSON mapping data into the editor

  • Automatic generation of a valid .evs file on save

  • Built-in validation for uploaded or pasted data

  • Cleaner, single-page workflow for variable-set management


Key settings

  • Edit XML Source:
    Enables direct editing or pasting of JSON/EVS content.

  • Upload EVS File:
    Lets you import an existing variable-set file from your computer.

  • JSON Mapping Area:
    Paste JSON directly; the system will convert and generate the .evs file automatically.

  • Save & Validate:
    Runs internal checks to ensure the structure is valid before applying changes.


Use cases

  • Simplify configuration: Non-technical admins can now set up variable sets without XML knowledge.

  • Reuse templates: Upload existing .evs files from another profile or environment.

  • Speed up development: Copy JSON directly from external tools or documentation to instantly generate .evs files.

  • Reduce human error: Automatic validation ensures all variable data is properly formatted.


Step-by-step implementation

Step 1 – Open or create a PDF Profile

  1. Go to Admin → PDF Profiles.

  2. Select an existing profile or click Add new.


Step 2 – Access the variable-set section

  1. Scroll to the Variable Set / Job Ticket area.

  2. Locate the Edit XML Source toggle.

  3. Switch the toggle on if you want to view or paste mapping data manually.


Step 3 – Choose your preferred input method

Option 1 – Upload a file:

  1. Click Upload EVS File.

  2. Select an existing .evs file from your local drive.

  3. The system validates and loads it automatically.

Option 2 – Paste JSON data:

  1. In the source editor, paste your JSON variable mapping.

  2. Click Save — Infigo will validate the content and automatically generate the corresponding .evs file.


Step 4 – Save and validate

  1. Click Save.

  2. The system runs validation to confirm the structure and generate or update the .evs file.

  3. Check for any validation or conversion messages at the top of the screen.


Step 5 – Test your profile

  1. Assign the PDF Profile to a product.

  2. Generate a test output file.

  3. Confirm that all variable data maps correctly into the resulting PDF.


Tips & best practice

  • Keep a backup of your original .evs files before editing.

  • Use the Edit XML Source toggle sparingly — only when pasting or reviewing mapping data.

  • Always test generated .evs outputs on a sample product before production use.

  • When moving profiles between environments, export the .evs for consistency.

Tier Visibility for Attribute Price Adjustments


When tiered pricing is active, attribute value lists now display tier information directly, improving transparency for storefront admins.

Highlights

  • Attribute editor now shows tier levels and prices

  • Simplifies configuration of quantity-based discounts

  • Reduces need to cross-reference pricing tables

How to implement

  1. Go to Admin > Catalog > Attributes > Product Attributes.

  2. Edit or create an attribute with tier pricing enabled.

  3. Use the Value Editor to define price tiers (absolute or percentage).

  4. Assign the attribute to a product or group and verify tier display in both Admin and storefront views.

Department Address Exclusivity Mode


These two enhancements extend how departments manage addresses in Infigo storefronts.
They introduce options that let you:

  • Automatically use a department’s billing address for all its members, and

  • Restrict customers so that only department-level addresses can be used for orders.

This ensures consistent billing data, reduces manual entry, and is especially useful for corporate or franchise storefronts where multiple users share the same financial details.


What’s included

  • Use Department Address as Billing Address

    • Automatically applies the department’s billing address during checkout.

    • Skips the manual billing-address step entirely.

    • Makes billing fields read-only in My Account and Admin.

  • Use Department Address Exclusively

    • Hides individual customer addresses and replaces them with department-level ones.

    • Applies to checkout, My Account, and split-shipping logic.

    • Supports VAT and multi-shipping workflows.


Key settings

  • Use Department Address as Billing Address
    Found under Admin → Departments → Edit Department.
    When enabled, the billing address step is bypassed, and the department’s billing address is applied automatically.

  • Use Department Address Exclusively
    Also in Admin → Departments → Edit Department.
    When enabled, only department-level addresses are available for checkout and account management.

  • Read-only fields
    Billing fields in My Account and Admin become non-editable when these settings are active, preventing inconsistent data.


Use cases

  • Corporate storefronts: Departments share one billing address for all team members.

  • Franchise networks: Centralise all orders to a main billing office while maintaining department-level shipping.

  • Simplified checkout: Reduce steps for repeat B2B buyers by skipping billing entry entirely.

  • Data integrity: Prevent discrepancies between customer-entered addresses and accounting records.


Step-by-step implementation

Step 1 – Enable billing address automation

  1. Go to Admin → Departments.

  2. Click Edit next to the department you want to configure.

  3. Select the Set as default Department Billing Address 

  1. Save changes.

    đź’ˇ When this setting is active, customers linked to this department will automatically use its billing address during checkout.


Step 2 – Enable address exclusivity (optional)

  1. In the same department settings page, enable Use Department Address Exclusively.

  1. Save your changes.

    • Customer address lists will now only display department-level addresses.

    • Customers can add or edit department addresses in checkout or My Account, but they won’t appear in their personal address book.


Step 3 – Test checkout behaviour

  1. Log in as a customer belonging to the department.

  2. Add products to your basket and proceed to checkout.

  3. Confirm that:

    • The billing step is skipped (if automation is enabled).

    • Only department-level addresses appear.

    • Read-only fields prevent manual entry.


Step 4 – Validate admin behaviour

  1. Check the Admin → Customers → Addresses section.

  2. Confirm that no duplicate addresses are stored against the customer account.

  3. Ensure the department address appears in the order summary and invoices.


Tips & best practice

  • Use billing automation for B2B accounts where finance details rarely change.

  • Combine both settings for full department-level control.

  • Test with split shipping to confirm correct handling of multi-address orders.

  • Communicate with users that addresses are managed centrally to avoid confusion.

Department-Level Billing Address Automation


These two enhancements extend how departments manage addresses in Infigo storefronts.
They introduce options that let you:

  • Automatically use a department’s billing address for all its members, and

  • Restrict customers so that only department-level addresses can be used for orders.

This ensures consistent billing data, reduces manual entry, and is especially useful for corporate or franchise storefronts where multiple users share the same financial details.


What’s included

  • Use Department Address as Billing Address

    • Automatically applies the department’s billing address during checkout.

    • Skips the manual billing-address step entirely.

    • Makes billing fields read-only in My Account and Admin.

  • Use Department Address Exclusively

    • Hides individual customer addresses and replaces them with department-level ones.

    • Applies to checkout, My Account, and split-shipping logic.

    • Supports VAT and multi-shipping workflows.


Key settings

  • Use Department Address as Billing Address
    Found under Admin → Departments → Edit Department.
    When enabled, the billing address step is bypassed, and the department’s billing address is applied automatically.

  • Use Department Address Exclusively
    Also in Admin → Departments → Edit Department.
    When enabled, only department-level addresses are available for checkout and account management.

  • Read-only fields
    Billing fields in My Account and Admin become non-editable when these settings are active, preventing inconsistent data.


Use cases

  • Corporate storefronts: Departments share one billing address for all team members.

  • Franchise networks: Centralise all orders to a main billing office while maintaining department-level shipping.

  • Simplified checkout: Reduce steps for repeat B2B buyers by skipping billing entry entirely.

  • Data integrity: Prevent discrepancies between customer-entered addresses and accounting records.


Step-by-step implementation

Step 1 – Enable billing address automation

  1. Go to Admin → Departments.

  2. Click Edit next to the department you want to configure.

  3. Select the Set as default Department Billing Address 

  1. Save changes.

    đź’ˇ When this setting is active, customers linked to this department will automatically use its billing address during checkout.


Step 2 – Enable address exclusivity (optional)

  1. In the same department settings page, enable Use Department Address Exclusively.

  1. Save your changes.

    • Customer address lists will now only display department-level addresses.

    • Customers can add or edit department addresses in checkout or My Account, but they won’t appear in their personal address book.


Step 3 – Test checkout behaviour

  1. Log in as a customer belonging to the department.

  2. Add products to your basket and proceed to checkout.

  3. Confirm that:

    • The billing step is skipped (if automation is enabled).

    • Only department-level addresses appear.

    • Read-only fields prevent manual entry.


Step 4 – Validate admin behaviour

  1. Check the Admin → Customers → Addresses section.

  2. Confirm that no duplicate addresses are stored against the customer account.

  3. Ensure the department address appears in the order summary and invoices.


Tips & best practice

  • Use billing automation for B2B accounts where finance details rarely change.

  • Combine both settings for full department-level control.

  • Test with split shipping to confirm correct handling of multi-address orders.

  • Communicate with users that addresses are managed centrally to avoid confusion.

OAuth Authentication for SMTP Email


Email accounts can now use OAuth 2.0 for secure, token-based authentication instead of traditional username/password logins.
This modernises email security and improves compatibility with providers like Microsoft 365 and Google Workspace.

Highlights

  • Added OAuth 2.0 authentication support for SMTP

  • New configurable fields: Tenant ID, Client ID, Client Secret, Token Endpoint, Scope

  • Backward-compatible with Basic Auth

  • Enhances email-sending security

How to implement

  1. Go to Admin > Configuration > Email Accounts.

  2. Edit an existing email account or create a new one.

  3. Select OAuth 2.0 Authentication and enter the required credentials.

  4. Send a test email to confirm token-based authentication works.

Editable Quantity for Versioned Products


A new basket option allows customers to edit quantities for versioned multipart products directly in the cart.
This simplifies order management for complex multi-version products.

Highlights

  • New basket setting “Allow quantity editing for versions”

  • Enables inline quantity adjustments for multipart items

  • Reduces checkout friction for high-volume users

How to implement

  1. Go to Admin > Basket Settings.

  2. Enable Allow quantity editing for versions.

  3. If needed, enable Consider versions on min/max quantity checks for correct validation.

  4. Test by adding a versioned product to the basket and adjusting quantities.

Date-Picker Localization


The datepicker component is now fully localisable, allowing translated day and month names and flexible date formats.
This ensures a consistent, region-specific experience for international storefronts.

Highlights

  • Localized day and month names

  • Customizable date formats per language

  • Applies across checkout and My Account forms

How to implement

  1. Go to Admin > Languages.

  2. Edit the desired language and search for keys vue.datepicker.days and vue.datepicker.months.

  3. Update the comma-separated values for days (7) and months (12).

  4. Save and verify translations appear in the storefront datepicker.

Artwork Previews for Versioned Products


This article explains how to display artwork previews for each product version when using multipart products. A visual preview on product landing pages, the cart, and job tickets helps differentiate multiple SKUs and prevent order errors.

Previously, artwork was defaulted to the standard product image or basket thumbnail. Switching the XML configuration from using the ‘asset’ type to the ‘userupload’ type restores the intended visual separator for each version.

Follow this guide to learn common use cases, key settings in the Infigo administration area, and a step-by-step process for updating the MultiPart XML Config so that artwork displays correctly across all customer touchpoints.

Use cases

  • Displaying distinct artwork for products with multiple versions to avoid confusion.
  • Improving internal workflow by visually differentiating similar SKUs on job tickets.
  • Reducing errors by providing clear, version-specific previews on the product page, cart, and job tickets.

Key settings in Infigo

  • MultiPart XML Config: Located in Infigo Admin under the product variant settings, this configuration determines how artwork is handled for multipart products.
  • PartConfiguration Type: Ensure this is set to userupload (and not asset) so that the correct artwork thumbnail uploads are displayed.

Step-by-step guide

  1. Log in to Infigo Admin and navigate to the desired product variant.
  2. Open the MultiPart XML Config settings for the product.
  3. Locate the PartConfiguration element and change the type from asset to userupload (ensure the mode is updated accordingly).
  4. Save the updated configuration.
  5. Upload artwork for each product version and place a test order.
  6. Verify that the artwork previews are now displayed correctly on the product landing page, cart, and each job ticket.

Related links

For additional guidance, head over to the Infigo Academy or contact our Customer Support team.

Incomplete
🔎
Loading…
    Select a tip or trick