Picture of 🚀 Job Tickets & Packaging Slips Problem Solvers 🚀

🚀 Job Tickets & Packaging Slips Problem Solvers 🚀

How do I Customise my Infigo Job Ticket?


Job tickets display important order information used by production teams. In Infigo, job tickets can be customised to include company branding, layout adjustments, and additional production details.

Customisation is typically handled by the Infigo Professional Services team based on the branding assets and requirements provided by the customer.


What a Job Ticket Displays


A job ticket is generated for each order and may include information such as:

  • Order details

  • Product information

  • Product attributes selected by the user

  • Uploaded artwork or files

  • Production notes or instructions

Production teams use this document to review the order and complete fulfilment.


Requesting a Branded Job Ticket


To create a customised job ticket template, the following information should be provided:

  • Company logo

  • Brand colours

  • Any required fonts or styling preferences

  • A layout example or mock-up (if available)

  • Details of any additional information that should appear on the job ticket

This information allows the Infigo Professional Services team to create or modify the job ticket template so it aligns with the company’s branding and workflow requirements.


Including Product Attributes on Job Tickets


Additional order information can be displayed on job tickets using product attributes. These may include details entered by the user when ordering a product.

Examples include:

  • installation location

  • selected product options

  • uploaded images

  • special instructions

Attributes must be configured correctly in the product settings to appear on the job ticket.


Configuring Attributes for Job Tickets


Product attributes are managed in the product configuration.

Location:

 
Product → Product Attributes
 

When configuring attributes for job tickets:

  • The attribute must not be hidden

  • The attribute should be configured under Attributes (Job Attributes) rather than Admin Attributes

Attributes marked as hidden may display differently or not appear as expected in the job ticket output.


Testing the Job Ticket


After a customised template has been implemented, it is recommended to place a test order to confirm that:

  • attributes display correctly

  • entered values appear as expected

  • the job ticket layout renders properly

Testing ensures the job ticket functions correctly before being used in production.

How to Separate Infigo Job Tickets into a Separate Hotfolder?


In Infigo, job-related documents such as Job Tickets, Packing Slips, and Invoices can be automatically copied to specific hotfolders for use by production or customer service teams.

This allows you to separate job tickets from other production files and send them to a dedicated folder.


Why Use Separate Hotfolders?


Separating job tickets into their own hotfolder can help teams:

  • organise production workflows

  • give customer service teams access to job documentation

  • separate job tickets from artwork or production PDF files

  • automate document delivery to external systems

For example, production PDFs may flow into one hotfolder while job tickets are copied into another folder used by customer service or administration teams.


Configure Job Ticket Hotfolder Routing


To configure where job tickets are copied, you must update the Hotfolder settings within the admin area.

Step 1

Open the Admin area.

Step 2

Search for:

 
Hotfolders and Print Locations
 

Step 3

Open the Hotfolder Settings tab.

Step 4

Locate the section that allows you to copy additional items to hotfolders.

The settings highlighted below allow you to send documents such as:

  • Job Tickets

  • Packing Slips

  • Invoices

to a specific hotfolder location. You can also choose a custom name for packaging slips, invoice filenames and job ticket filenames. 

Step 5

Select the hotfolder where you want the Job Tickets to be copied.

Step 6

Save your changes.


How It Works


Once configured, Infigo will automatically copy the selected documents to the configured hotfolder whenever an order is processed.

This allows different files generated during the order workflow to be routed to separate folders.

For example:

File Type Destination
Production PDF Production hotfolder
Job Ticket Customer service hotfolder
Packing Slip Packing or dispatch folder

Testing the Configuration


After configuring the hotfolder mapping, it is recommended to place a test order.

Confirm that:

  • the production files appear in the correct production hotfolder

  • the job ticket is copied to the configured job ticket hotfolder

Testing ensures the routing works correctly before using it in a live workflow.

Creating your own Infigo Job ticket

Overview

Job Tickets contain information at a job or orderline level.

A Job Ticket in Infigo is essentially a PDF that contains information about each job in the order. Generally, it will be documentation that is used internally to aid with the production process. It will be printed with the job, and will follow it around the production process. It will contain information specific to the job, including the product name, thumbnail, quantity, specification and product attribute details.

Similar to Packaging Slips and Invoices, we allow for users to create their own Job Tickets in Infigo and you will do this in the same way as you would build an Infigo Variable product.

Creating your Job Ticket

We have attached our default Infigo Job Ticket template to this article which you can download and use or modify on your own storefront.

The Job Ticket can be created using the standard Infigo Designer plugin, using fields and variables named after placeholders. For example, if you wanted to use the "Attributes" placeholder to show product attributes, you would simply create either a Text Field, a Local Variable, or a Global Variable, and name the field/variable "Attributes." 

There is a complete list of placeholders in Admin where you can search for Order specific or Orderline specific placeholders. These are located under Admin > Configuration > Placeholder Overview.
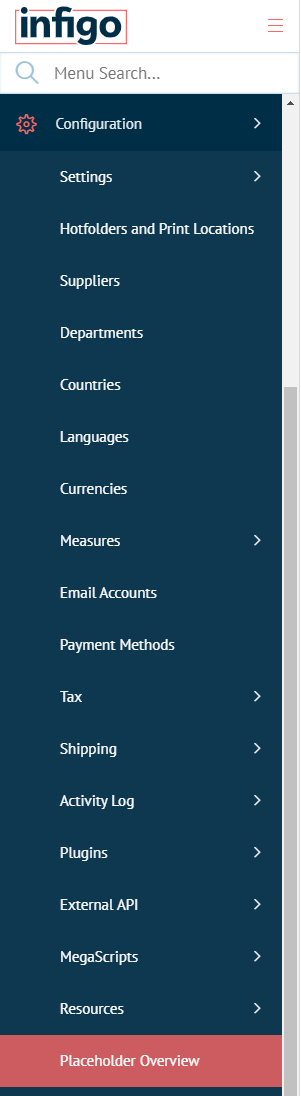
placeholder1.png

Order specific placeholders are officially supported for Invoices and Packing Slips, whereas Orderline specific placeholders are officially supported for Job Tickets.

Note:  Some Order specific placeholders will still work on job tickets, and some Orderline specific placeholders will work on Invoices and Packing Slips, however this would not be an officially supported configuration and may not work as expected.

If you click the > next to a placeholder in the list, you will see that it expands to give you an example of how to use the placeholder, as well as a brief description of what it's for:
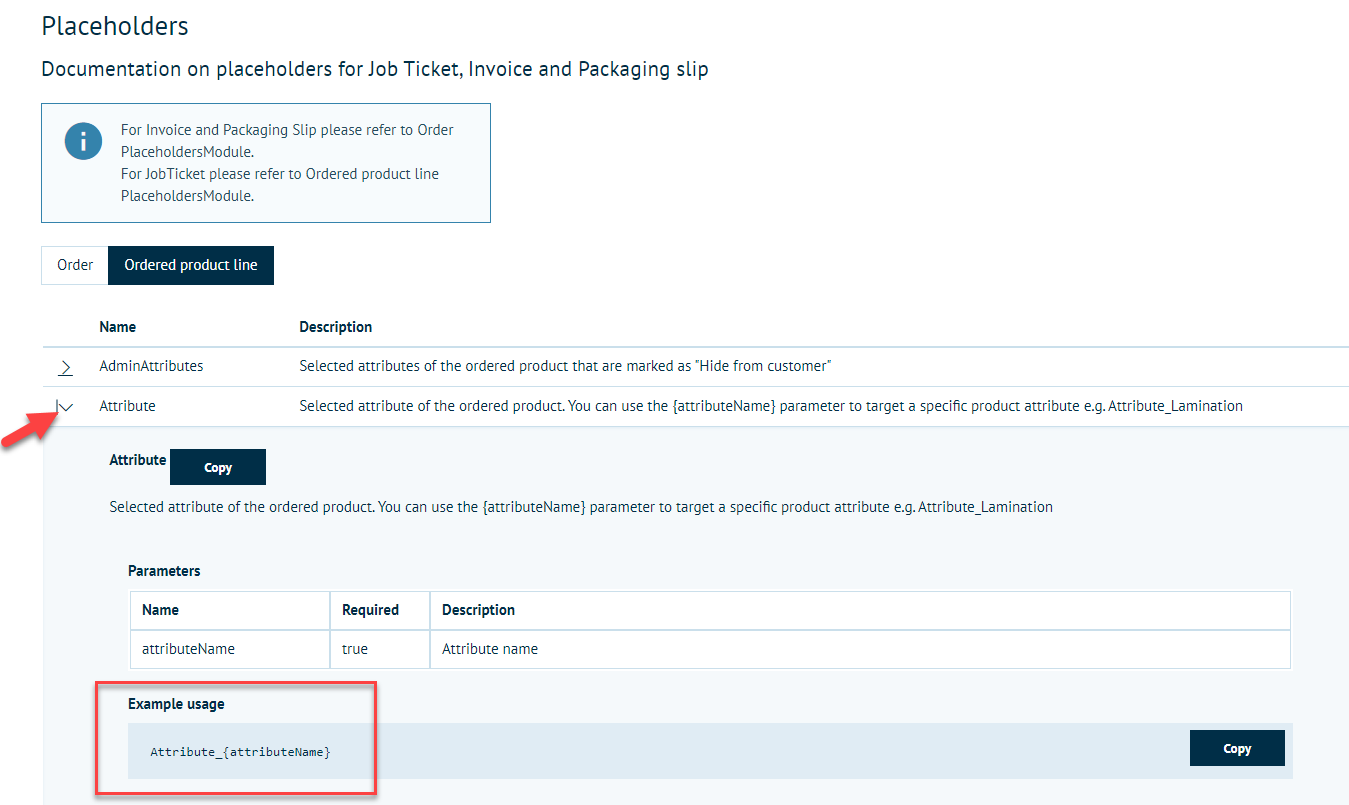
placeholder2.png

An example of the default Job Ticket is attached to give you an idea of how one can look.

Uploading the job ticket

To upload the job ticket file, navigate to Configuration > Settings > Product and editor settings > Infigo Settings and simply upload the file in the location highlighted below, then click "Save.
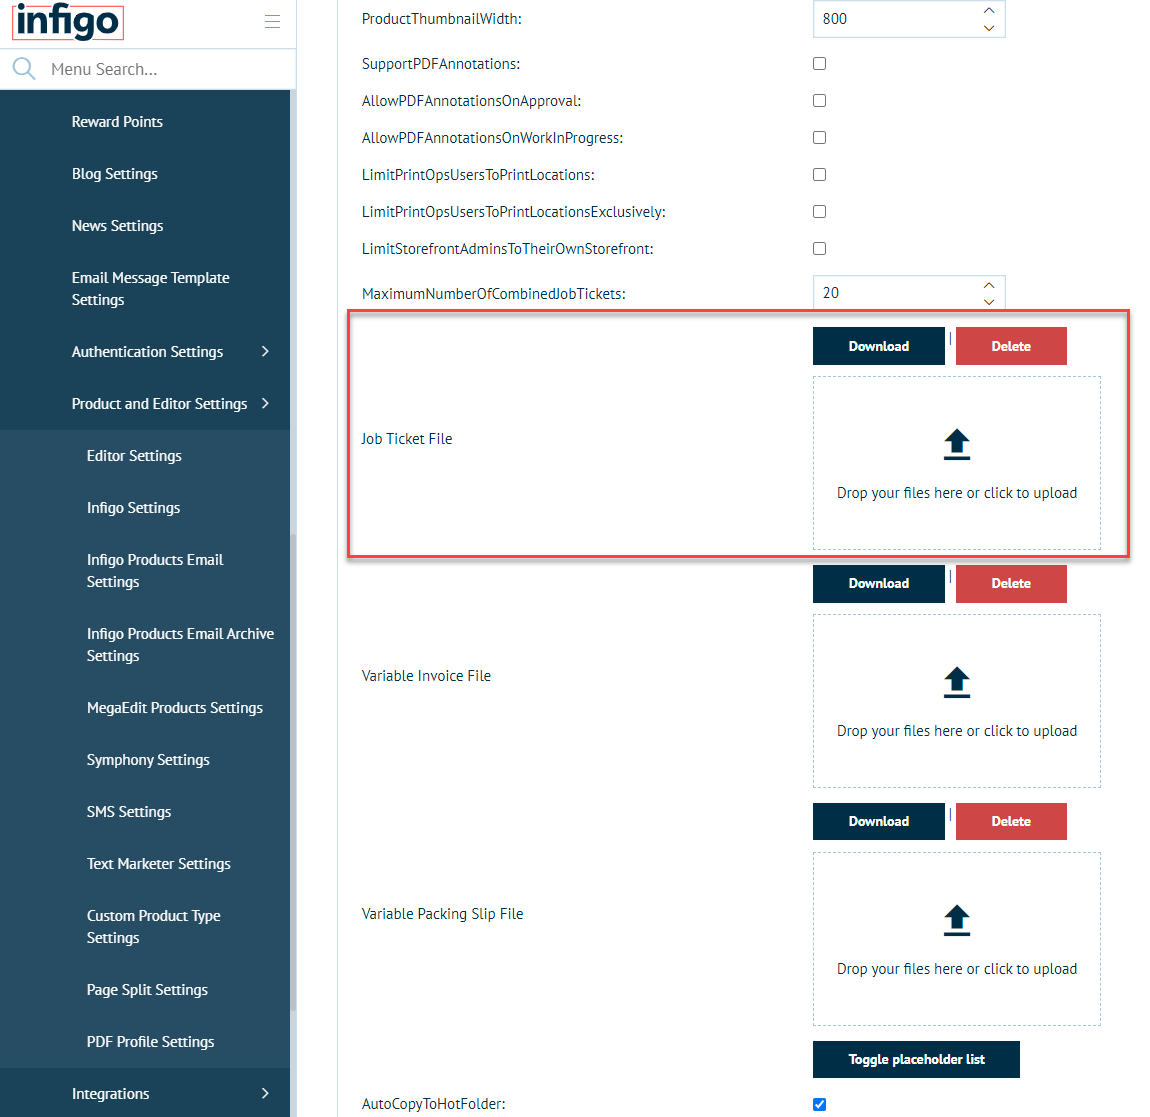
placeholder3.png

NOTE:

If you upload the Job Ticket to a specific Storefront, it will only apply to that Storefront.
If you upload the Job Ticket to the Platform, it will apply this specific Job Ticket to all Storefronts.

Creating your own Infigo Packaging Slip

Overview

Packaging Slips contain information at an order level.

A Packaging Slip in Infigo is essentially a PDF that contains information about the order. Generally, it will be printed with the order and placed within the parcel that is then shipped. It will contain order details like shipping and billing address, a summary of the items purchased and potentially breakdown of the costs.

Creating your own Packaging Slip

Attached to this article are our Infigo Default Packaging Slip templates. Feel free to download these and use them, or create your own using these as a base.

We allow for users to create their own Packaging Slips in Infigo. You can do this in the same way as you would build an Infigo Variable product, using the Infigo Designer plugin in Acrobat..

When populating the Packaging Slip with order information, you must use a specific set of placeholders in order to display the information you want. In order to understand more about what placeholders are available for you to use, you can navigate to Configuration > Placeholder Overview in Admin or search 'Placeholder' in the Admin menu search.

There you will find a list of available placeholders and their definitions which can be used when building your Packaging Slip. Items under the Order tab may be used for Packaging Slips. When you click on the > next to the Name, you will see an Example of how the placeholder may be used.

packaging_slip1.png

Uploading the Packaging Slip

Once you have created your packaging slip you need to upload it in Admin. Navigate to Infigo Settings or search for 'Infigo Settings' in the admin menu search.
Scroll down until you see the Variable Packing Slip File upload area.

packaging_slip2.png

NOTE

If you upload the Packing Slip to a specific Storefront, it will only apply to that Storefront.
If you upload the Packing Slip to the Platform, it will apply this specific Packing Slip to all Storefronts.

How do I create an Infigo Job Ticket and Invoice?

Your Invoice, Job Ticket and Packing Slip in Infigo

Overview

Invoices and packing slips in Infigo are not edited directly by customers.

Instead, these documents are configured for you by the Infigo team based on your requirements. This ensures consistent formatting, reliable output, and avoids issues caused by manual template editing.

This article explains:

  • What can be customised

  • What information you need to provide

  • How the setup process works

  • How to upload your Infigo Job Ticket / Invoice

How Invoice & Packing Slip Customisation Works

To create or update your invoice or packing slip, we ask for a clear example of what you want the document to look like, and we handle the build for you.

The Process

  1. You provide a PDF example of your invoice or packing slip

  2. You clearly explain what information should appear, and in what order

  3. The Infigo team rebuilds the document in your system using a PSN (Professional Services Number)

This approach avoids unnecessary back-and-forth and ensures the final output matches your expectations.


What You Need to Provide

When requesting invoice or packing slip changes, please include all of the following in one request:

1. A PDF Example

  • An existing invoice or packing slip you already use

  • This can be from another system or a previous provider

2. Branding Details

If applicable, include:

  • Logos

  • Brand colours

  • Fonts

  • Any specific layout rules

3. Content & Layout Instructions

Please clearly highlight:

  • What information should appear on the document

  • The order in which it should appear

  • Any sections that should be grouped together or separated

Providing this information upfront helps us avoid multiple revisions and speeds up delivery.

Uploading the Job Ticket/ Invoice:

Once you receive your brand new Job Ticket/Invoice from our Infigo Team - If you load the Storefront you want to use this Job Ticket/Invoice in, navigate you can upload it by navigating to Admin Area > Infigo Settings and upload it at the link shown in the screenshot below:

mceclip0.png

Please note that this invoice can be uploaded at either a storefront or a platform level. If it is uploaded at a storefront level, then that will be the invoice template used for all orders placed on that storefront.

If it is uploaded at the platform level, then it will be the template used for all storefronts which do not have an invoice uploaded at storefront level.

Incomplete
🔎
Loading…
    Select a Problem Solver