🚀 Connect: Flow Problem Solvers 🚀

Multipart Asset Files in Connect Flow XML

Title

Enabling Multipart Asset Files in Connect Flow and Switch XML

Summary

A new “Include generic job files” setting in Connect: Flow and Connect: Switch plugins adds a GenericJobFiles section to the Connect XML for each order line. When enabled, all asset files in a multipart order are listed with their filename and a download link, making them accessible to automated Switch and Flow workflows without manual intervention.

image-20260622-123017.png

Problem

Automated integrations consuming the Connect XML for multipart orders found that asset-type parts were absent from the XML. The asset files existed in the system but were not exposed in the Connect XML that Switch or Connect: Flow polls, forcing users to rely on manual workarounds to retrieve those files. Additionally, thumbnail previews for PDF and image files uploaded as asset parts in multipart products were not generating correctly in the cart or product preview.

Environment

Admin area: Connet: Flow plugin (General settings and per-supplier settings) and Connect: Switch plugin (Job configuration).

Applicable to storefronts using multipart products with asset-type parts and Connect: Flow or Connect: Switch integrations.

Resolution

  1. Log in to the admin area.
  2. To enable globally in the Connec: Flow plugin: navigate to Connect Plugins page and configure Connect: Flow. Locate the Job Configuration section, and enable “Include generic job files”.
    1. image-20260622-123520.png
  3. Save.
  4. To enable per-supplier in the Connect: Flow plugin: navigate to Suppliers, select the supplier, find the Job Details section, and enable Include generic job files. Save.
  5. To enable in the Connect Switch plugin: open the plugin settings, navigate to the Job configuration section, and enable Include generic job files. Save.
    1. image-20260622-124023.png
  6. Place a test order containing a multipart product with asset-type parts.
  7. Retrieve the Connect XML for the order and verify that a GenericJobFiles section is present, listing one entry per asset file including the filename and a download URL.
    1. image-20260622-124137.png
  8. Download each URL to confirm the correct file is returned.

Closing note

Download links in the GenericJobFiles section are valid for a limited time, controlled by the Delete Short Lived Download After X Hours system setting. If your integration polls the XML after this window has expired, contact Infigo Support to adjust the setting. The feature defaults to off and must be opted in per plugin or per supplier. Disabling the setting returns the XML to its previous structure with no code changes required.

Search Terms

multipart asset files Connect XML, generic job files MIS, include generic job files, Connect Switch multipart assets, multipart order asset download, Connect flow XML asset, MIS plugin asset files, multipart product Connect integration

Connect: Flow General Overview


Overview

As well as a substantial library of specific MIS plugins, we also offer our own Infigo Connect: Flow plugin. This plugin was developed as more of a general catch all for integrations where a JSON or XML file is required to be created on order placement and then absorbed by a third party system.
This article aims to explain the basics around what our Infigo Connect: Flow plugin does and how you can use it within your Infigo setup.


What does the plugin do?

The Infigo Connect: Flow plugin provides job information in a specified file type and format that can then be handled externally by a third party software.


When does it get triggered?

This depends on the product types that are being ordered but fundamentally when an order is placed.
If you are ordering variable products (MegaEdit or Infigo Editor) then it will wait until the dynamic output files have been created. 


If you are ordering standard products or static products that do not require an output then it will trigger as soon as the order is placed and paid for.


What file types are supported?

As part of the configuration you choose your output format from the Data format type dropdown, which offers three options: JSON, XML or XSLT. JSON and XML are generated in a specified format and structure that we have pre-determined, and examples of both can be found below. XSLT lets you transform our standard output into a format of your own – see the next section.


What if these formats are not what we require?

Select XSLT as your Data format type and we allow for an XSLT file to be applied to the XML so that it can be transformed into any format. This means that you can take our standard XML format we create and from that generate a different XML, HTML, XHTML, plain text etc. What we export will then be in a format you expect and can handle.

The XSLT fields (Predefined XSLTs and XSLT for Submit Order) are only shown when Data format type is set to XSLT, so if you cannot see them, check the dropdown selection first.

Choosing XSLT also reveals a File type setting, where you specify whether the transformed output should be treated and delivered as XML or JSON. This ensures your file is sent with the correct content type whether you are delivering it to an API, an FTP location or a hotfolder.


How do I get the data I want?

At the bottom of this article is a sample XML that you can use to assist in creating your XSLT. Additionally, the Plugin Instructions section of the configuration page has buttons to download example order data, so you can preview exactly what your integration will receive for a given order.

By default, data is sent in JSON format. To change this, select XML or XSLT from the Data format type dropdown:

Data format type dropdown

If you were using Connect: Flow before this dropdown was introduced, your existing configuration was migrated automatically – the previous Use Data Format XML checkbox and XSLT settings were converted to the equivalent Data format type value, so there is nothing you need to change. Only new setups need to actively choose a value.


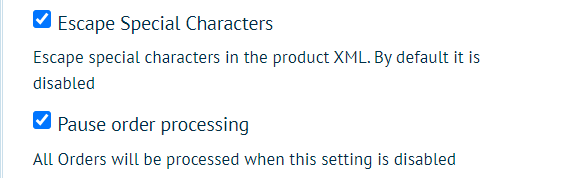
You can also automatically escape special characters by enabling the setting, and pause order processing with the setting enabled:
mceclip4.png

Please note: Escape Special Characters only affects XML output. It is available when Data format type is set to XML or XSLT, but if your XSLT output is delivered as JSON (File type = JSON) the setting has no effect.


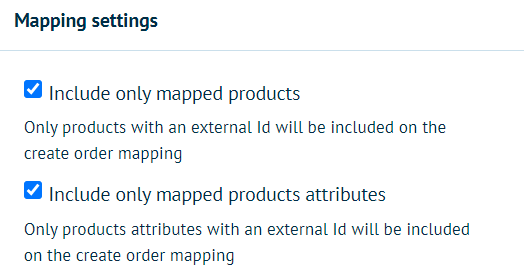
We can also send only specified products and product attributes via external IDs. This may useful if you only need certain products to be sent to your 3rd party system.
mceclip5.png


Can I download assets from an XML?

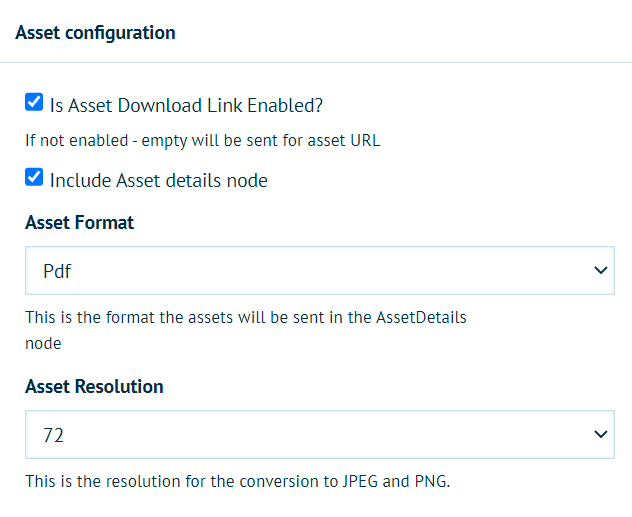
Yes, we can send asset links into the XML. This scenario would be useful if you did not want to use our hotfolders; the XML will contain a link per orderline of the assets to be downloaded. To enable this simple toggle on these asset settings under Asset Configuration:
mceclip6.png

Your received XML will then have a link to the artwork that can be open and downloaded.


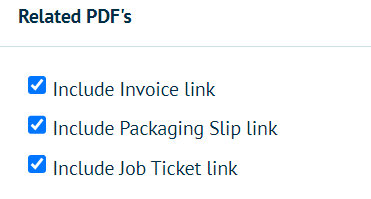
We can also send links for Job Tickets, Invoices, and Packing Slips. Just enable the files you want to receive in the XML as links:
mceclip7.png

Where can the files be placed?

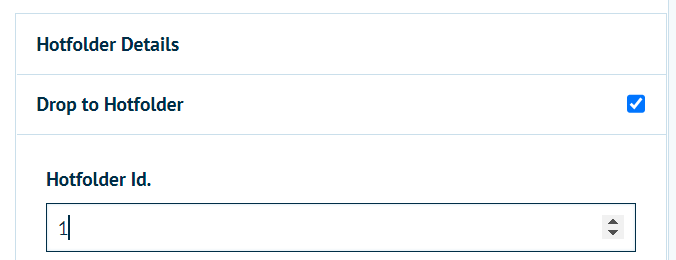
The Infigo Connect: Flow plugin supports downloading the data file into a specific hot folder, this can be configured per storefront and will then allow you to download it through Infigo Sync.

To set this up, simply enable Drop to Hotfolder, then route the XML to the folder of your choice:
mceclip0.png


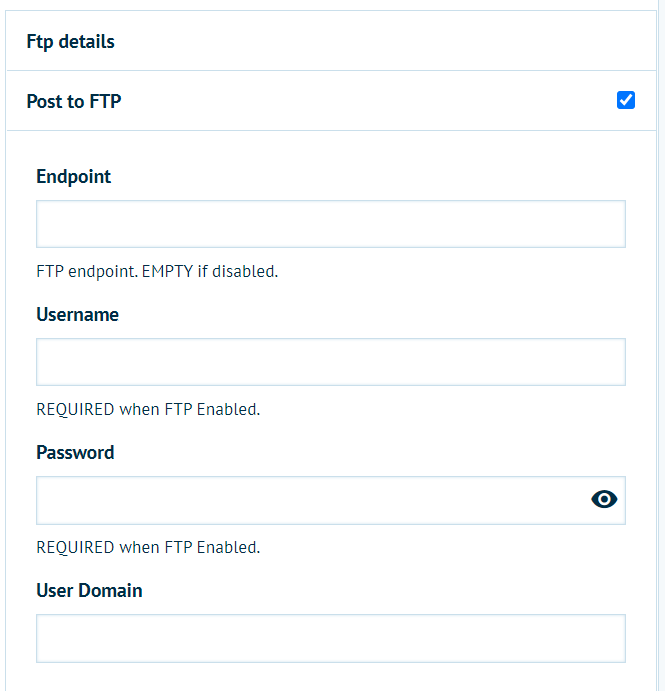
OR we support exporting the file to an FTP location. This can be done by enabling Post to FTP then inserting your FTP details:
mceclip1.png

OR we support the ability to post the file to an API endpoint, along with credentials, so that it can be sent directly to a third party system.


Can I email my JSON or XML directly to someone?

Yes - under Email Details simply check Send to Emails and insert the email address(es), you can also BCC an email if needed. 

We have a predefined Email ESLT you may use called Email, or, write your own for your needs. 


Want help from Infigo Software to generate the transformation files?

This is a professional service that we offer at an additional development charge.
If you want to request assistance then please provide us with the following:
* Download our example XML file, take a look at all the fields provided
* Generate an XML file in the format that you require
* Add the mapping for the fields that we provide in your structure, so that each field in your structure is mapped to a field from our structure.
* If you want it posted to an API end point then please supply us with the credentials and ensure that we have access.


What is the extra data node?

Extra data is an additional data attached to the order and/or order line. It is a key/value property which can be set using MegaScript or API mechanism.
Once the order/orderline contains the extra data, Infigo Connect: Flow will include it in json/xml request.


What is the "Exclusion list for Extra Data" setting?

The exclusion list is a list of extra data which are ignored for order/orderline request.
To exclude a specific extra data you need to write the extra data key in the textbox.
Each new extra data should be separated by a new line.
There is a possibility to exclude the extra data by a regular expression.

Adding the Stripe CaptureRequestId to Connect: Flow

Many customers’ downstream systems (ERPs, fulfilment hubs, reporting tools, etc.) need the Stripe CaptureRequestId to reconcile payments.
This artfcle introduces:

  1. Database support – a CaptureRequestId column is present on the Transaction table.

  2. Connect: Flow “Payment” node – an optional block of detailed payment data (including CaptureRequestId) that can be added to every MIS.Generic XML/JSON payload.

  3. A new settings group – lets you turn the Payment node on or off globally and/or per supplier.


Key settings

Setting Location What it does
Include payment information Admin ➜ Configuration ➜ Plugins ➜ Connect: Flow [Configure] When ON, the connector injects the full <Payment> node into the payload. When OFF, no payment data is sent (default for backwards-compatibility).
General vs. Supplier-specific toggle Admin ➜ Configuration ➜ Plugins ➜ Connect: Flow [Configure] ➜ Suppliers [Tab] Lets you override the global choice for a specific supplier if they do (or don’t) require the extra data.

Fields inside the <Payment> node

PaymentMethod
PaymentTransactionId
CaptureTransactionId
PurchaseOrderNumber
InfigoTransactionId
AuthorizationRequestId
CaptureRequestId   ← new & critical
CurrencyCode
Amount
AuthorizationExpirationDateUtc
TransactionDateUtc

Typical use cases

Use case Why the Payment node helps
ERP reconciliation Finance teams can match Stripe captures to sales orders by CaptureRequestId.
Chargeback investigations Support agents see full transaction lineage (auth → capture IDs) inside their MIS logs.
Multi-capture orders Future-proofed: the <Payment> node is already a list, so multiple transactions per order won’t break existing integrations.
   

Step-by-step implementation guide

1 Enable the Payment node

  1. Sign in as an administrator.

  2. Navigate to Admin ➜ Configuration ➜ Plugins ➜ Connect: Flow [Configure]

  3. Toggle “Include payment information” to ON.

  4. Save your changes.

3 Verify the payload

  1. Place a test order on a storefront that uses ExternalPayments.

  2. Allow the Connect Flow job to post to your test API endpoint

    • or view the “Extra Data” preview in the order details. (Sales ➜ Orders ➜ View [Order] ➜ Extra Data [Section]

  3. Confirm the <Payment> node is present and contains the fields listed above, including a non-null <CaptureRequestId>.

Using Approval Comments and Status History in Connect: Flow XML/JSON

Overview

Connect: Flow can embed two history related, fully-structured data blocks in every order export (XML or JSON):

  • Job History – a chronological log of all order-level status changes.

  • Approval History – a dedicated log of approval events that captures the approver’s comments (e.g., a billing code) alongside the status that triggered the event.

These optional nodes give your MIS or downstream XSLT transformations immediate visibility of what happened, when it happened, and, for approval events, why it happened. The result is cleaner hand-offs to production, richer reporting, and fewer support calls asking “what changed?”


Key Settings

Setting Location What it Does Typical Impact
Include job history Admin ➜ Configuration ➜ Plugins ➜ Connect: Flow [Configure] Adds a <History> (XML) / history (JSON) node under each <OrderLine> containing every recorded status change for that line. Enables detailed audit trails and MIS dashboards that rely on end-to-end status progression.
Include approval history Admin ➜ Configuration ➜ Plugins ➜ Connect: Flow [Configure] Adds a <ApprovalHistory> / approvalHistory node under each <OrderLine> containing only approval-related statuses. Allows an MIS to pick up approver comments (e.g., purchase codes) without parsing the entire job history.

Good to know:

  • Both settings are independent. You can export only job history, only approval history, or both, depending on the needs of each supplier-specific flow.
  • Both settings can be applied at a general level for Connect: Flow or on a supplier basis


What You’ll See in the Payload

Each history entry is serialised as a HistoryItem with the following fields:

Field Description
Timestamp UTC time in the platform’s global date-time format.
Status Human-readable status name (e.g., AwaitingApproval).
StatusId Integer enum value – useful for systems that map on numeric codes.
CustomerId Identifier of the user whose action triggered the event.
Info Free-text note. For approval events this contains the approver’s comment.

The approval log is automatically filtered to include only: UnapprovedOrder, AwaitingApproval, PartiallyApproved, Approved, and Rejected.


4️⃣ Typical Use Cases

  1. Billing-code hand-off to an MIS
    Approver enters a billing code in the approval comment. The MIS extracts it from the Info field of the first Approved entry and routes the job to the correct cost-centre.

  2. Shop-floor dashboards
    Production screens poll the job-history node to display live status changes without hitting the storefront API.

  3. Supplier-specific compliance logs
    For suppliers that require a full audit trail, enable both settings at supplier level; for low-touch suppliers, leave them disabled to reduce payload size.


5️⃣ Step-by-Step Implementation Guide

  1. Open the Connect → Flow plug-in settings

    • In your storefront admin, navigate to Admin ➜ Configuration ➜ Plugins ➜ Connect: Flow [Configure].

    • (If supplier overrides are required) open Admin ➜ Configuration ➜ Plugins ➜ Connect: Flow [Configure] ➜ Suppliers [Section].

  2. Enable the desired history blocks

    • Tick Include job history to insert the <History> node.

    • Tick Include approval history to insert the <ApprovalHistory> node.

  3. Update or create your XSLT / JSON transform

    • Map the new nodes into the target schema.

    • Example XSLT snippet for approval comments (XML):

    <ApprovalComments>
      <xsl:for-each select="ApprovalHistory/HistoryItem">
        <xsl:if test="Status='Approved'">
          <xsl:value-of select="Info"/>
        </xsl:if>
      </xsl:for-each>
    </ApprovalComments>
    
  4. Place a test order

    • Use a product that requires approval.

    • Approve the job and enter a distinctive comment.

    • Download the raw export from Admin → Sales→ Orders → [Order] → Extra Data and verify that:

      • The <History> and/or <ApprovalHistory> nodes are present.

      • Your comment appears in the Info field of the Approved entry.

      • Timestamps are in UTC.

  5. Validate downstream processing
    Run the export through your MIS or a staging transform to ensure the new data is consumed correctly.

Enable Self‑Signed Certificate Support for Connect Integrations (Connect Flow, Connect Hybrid & Connect Switch)

Overview

When a Connect plug‑in sends data to an HTTPS endpoint, the platform normally verifies that the server’s SSL/TLS certificate is trusted (signed by a recognised Certificate Authority, valid for the current date, and issued for the correct hostname). Development and on‑premise systems often use self‑signed, expired, or otherwise untrusted certificates. In those cases, requests fail with an SSL/TLS error and the order cannot be posted.

The Ignore SSL Certificate Validation setting lets you bypass all certificate checks for a single API connection, so that calls succeed even when the endpoint’s certificate is not trusted.

Note: This setting is only available for Connect: Flow, Connect: Switch and Connect: Hybrid


Key Setting

Field Location Default Scope
Ignore SSL Certificate Validation (checkbox) Connect PluginsConnect Flow, Connect Hybrid, or Connect SwitchConfigure.
For Connect Flow the option is also available in each supplier‑level profile.
Cleared (validation enforced) Only impacts the profile you edit
 

Tooltip shown in the UI

“If enabled, SSL/TLS certificate validation will be bypassed, allowing connections even if the certificate is expired, self‑signed, or untrusted.”


Typical Use‑Cases

Scenario Why you might enable the setting
Local development or CI Test APIs often use self‑signed certificates generated on demand.
Internal MIS with a private CA The MIS is secured by an internal root certificate that the storefront VM does not trust.
Temporary work‑around for an expired certificate You need to keep order flows running while the endpoint’s certificate is renewed.
 

Step‑by‑Step Implementation Guide

  1. Open the configuration panel

    • Sign in as an administrator.

    • Go to Connect Plugins and select Connect Flow, Connect Hybrid, or Connect Switch.

    • Click Configure next to the relevant Connect plugin (or the supplier profile for Connect Flow).

  2. Enable certificate override

    • Tick Ignore SSL Certificate Validation.

    • Click Save.

  3. Test the connection

    Setting state Result visible in order extra‑data or job print‑order history
    Disabled (default) “The underlying connection was closed: Could not establish trust relationship for the SSL/TLS secure channel.”
    Enabled Alternate, successful response from the API.
     
  4. Monitor & review

    • Use storefront logs or the job print‑order history to confirm that calls reach the endpoint.

    • Once the target system presents a valid CA‑signed certificate, return to the settings page and clear the checkbox to restore full verification.


Technical Notes (for advanced users)

  • The plug‑in creates an HttpClientHandler with a ServerCertificateCustomValidationCallback that always returns true, then passes it to a new HttpClient.

  • Certificate validation is skipped only for the requests made through that client instance; other HTTPS traffic in the platform still performs full validation.

  • The setting is stored per connection, so you can enable it on one API profile while leaving others secured.


Best Practice

Do Avoid
Enable the override only in trusted or isolated networks. Leaving the checkbox enabled on publicly‑accessible endpoints.
Document why the override is active and schedule a review date. Relying on the override as a permanent solution instead of fixing the certificate.
Disable the override as soon as a valid certificate is available. Assuming that the override protects against man‑in‑the‑middle attacks—it does not.
 

By following these steps, you can connect Connect Flow, Connect Hybrid, and Connect Switch to endpoints secured with self‑signed or untrusted certificates while keeping the rest of your storefront’s HTTPS communications fully validated.

Incomplete
🔎
Loading…
    Select a Problem Solver