🚀 Other Integration Problem Solvers 🚀

Picture of 🚀 Other Integration Problem Solvers 🚀
Read our handy storefront styling tips and tricks!

What version of VeraCore does Infigo integrate with?


The Veracore plugin doesn't specify a particular Veracore version, it uses Veracore's standard OMS web service and Dynamic Reporting API, so it should work with any reasonably current version.

On-premise is fully supported. The API URLs and credentials are all configurable per-storefront - you just need to provide your on-premise Veracore server URL instead of the default cloud one. The only requirement is that your server must be accessible over HTTPS.

HubSpot CRM Integration for Order Tracking


What this article covers

This article explains how to configure the new HubSpot CRM integration using Infigo MegaScripts.
You’ll learn how the integration works, what’s included, and how to set it up to automatically create or update contacts, deals, and order data in HubSpot when a customer places an order.


About this feature

The HubSpot CRM integration allows you to automatically synchronise Infigo customer and order information with your HubSpot environment.
When configured, Infigo uses a MegaScript to connect with the HubSpot API — creating or updating contactsdeals, and related records whenever an order is placed.

This ensures your sales and marketing teams can track live order progress directly in HubSpot without manual data entry, maintaining a single, accurate source of truth between systems.


What’s included

  • new integration workflow between Infigo and HubSpot CRM

  • Ability to create or update contacts, deals, and orders automatically

  • Integration built on MegaScripts, giving you full control over mapping and behaviour

  • Support for affiliate-based deal naming and linking

  • Configurable success and error handling pages


Key settings

  • MegaScript trigger: Set to run On Place Order so HubSpot receives data when orders are confirmed.

  • HubSpot Properties: Define mapping for deal and contact objects (pipeline, deal stage, owner ID, etc.).

  • Affiliates: Links orders to affiliate data for structured deal naming and tracking.

  • Plugin Connection: Managed through Connect: Scripting to tie your MegaScript instance to storefront events.


Use cases

  • Sales automation: Automatically create a HubSpot deal whenever a customer places an order.

  • Customer management: Keep customer and contact details in sync between HubSpot and Infigo.

  • Marketing visibility: Give sales and marketing teams a unified view of order status and pipeline performance.

  • Affiliate tracking: Use affiliate links to group deals or attribute them to sales partners.


Step-by-step implementation

Step 1 – Create the MegaScript

  1. Ask our support team for the needed MegaScript and they will provide this. Then go to Admin → MegaScript Management and click Add New. Create a new script using the MegaScript our support team provided.

  2. Navigate to Admin → MegaScript Instances and create a new instance based off of the script you created above
  3. Choose Trigger on Event and set it to Place Order.

  4. Enter your configuration JSON, including HubSpot connection details, for example:

     
    {
    logLevel: 4,
    pluginSystemName: 'mis.scripting',
    hubSpotProperties: {
    deal: {
    pipeline: 'default',
    dealStage: 'closedwon',
    associationCategory: 'HUBSPOT_DEFINED',
    associationTypeId: 3,
    // hubspot_owner_id: xxx,
    },
    contact: {
    // hubspot_owner_id: xxx
    }
    }
    }
  5. Save the MegaScript.


Step 2 – Connect the MegaScript to your storefront

  1. Navigate to Connect Plugins → Connect Scripting.

  2. Select your storefront and assign the MegaScript you just created to the Place Order event.

  3. Save changes.


Step 3 – Set up affiliate tracking (optional)

  1. Go to Admin → Affiliates and create a new affiliate.

  2. Copy the generated affiliate URL.

  3. Share this URL or use it in campaigns — orders placed through it will automatically link to the affiliate ID.


Step 4 – Test the integration

  1. Place a test order in your storefront.

  2. In HubSpot, verify that:

    • contact is created or updated for the customer’s email address.

    • deal is created in the correct pipeline and stage.

    • The deal name matches your affiliate or customer mapping.

  3. Confirm no duplicate records are created.


Step 5 – (Optional) Customise error handling

  1. Use the success and error configuration options in your MegaScript to display different pages depending on API response.

  2. This helps provide clear messaging to users or trigger internal notifications if synchronisation fails.


Tips & best practice

  • Test your configuration with a sandbox HubSpot account before going live.

  • Keep API credentials secure — do not hardcode keys in plain text.

  • Review HubSpot rate limits if you expect high order volumes.

  • Use MegaScript logging (logLevel 4) for detailed troubleshooting.

Google Tag Manager


In order to use the Google Tag Manager you need to ensure you follow these steps:

  •  Create a Google Tag Manager account
  •  If required, you can download and import the example container JSON attached. Just amend the account ID to your own account ID before importing (gtm.json) this will create 4 tags for you

Affiliate Window Tag

TagServe HTML Tag

TagServe Tag

TradeDoubler Tag

  • Navigate to Admin (In your Google Tag Manager account) then Import Container - here you can choose to overwrite which will amend all the account and container IDs with your own.
  • Now when you navigate to your Tags under the Container section you should see your newly created tags.
  • You will now need to go into each and ensure that the IDs used are correct for your account with each. At this point, you can also delete any that you do not require.
  • Along with the created user-defined variables you can create your own, depending on the Affiliate Tag:mceclip0.png 
  • User-defined variables are set in Catfish and are mapped to:

OrderId: Catfish Order Id

OrderTotal: Catfish Order Total

OrderShipping: Catfish Order Shipping

OrderTax: Catfish Order Tax

StorefrontName: Catfish Storefront Name

Products: A list of catfish order line items based on Quantity and Unit Price Including Tax

CheckSum: Checksum Value based on Catfish Order ID and Catfish Order Total

TduId: TradeDoubler unique ID from cookie (specific per customer)

  • You can also configure the trigger when the tag will be triggered: 
  • Now in Infigo, you need to navigate to Configuration > Settings > General Settings > Tab 'Google Tag Manager Settings'
  • Check the 'Enable Google Tab Manager' setting

  • Enter your Container ID in the 'Google Tag Manager ID' field. (This should look something like - GTM-XXXXXXXX)


Google Analytics


This article aims to cover the integration of Google Analytics onto a storefront. Google Analytics allows for the tracking and reporting of website traffic and can determine the success of a storefront based on the figures received.

Pre-requisites: You will need to have an existing Google Account to allow for successful integration of this tool.

Step One

1) Search for 'Google Analytics' within a web browser and select the first option that appears. You will be subsequently asked to select your Google Account and follow the appropriate steps, shown on-screen.

 The above screen capture depicts the three primary steps that are to be followed, in order to integrate the Google Analytics tool.

Step Two

2) Following the selection of 'Sign-Up', you will then be directed to the following screen (depicted below) this allows you to assign an account name, website name, as well as the URL for your storefront. For the purpose of this example, i have inserted my own name as the 'Account Name', 'Storefront Example' as the website name and inserted the URL for my storefront.

Depicted above is the necessary completing of fields that will allow for the obtaining of a Tracking ID. Note that all three fields are required.

Ensure that the pre-selected options found at the bottom of the current page (those that are marked as 'recommended') remain unchanged and select 'Get Tracking ID'. Accept the Terms and Conditions and you will arrive at the screen shown below.


Step Three

3) Now that you are on the current screen (shown at the conclusion of the previous stage) you will need to copy the code, shown under the 'Global Site Tag', and paste this within the 'PageHeadContainer' found via navigating: Admin --> Configuration --> Settings --> Product and Editor Settings --> Infigo Settings

It is worth noting that, should you wish to view traffic, you will need to always open Google Analytics in a new tab - as this is where you will view the traffic (as opposed to the Dashboard on Catfish).


Step Four/Testing

In order to test that the integration has been successful, the status - located adjacent to the Tracking ID will change in value based on the number of visitors to the storefront. This can be replicated via impersonating a user.

Note: You will only be able to view traffic afterthe installation of the Google Analytics tool. Therefore viewing traffic numbers, prior to this, will not be possible.

 If you have followed the steps above correctly, you will now be able to monitor the customer traffic on your storefront.


Google Merchant Setup


We have added a new MIS plugin for Google Merchant. Now you can configure a synchronization process or upload manually the generated XML from your products and attribute combinations, including the images and descriptions into your Google Merchant account quickly and easily.


**There are steps that require assistance from the Support Team, please be sure to include the following information in your ticket when setting up Google Merchant:

  • Request to have access to MIS Plugins and MIS Settings
  • Request to have access to Widgets
  • The Platform URL from Step 3


1. Signup for Google Merchant. 


2. You need to validate your URL. We will do this with an HTML Tag. In Catfish, navigate to Content Management > Widgets > Google Analytics > Add to zone. 

A. Copy the HTML Tag from the Google Merchant setup:


B. On the Google Analytics Widget, Paste the HTML tag into the 

Press Save.


In Tracking code with {ECOMMERCE} line, here is an example: 


For Tracking code {ECOMMERCE} part, with {DETAILS} line and Tracking code for {DETAILS} part sections, these need to always be left blank. 


C. Now you can press Verify URL in Google Merchant: 

Press Finish after you see the URL is verified. 


3. Infigo needs to install Google Merchant into your MIS Plugins. Please provide the Platform URL where you need this installed. After Infigo has installed the plugin, navigate to Catfish > Other > MIS Settings and enable Google Merchant. Please proceed to Step 4 after these steps have been taken. 


4. You will need an Authentication Key from Google Merchant. Navigate to Content API:

A. Go to Authentication

B. Create a New API Key


 C. A new content-api-key.json file will be created. Be sure to save this. Now you need to create a new Authentication User. Click on the new user just created:

D. Now you need to create a new authentication key:

E. Select Key Type as JSON. Select Create and a JSON file will be downloaded. 

F. Navigate to Catfish > Other > MIS > MIS Plugins. Press Configure against Google Merchant. You will need to insert the Merchant Store ID. The ID can be found on the Google Merchant homepage for your site:

Paste the ID into Catfish:


Next paste in the Merchant Center JSON file (From Step 4E) you downloaded into Key:


Press Save. 

By default, your settings will be set to automatically sync your google merchant account with your storefront. It will be set to 24hrs for the auto sync interval, you can change this.


5. Add a target country, under Targets. The press Save to have the download xml appear. mceclip0.pngThis will allow you to download the XML for English Language (Or which ever language you choose). 


After all of these steps are completed, your Google Merchant account will now start communicating with Catfish. Please allow up to 2 hours for products to start syncing. You will see your products on Google Merchant under Products > List.


Google Merchant Settings

Key This is where you place the Merchant Center JSON file from Step 4E
Merchant Store ID Found in your Google Merchant Account, Step 4F
Manual Sync Clicking this will allow you to manually sync your products. Please allow up to hours after clicking this for the changes to appear on your Google Merchant Account.
Auto Sync Enabled

This will allow for Google and Catfish to automatically sync your products as a background task

There are some rules in order for a product to sync:

  • Product must have a price greater than 0
  • Product must have an image
Auto Sync Interval This is the time the sync will take place in intervals of minutes. By default it is 1440.
Create a product for each combination

This setting will create 1 product in google merchant per each product attribute combinations. In case products don’t have any attribute combinations, we will create a simple product without any preselected attributes and will use the product image and not the attribute combination image.

Example: Two attribute combinations

Attribute combinations:
1. Color=Black
2. Size=Small

1. Color=Red
2. Size=Medium

 This will create two separate products in Google Merchant. You can also add a Product Title and Description per combination, see details below.

Download XML button We will download all xml data for specific language to sync manually in google merchant


Adding a Product Title and Description for an Attribute Combination

Navigate to the Attribute Combinations, and press MIS Configure

mceclip0.png

Then you type in your Title and Description:

mceclip1.png


You can also setup shipping methods in Google Merchant

https://support.google.com/merchants/answer/6069284?hl=en


Manually Syncing Products using XML

Please visit this article here after you have setup Google Merchant. 


Google Merchant Manual Sync


After you have completed setting up Google Merchant, you have the option to manually sync your products to Google Merchant. 

1. First, we need to get the XML from Google Merchant configuration page in Catfish:

mceclip0.png

2. In Google Merchant, open go to Products > Feeds

mceclip1.png

3. Press Add

mceclip4.png

4. Select a country and a language:

mceclip6.png

5. Give your feed a name, then choose Upload for the input method:

mceclip9.png

6. Be sure to name your feed file EXACTLY like the one you downloaded. Choose Upload a file now

mceclip0.png

7. Your manually uploaded feed will appear in Google Merchant under Products > Feeds. mceclip2.png

8. Your products will then appear in your list, please allow up to 2 hours for this to occur. Please note that all products will be added, regardless if they meet the criteria (An image and pricing).


Facebook Integration


Infigo supports using Facebook to register an account, log in using Facebook authentication, and upload images to MegaEdit from your Facebook albums.

To implement any of these features, you first need to set up and configure an application using a Facebook developer account.

This can theoretically be any account, but we recommend making it one neutral within your company so that anyone who needs to modify the configuration has access to it.

Please note that we do not support Facebook apps directly, and can only advise as to what the configuration needs to be in order to integrate with Infigo.

With this in mind, please follow Facebook's official guide to create a Facebook application, which can be found here.

Facebook Login

  1. Once you've set your Facebook application to be used for Facebook Login, and designated it a Web Application, you need to navigate to Settings -> Basic.
  2. In this menu, there are four fields to note, each highlighted in the screenshot below.mceclip0.png
    You will need to do the following for each respective field:
    App ID:
    This is automatically generated, and you will need this later - make a note of this ID.
    App Secret:
    As with the App ID, you will need this later - make a note of it alongside the ID.
    App Domains:
    You will need to add the domain for each URL people will be accessing your Infigo storefront through. For example, if you have the binding mystore.com configured on your storefront, you will need to add mystore.com to the App Domains field. Note: this is effectively the base URL for the storefront without http, https, or www.
    Contact Email:
    This will be automatically populated with the email of the Facebook account you created the app with. You don't need to do anything with this field except make sure it's set to an email you can monitor in case Facebook needs to get in touch with you.
  3. Next, you need to add the Platform. Please note that this does not relate to Infigo platforms - it is simply Facebook's terminology for your storefront.

    To add this, scroll down to the bottom of the Basic Settings page from step 2 and click "Add Platform":
    mceclip1.png

    Select Website:

    mceclip2.png

    Enter the Site URL - should be the full URL of your storefront, including http/https and www (if relevant).
    A good test to see if this URL is valid is to copy and paste it into your browser. If it takes you to your storefront, then it is likely a valid URL.
    Note: this URL must match the domain that you entered in step 2.

    Once this has been entered, click "Save Changes"
    mceclip3.png
  4. Next, navigate to Products -> Facebook Login -> Settings:
    mceclip4.png
  5. In this menu, you will need to do the following:
    1. Enable "Embedded Browser OAuth Login"
    2. Enter a valid OAuth redirect URI. This will be the same URL you used for the Site URL in step 3, except you will need to add the following extension to it: /Plugins/ExternalAuthFacebook/Login
      So that
      https://yourstorefront.infigosoftware.com 
      becomes 
      https://yourstorefront.infigosoftware.com/Plugins/ExternalAuthFacebook/Login

      mceclip5.png
  6. Once you have configured and saved all of the above, your application should be ready for integration with Infigo. 

    On the storefront you would like to set this up on, navigate to Configuration -> Plugins > External Authentication, and click "Configure" for the "Facebook" option.
    Note: if you do not see this menu, please contact Infigo Support.
    mceclip0.png
  7. In this configuration menu, you simply need to enter the App ID and the App Secret which you took down in step 2, then click Save.
    mceclip1.png
  8. Once you are ready to start using the application, simply edit the Facebook option under Configuration -> Plugins > External Authentication, enable "Is Active", then click "Update":
    mceclip2.pngThis will cause the Facebook login button to appear on your user registration page.
  9. If you would like Facebook login to automatically fill in the user information, navigate to Configuration -> Settings -> Customer Settings and enable Auto register enabled under the External authentication settings tab:
    mceclip3.png

Once all of the steps above have been followed, your Facebook application should be integrated with your Infigo storefront. 

Please note that it will be integrated in development mode and will not be ready for live use. For more information on this, see the Going Live section of this article.

Facebook Image Upload

To utilise Facebook's Image Upload functionality, you will first need to get your app ready by following steps 1 -> 5 of the Facebook Login section of this article.

Once they have been completed, all you need to do is navigate to Configuration -> Settings > Media Album settings, enable the "Facebook" plugin in the "Installed Image Plugins" section, and enter your App ID (found in step 2 of the Facebook Login section of this article).

mceclip4.png

Going Live

Please note that when you first set this up, Facebook Login will only work with an email account that matches the one used to set up the app, and any authorised testers for the app. This is because your app will be in development mode. In order to go live with your app, you will need to follow Facebook's steps here.

Our integration requires the following permissions:

  • email
  • user_photos
  • user_birthday
  • user_hometown


Once again, going live is entirely with Facebook, and we cannot support the steps required to go live (though if you have any questions which arise from the go-live process, please feel free to contact us).


Image search plugin


We have different image plugins that allow adding media resources to albums in My Account or inside the editors. One of those plugins is the Image Search plugin that uses Elasticsearch to index and retrieves a large number of images categorised for usage.


mceclip6.png

There are different areas that need to be configured to make this work and check with support if all your custom configurations and plugin's have been enabled on your platform.


Getting Started

Before you begin configuring the Image Search Plugin, you will need to contact the Infigo Support team to do the following on your behalf:

- Configure Elastic Search 
- Enable the image search plugin
- Grant Platform & Storefront admin access to the 'upload folders' page via an update ACL.

Once the above 3 steps are complete, you are ready to begin your configuration.


Custom Data Category

In order to perform a search using an Elastic Search server, we need to have the data to search in text records. Those records are going to be created in a "Custom Data" category that we need to create in advance.

To know more about custom data and how to create one you can read our Custom Data Category guide.


Upload folder

All the images will be available in an "Upload folder". But we need to configure if we are going to post-process those files after they have been uploaded. As we are going to use a plugin that will create custom data records out of the images uploaded into here, you need to create a new upload folder where you configure:


  • Active
  • Custom data category id (from the previous step)
  • Post Processor System Name: “Image search post-processor”


To know more about Upload folders and operations that you can perform on them you can read the Upload folders guide.


Media album settings

The last bit is the ability to show the images and a search in

  • Dynamic editors
  • My account album management


For this, we need to enable the imageSearch plugin from “Media Album Settings” in the admin. Access via the admin search or via the relative URL CA/Admin/CatfishSettings/MediaAlbumSettings


mceclip0.png


Configure the IMAGE_SEARCH plugin on the Media Album Settings (2nd tab) - and configure the name of the upload folder.

mceclip1.png


Adding images

Now the only thing left is to upload images to the created upload folder and the custom data related to the images will be created. Replacing an image will also create update the related custom data values.

There are two ways to get images into the upload folder:

  • Upload the images in the created upload folder from the admin manage folder view
  • Via our sync tool

We are going to add the files via the upload option, for more information on the sync tool option, you can check our Setting up and installing Infigo Sync guide.


Adding IPTC image metadata

When you have assigned a custom data category to an upload location, any image you upload will create an entry on the custom data. The custom data created for images have the following format.

mceclip3.png

If you want to add values for the missing properties you will have to set the IPTC metadata. For more information on ITPC check their website https://iptc.org/


You can set this information using some of the software where IPTC is supported as they have on their website. https://iptc.org/standards/photo-metadata/software-support/

This image plugin uses Categories and Tags to show the data in an organised way.


Using the plugin

Now that all the admin parts are configured, the final result can be seen in the storefront.
Whenever in the editors or My account album management a user can upload an image a new menu will be present where he can choose to take an image form the image plugin.


mceclip4.pngmceclip5.png

Presenting you a window where you can perform the searches and browse categories or tags.

mceclip6.png


Shopify


The purpose of our Shopify App is to provide an embedded Infigo editor experience on an existing Shopify Store. Through our custom built app we make this a quick and easy process.

Below we cover the steps to install and configure the app so that you can get up and running, providing your end users with the flexibility and power of MegaEdit on your Shopify Store.

The app will allow to link up Infigo products to Shopify products or individual variants.

It does not sync any product options to Infigo for the editor or ordering process.

It does not sync any checkout options to Infigo for the ordering process.

Installation

The Shopify app currently is not listed on the public app store of Shopify. Instead, we will create a custom app for you and will create an installation link specifically for your store. Please raise a ticket with the Shopify link we would connect to.

The app will modify some theme files to inject the editor experience to the frontend. Currently, the app supports only liquid based themes. If your theme is liquid based, the installation takes care of any necessary steps. If you have a json based theme, please inform our support after installation and provide login details with sufficient rights to edit the theme so the necessary adjustments can be made for you.

Once the link has been provided, log onto Shopify with an administration account with permissions to install external apps and open the link. A summary of the installation is shown and via one click, the app installs for your store.

The Infigo app will show up under the Apps section on the left hand menu:

mceclip0.png


Setup

Infigo Setup

  • Enable external editor in the security settings
  • Ensure the site runs under a subdomain of your shopify site

Shopify Setup

On the integration area, there are three tabs:

  • Configuration
    • Setup the Infigo storefront URL (note: no path based storefront supported)
    • Setup the API token for that storefront
    • Setup an existing shipping method on that storefront
  • Sync producs
    • Link Infigo products to Shopify products or variants via the UI
  • Orders
    • you can see any order placed along with additional information (Infigo id and Shopify id)
    • if there was a problem placing the order (e.g. unknown shipping method), a retry button allows to push the order into Infigo

Shopify Set Up


Introduction:

One of our latest projects introduces the new Shopify module. This means you can now create a Shopify storefront and link your Megaedit products within Infigo to give customers a seamless experience. By using this module, customers will enter a Shopify storefront, find the products they need, be taken to our editor to edit their product and then taken back to Shopify where they can checkout.

If you are interested in this module and would like more information about functionality and cost, please raise a ticket to our support team - Click Me  

Set Up:

Once the module has been set up and enabled for you, then you are ready to make a start!

You can use existing or create new Megaedit products. Once you have the products created within Infigo, you are ready to start the process of linking products! For the next steps, you will need to head to your Shopify storefront.

You will need to create products within Shopify, this will allow the link between Shopify and Infigo to take place. To do this, you will need to log into your Shopify storefront, and head to 'Products' in the left hand toolbar:


Once in 'Products', select 'Add Product':


It is important to note, that when you create a new product within Shopify, this is what the end user will see. The only section of Infigo that the customer will see, is the Megaedit editor. Once you have created the products within Shopify, you are ready to link them with Infigo!


Linking Products Between Infigo and Shopify:

To Link products between Infigo and Shopify, you will first need to 'Sync' the products from Infigo, to do this, you will see an option in the left-hand tool bar to select 'InfigoIntegration':


Once this has been selected, you will see some options in the top right hand corner, you will need to select 'API Settings':


Within the API settings, there is an option to 'Sync Products Now', selecting this will sync the products you have created in Infigo and allow you to link them to your Shopify products. This Sync does automatically take place overnight but if you need to sync the products sooner, then you have the option below:


Once the Sync has taken place, it's time to link your products together. From the page above, select the 'Products' button, this will then show you all of the products that have been synced from Infigo:


Now it's time to select the product you wish to link by selecting the 'Link' button next to the chosen product.


Selecting 'Link' will open a new window, where you can choose the product in Shopify you wish to link to.

You will then see that the product has now been linked from Infigo to Shopify:


You can then find the product on the front end of your Shopify storefront and select 'Create':


This will then take you through to the Megaedit Editor:


Once saved/added to basket in the editor, it will take you back to Shopify and add the item to the customers basket, where they can complete the normal Shopify checkout.


Using Variables within Shopify

A current limitation of using the Shopify plugin is that 'Attribute Combinations' do not directly link with Shopify. This means if you have for example, a t-shirt product with a size and colour, this will need to be set up as a separate product within Infigo. Even though it is a separate product within Infigo, it can be still be linked to the same Shopify product using 'Variants' within Shopify.


To set this up, you will need to head to the product in Shopify that you need to add a 'Variants' to. If you scroll down the page, you will see an option to 'Add Option Like Size or Colour'.


If you select this, you will get a new drop down where you can add the different variants, and select 'Save'


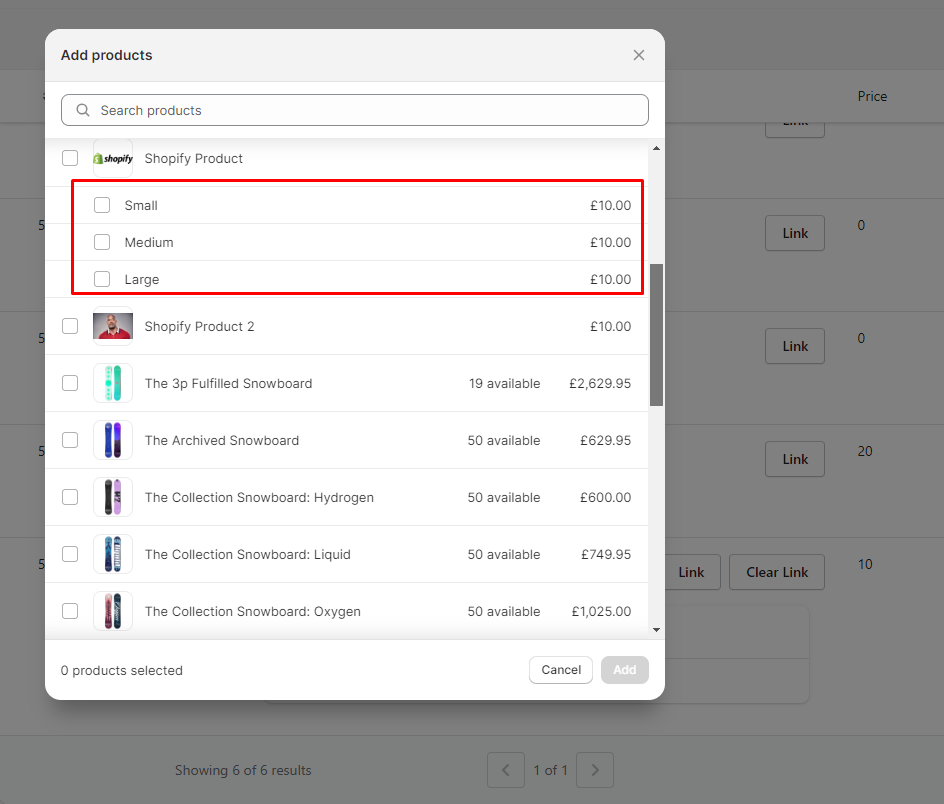
Once this has saved, you can now link products from Infigo to the correct 'Variant' using the methods that was shown in the begging of this article. Once you have run the Sync, you can then choose an Infigo product to link to the variant of your choice.


Sub-Domain URL

One thing to note within the process is domains. You will need a separate domain for both the shopify site and the Infigo site. This means both sites cannot share the same URL. You can keep the infigosoftware.com binding for your Infigo storefront or you can change this at anytime, as long as it is a different domain from your Shopify storefront, for example:

Correct Scenario:

Shopify URL - ilovelabels.com
Infigo URL - editor.ilovelabels.com


Incorrect Scenario:

Shopify URL - ilovelabels.com
Infigo URL - ilovelabels.com


If you have any questions about this, please feel free to reach out to the support team by raising a new ticket.

Bulk link customers to Connect plugins using Customer CSV Import (External ID columns)


This is a quick reference for bulk linking Infigo customers to a Connect integration user by setting the customer’s External ID during Customer CSV Import.

It applies to any Connect plugin that exposes a customer external reference field via the CSV Import page or when clicking the Connect Link button on a customer entry. Common examples include Connect: printIQ, Connect: Tharstern, Connect: CERM, and Connect: Veracore.

This does not bulk create customers in your MIS or other external system. It links customers across systems using the external identifier.

For the full customer import walkthrough and troubleshooting, use the main guides here:


When to use this

Use this when you are implementing an MIS or integration alongside Infigo and you want to:

  • Bulk import customers into Infigo.

  • Bulk update existing Infigo customers.

  • Avoid opening each customer record just to press a Connect button, by supplying the external ID in the import instead.


Before you start

  1. Ensure your Connect plugin is enabled and configured. Use the Academy setup guide for your plugin.

  2. Gather the correct external identifier for each customer from the connected system. The exact value depends on the integration and the customer record structure in that system.

  3. Keep imports manageable. We recommend 200 customers per CSV, then upload multiple files one after another if needed.


Step by step: bulk link customers to a Connect plugin via CSV Import

1) Download the Customer Template CSV

Go to Admin → Customers → Customer Management → CSV Import, then select Download Customer Template CSV.


2) Find the correct External ID column header for your Connect plugin

On the same CSV Import page, look for the info section that lists plugin link columns. It will show you the exact header text to use for each enabled Connect plugin.

Important notes:

  • The headings are case sensitive.

  • The value is usually not required, so you can include it only for customers you want to link.


3) Add a new column to your CSV using that exact header

Add a new column to the template CSV. The column header must match what the page shows for your plugin.

Example only: if you are using Connect: printIQ, the header shown is Mis.PrintIQ. Your environment may show different headers depending on which plugins are enabled.

Then populate each row with the customer’s external ID from the connected system.


4) Populate the rest of the customer rows as normal

Fill out the customer details you want to import or update. You do not need to fill every field. The importer validates the rows and reports any issues so you can fix and re upload.

For the full field list and import behaviour, use:


5) Upload the CSV and run the import

Upload your CSV in the CSV Import tab and run the import. Infigo will create or update the customers, and store the external ID values so the customers are linked to the relevant Connect integration without needing per customer manual linking.

Why is my site loading slowly and external stock levels not displaying via an integrated system?


This article explains how to diagnose and resolve issues where product pages load slowly and external stock levels are not displayed in the storefront.

It is based on a resolved case where the integration failed to retrieve an authentication token from the external stock system after a network change. The guidance below walks through structured checks to quickly isolate whether the issue lies with configuration, connectivity, or endpoint changes.

Before escalating, complete the checks outlined below and collect supporting evidence (HAR files, screenshots, connector settings) to assist investigation.


Use Cases

  • Product pages take significantly longer than normal to load.

  • External stock levels do not display on product pages.

  • The Add to Basket button is disabled or unavailable.

  • The issue began after a broadband, firewall, or network infrastructure change.

  • One storefront works correctly while another does not.


Key Settings to Review

  • Connect Plugin – API URL
    Confirm the endpoint used to contact the external stock service.

  • Connect Plugin – Credentials
    Verify the application ID/email/password used to request an authentication token.

  • Handle Stock Setting
    Ensure the product or connector setting instructs the system to use the external connector for stock handling.

  • Storefront Connector Mapping
    Confirm the connector is enabled for the affected storefront.

  • Connection Test / Integration Logs
    Use the built-in test function to attempt token retrieval and review any error responses.


Step-by-Step Troubleshooting Guide

1. Confirm the Symptom

Open an affected product page and observe:

  • Page load time

  • Whether stock appears

  • Whether Add to Basket is enabled

Document the behaviour.


2. Capture Browser Evidence

  • Generate a HAR file from the browser Network tab.

  • Check the Console tab for JavaScript errors.

  • Capture screenshots showing missing stock or disabled purchase controls.


3. Compare Working vs Non-Working Storefronts

If another storefront is functioning correctly:

  • Compare connector assignment

  • Compare API URL configuration

  • Compare stock handling flags

Differences here often identify misconfiguration.


4. Test the Connector

Use the Connect plugin’s Test Connection feature.

Expected outcome:

  • A successful authentication token is returned.

If the response is null, empty, or errors:

  • The integration cannot reach the external service

  • The endpoint may be incorrect

  • Credentials may be invalid


5. Verify the API Endpoint

If token retrieval fails, confirm:

  • The external stock system’s public address has not changed.

  • The connector is not pointing to an outdated IP address.

  • The correct hostname or current public IP is configured.

In the referenced case, the external system’s public IP changed following a network migration, and the connector continued referencing the previous address. Updating the API URL resolved the issue.


6. Confirm Network and Firewall Rules

If the endpoint is correct but connection still fails:

  • Confirm outbound traffic from the integration environment is not blocked.

  • Confirm inbound firewall rules on the external system allow requests from the integration server.

  • Verify no recent security rule changes were introduced.

Firewall allowlisting may be required depending on hosting setup.


7. Prefer DNS Over Raw IP (Best Practice)

If the external stock system is hosted on a connection where public IPs may change:

  • Use a stable DNS hostname rather than a fixed IP address.

  • This reduces risk of future outages following ISP or infrastructure changes.


8. Re-Test End-to-End

After configuration changes:

  1. Re-run the connector test.

  2. Reload a product page.

  3. Confirm:

    • Stock loads promptly

    • Add to Basket is enabled

    • No console/network errors appear


9. When Escalating to Support

Provide:

  • Product URLs

  • HAR files

  • Console logs

  • Screenshots

  • Connector configuration (obscure passwords)

  • Details of any recent network or ISP changes

Including this information significantly reduces investigation time.


Summary of Confirmed Root Cause (From Resolved Case)

In the validated incident:

  • The external stock system’s public IP changed following a network migration.

  • The Connect plugin API URL still referenced the previous IP.

  • The system could not retrieve an authentication token.

  • Updating the endpoint resolved both slow loading and missing stock display.


Additional Resources

For further guidance, consult your internal integration documentation or contact your Support team for assistance.

Related links

How Do I Install and Setup Infigo Sync?


Please watch our video tutorial here for a visual walkthrough: https://youtu.be/nB2bdcWOtgU?si=IZKPPcoLrp_rUIiL 

Important, please note: 

1. You cannot have 2 instances of Infigo Sync on the same computer or server. If you would like the sync to run on many storefronts, then you will require a platform API key. If you're running the sync on one storefront, then you can configure it at storefront level with a storefront API key. 

2. Before you start the installation process please switch off all other programs and processes (including antivirus software, and if installing on a sever, the firewall). These services interrupt the installation process and prevent install. 


InfigoSync is a Windows based service which polls your Infigo Platform and downloads any print ready jobs to hotfolders.

It is a two way service that identifies files have successfully reached their destination on your internal network, and automatically updates the status of the order in Shared Print Operations.

InfigoSync can also upload files to the Infigo system.

Installation

To Install InfigoSync, firstly you require an API token. In order to attain one, simply contact the support team and they will produce one for you. When requesting a token, please confirm whether you would like it to be created on the platform level, or confirm which storefront you would like it to be created on.

You will now see a string of letters and numbers. Copy this value to your clipboard.

mceclip0.png

1. Download InfigoSync

2. Run the installer you have downloaded from above. Note, this is a Windows ONLY installer

3. Paste your newly created API Token into the Infigo API Key field (shown below)

4. Enter the full site URL of your platform (using HTTP only)

5. Clicking Next allows the installer to search your platform for available print locations.

6. Select the Print Location relevant to you and complete the install.

7. Set your Download folder to the directory you require your jobs to be copied into.

Please note: basic installation is recommended for users, please contact Support for the guided installation of Advanced configurations (For use with: Upload Group, Batch CSV Group and Local Sync)


If your install is unsuccessful and it says "Catfish Sync Installer Setup Wizard ended prematurely because of an error...". The please switch off all other programs and processes (including antivirus software, and if installing on a sever, the firewall). These services interrupt the installation process and prevent install. 

mceclip0.png


The InfigoSync service does not start automatically. To start the service,

  1. Go to Control Panel > Administrative Tools > Services


Locate Services:


mceclip2.png


Locate the InfigoSync Service in the list, and start the service.

New jobs will begin to appear in your local Download location (for example C:\InfigoSyncDownload)

How To Fault Find InfigoSync Issues

How do I check if files are uploading successfully?

There is currently no UI to manage files uploaded via InfigoSync, however there are a couple of ways you can see what has been uploaded.

  • Check the InfigoSyncUpload Error folder, by default this is C:\InfigoSyncUpload and will contain any PDF's that InfigoSync has been unable to upload.
  • Check the local InfigoSync error log C:\Program Files (x86)\[companyreference]\InfigoSync\infigosync.log, again this will detail any files that have errored.

If the above are reporting no errors then files have been successfully uploaded.  

How do I check the InfigoSync error log

  • Check the local InfigoSync error log C:\Program Files (x86)\[companyreference]\InfigoSync\infigosync.log, this will detail any errors InfigoSync has reported.

How do I find my configuration file

  • Check the same directory as for the log file; C:\Program Files (x86)\[companyreference]\InfigoSync\InfigoSync.exe.config

How do I check which Hotfolders jobs are dropping into

  • Go to Shared Print Operations and find the job/s you are searching for, open the entry and check the 'Print Location/Hotfolders section to see where it currently is and manually copy to another hotfolder if necessary.

Infigo Sync: Why do I get a service log-on error and why is my hotfolder file copy blocked?


This article explains how to diagnose and resolve an issue where:

  • The Infigo Sync Windows service fails to start with a logon error.

  • Files remain in the hotfolder and do not move to the paste/output folder.

  • No .lock file is present, yet processing does not occur.

In the referenced case, the root cause was insufficient Windows permissions for the service account, which prevented the service from starting and moving files. The issue was resolved after the machine’s permissions were corrected by IT.


When to Use This Guide

Use this guide if:

  • The Infigo Sync service shows a Windows logon failure.

  • You cannot modify the service Log On account.

  • The Log On tab fields are greyed out.

  • Files are stuck in the hotfolder with no .lock file present.


Step-by-Step Troubleshooting

1. Confirm the Service Error

  1. Press Win + R

  2. Type services.msc

  3. Press Enter

  4. Locate Infigo Sync

  5. Attempt to start the service

If a logon failure appears, continue to the next step.


2. Check the Hotfolder

  • Look for a .lock file.

  • If one exists, confirm no job is actively processing before removing it.

  • If no .lock file exists, continue troubleshooting.


3. Review the Service Log On Account

  1. In services.msc, right-click Infigo Sync

  2. Select Properties

  3. Open the Log On tab

If editable:

  • Select This account

  • Enter a Windows account that:

    • Has local administrator rights

    • Has read/write access to both the hotfolder and paste/output folder

  • Click BrowseCheck Names

  • Apply and restart the service

Tip: Run whoami in Command Prompt to confirm the current Windows username.


4. If Log On Settings Are Greyed Out

If you cannot change the service account:

  • Confirm whether you are logged in as a local administrator

  • If not, contact your IT administrator

In the validated case, lack of admin rights prevented the service account from being modified.


5. Verify Folder Permissions

Ask IT to confirm that the service account has:

  • Full read/write access to the hotfolder

  • Full read/write access to the paste/output folder

Once permissions were corrected in the referenced case, the service started successfully and files moved as expected.


Resolution Summary

The issue was caused by Windows account permissions preventing the Infigo Sync service from running correctly and accessing required folders.

After updating the PC permissions for the service account, the service started normally and file processing resumed.


When to Escalate

Contact Support if:

  • The service still fails after permissions are confirmed

  • Log files show repeated authentication or access errors

  • Files remain stuck despite correct folder permissions

Include:

  • Screenshot of the Windows service error

  • Screenshot of the Log On tab

  • Relevant Infigo Sync log excerpts

How Do I Add Hotjar to My Infigo Storefront?


Hotjar is a powerful tool designed to track and analyze user behavior on your website. By capturing heatmaps, session recordings, and user feedback, Hotjar enables businesses to improve their website's usability and customer experience. This guide explains how to integrate Hotjar into your Infigo storefront to monitor user interactions effectively.

For additional information and detailed tutorials, the Infigo Academy offers extensive resources on a wide variety of topics. Visit the Infigo Academy to search and browse our content.


2. Contents

  1. Overview
  2. Contents
  3. Key Points and Takeaways
  4. Key Settings
  5. Step-by-Step Guide to Adding Hotjar
  6. FAQs
  7. Alternate Search Terms

3. Key Points and Takeaways

  • Hotjar can be integrated into Infigo storefronts by adding its tracking script to the appropriate section in the Infigo platform.
  • The integration involves no coding experience and can be completed in minutes.
  • The script must be added to the PageHeadContainer section under "Infigo Settings."

4. Key Settings

PageHeadContainer

  • Path: Infigo Settings → Scroll to the PageHeadContainer section.
  • Explanation: This setting allows you to insert custom scripts, such as the Hotjar tracking code, into your storefront's HTML <head> section. This is crucial for tracking user behavior across the site.

5. Step-by-Step Guide to Adding Hotjar

Problem:

You need to add Hotjar to your Infigo storefront to gather user behavior insights but are unsure how to implement the tracking code.

Solution:

  1. Retrieve Your Hotjar Tracking Code:
    • Log in to your Hotjar account.
    • Navigate to your dashboard and copy the tracking script provided for your project.
  2. Access Infigo Settings:
    • Log in to your Infigo admin dashboard.
    • Go to Infigo Settings.
  3. Locate the PageHeadContainer Section:
    • Scroll through the Infigo Settings page until you find the PageHeadContainer section.
  4. Insert the Hotjar Script:
    • If there is existing content in the PageHeadContainer, ensure you do not overwrite it. Instead, add your Hotjar tracking script within the <script> tags:

      html
      <script> // Existing content remains untouched // Add your Hotjar script below [Your Hotjar Tracking Code] </script>
  5. Save the Settings:
    • Once the script is added, save your changes.
  6. Verify the Integration:
    • Return to Hotjar and check the installation status to ensure the script is running correctly.

6. FAQs

Q: What happens if there is already a script in the PageHeadContainer?
A: Ensure you do not delete the existing script. Add your Hotjar tracking code within the <script> tags in a new line.

Q: Do I need coding knowledge to do this?
A: No, the process involves copying and pasting a script provided by Hotjar.

Q: Can I test if Hotjar is working immediately?
A: Yes, log in to Hotjar, and it will confirm whether the script has been successfully installed.

Q: What if I cannot locate the PageHeadContainer section?
A: Contact Infigo support or refer to the Infigo Academy for further guidance.


For additional information and detailed tutorials, the Infigo Academy offers extensive resources on a wide variety of topics. Visit the Infigo Academy to search and browse our content.

How Do I Add an Instagram SnapWidget on my Storefront?


When connecting your Instagram account to your website you can follow the below steps: 


1) Purchase SnapWidget Instagram account

Head over to: https://snapwidget.com/ and setup an account, then purchase a monthly plan which is suited to your needs. For most cades the basic plan will do and the rest of the guide will assume you have bought this. 

You will need to have a business / company Instagram account not a personal one.


2) Create a widget

Once you have bought and setup your SnapWidget account it's time to connect the Instagram account.

Click "Create a new widget" in the dashboard. 

From the list of Widgets click the "Instagram" pill to filter them out and then select the type of widget you would like to use. 

Follow the on screen instructions to connect your Instagram account, allow access and then return to SnapWidget. 


3) Edit and create your Widget

Once you have setup your widget you can edit it to change some settings

When you are happy with the settings and the preview looks how you want it click "Update & Get Widget" 

You will get the following popup, copy the embed code to clipboard then navigate to your Infigo website.


3) Embed on website

Navigate to the area on your website you would like to embed the widget.

Here is an example of the embed using content templates: 

How Do I Add PostCoder to the checkout process?


Our UK customers can use Postcoder for postcode lookup services on their Storefront.

To set this up on your storefront, go to https://postcoder.com/ and click on "Start a free trial" (https://postcoder.com/sign-up) and create an account 


mceclip0.png


Once you have done this please open a ticket and send us your new credentials (username and password). We'll input the credentials for you. 

***

Once our Support Team come back to you to - please go into Customer Settings in admin and select poster as the address provider and force the postcode look up. Remember to Save. 


***

Once it is up and running on your storefront, the end user would add a new address, search the postcode and select the correct address from the list. From here the address fields would be auto populated: 


How to enable Loqate address validation in Infigo


Problem

You’ve set up Loqate (or added your API details), but:

  • Address lookup isn’t appearing at checkout
  • Or you’re unsure how to connect Loqate to your storefront

Cause

Infigo does not have built-in address validation.

Instead, it supports third-party integrations like Loqate, which must be:

  1. Subscribed to externally
  2. Configured within Infigo (Other plugins)
  3. Enabled in Infigo (Customer Settings)

Even if API details are added, the feature won’t work unless all required settings are configured.


Resolution

1. Ensure you have a Loqate subscription

Loqate is a paid, external service, so you’ll need an active account and API credentials.

You can sign up here: https://www.loqate.com/en-gb/get-started/


2. Provide required Loqate details

You’ll need the following:

  • API Key
  • SearchMode (e.g. ByUserSelection)
  • SearchCountrySet (optional, depending on setup)

These are used to configure the plugin within Infigo.


3. Enable Loqate as the address provider

This is the most commonly missed step.

Go to:
Infigo Admin → Customer Settings → Billing and Delivery Addresses Configuration

  • Set Address Provider = Loqate
  • (Optional) Enable Force Postcode Lookup

Without this, the plugin will not appear at checkout - even if everything else is configured.


4. Test on the storefront

Go to checkout and:

  • Add a new billing or delivery address
  • Enter a postcode/ZIP code
  • Select from the returned address list

If configured correctly, Loqate will suggest addresses automatically.


Key takeaway đź’ˇ

If Loqate isn’t showing, it’s usually not a plugin issue - it’s because the Address Provider setting hasn’t been switched to Loqate.


Still not working?

Check the following:

  • API details have been added correctly
  • Loqate subscription is active
  • Address Provider is set to Loqate
  • You’re testing via “Add new address” at checkout

If all of the above are correct and it still doesn’t appear, further investigation may be required.

API Overview


RESTful API

Requires an API token created by the support team

Can control many aspects of the storefront from creating users, categories and products to placing orders.

It also allows you to extract a lot of information on Orders, Customer behaviour, product information and more too.

You can also carry out processes like returning all shopping cart items for a specific user, loading the editor for a specific user and product, and also logging a specific user in.


More information can be found by going to your infigo storefront and adding /services/api to the URL

e.g. https://demo.infigosofware.com/services/api


Using Postman


What is Postman?

There are many ways to test making API requests against the Infigo API but one of the easiest is to use a tool called Postman. Simply sign up (if required) and then download the Postman App

Postman is a collaboration platform for API development. Postman's features simplify each step of building an API and streamline collaboration so you can create better APIs - faster. Once you have downloaded the API you can start to make requests against our API by reading our API Overviewand by requesting an API Token

Postman is broken down into Workspace's - which you can think of as individual projects, then Collections which are essentially a way of grouping, finally, API requests.

In addition, Postman has the concept of Environments. Environments allow you, through the use of variables, to quickly and easily manipulate your requests based on the values assigned to your variables within the Environment. We'll cover more on Environments later in the article.


How can I start using Postman against the Infigo API?

Attached to this article is a Sample Postman Environment that you can download.

Once you have downloaded it, open your Postman app and click on the Import button (depending on your version of Postman this may be located and look slightly different.

mceclip0.png

Locate your downloaded Sample Postman Environment file and click Import.

You should see in the top right corner a dropdown and within there you should be able to select 'Sample'. Once you have selected 'Sample' click on the eye symbol next to it to view it.

mceclip2.png

The breakdown of the sample Environment you imported can now be seen in the popup. It should contain the following Variables, and what you can do in this popup is also enter in values for each of these variables:

  • HostURL - This is the URL of your Infigo Storefront
  • APIToken - This is the API Token you have obtained from the Support Desk
  • CustomerGUID - This is a container to capture and store a Customer GUID value
  • CustomerId - This is a container to store a sample Customer ID you have fetched from the admin in Infigo
  • ProductId - This is a container to store the product ID of an Infigo product
  • JobId - This is a container to store a Job ID
  • OrderId - This is a container to store an Order ID
  • EditorUrl - This is a container to store the Editor URL (if looking to follow the sequence of embedding our editor via an iframe in an external site)

Simply populate the environment variables with the values you want to test with each time and it will modify the requests to request and return the correct information.

We have created a number of Collections that are related to different aspects or features of our API that you will be able to download from the relevant Articles. These should all work with the environment you have downloaded from this article but to import them you simply click on the Import button (the same as you did for the Environment) select the Collection JSON file and click import.

Now you will see the Collection in the left hand panel and when you expand a Collection you will notice it is made up of a series (or collection) of API requests.

mceclip4.png


Running an API Request

All the action happens in the main centre console. Here you can decide if you want to make a POST or GET request (among others), configure any parameters, Authorization type, Input the body of the request and also create some tests which we cover later.

If you have imported one of or Collections then everything should be setup for you to just run it, once you have input your Environment variable values. If you are not using our Environment and want to just make some simple calls from scratch then that is also just as simple.

Lets take the Get Customer data API call as an example.

Request URL: https://myteststorefront.infigosoftware.com/services/api/Customer/Get/31847

Type: GET

Authorization: Basic Auth (in the Username field paste in your Infigo API Token)

Body: This can be left blank as the information required to make this API call is all sent in the request URL.

You can optionally save the Request if you want to use it in a Collection later or just click Send.

If everything is configured correctly you should see in the Response section all the information returned for the customer on that storefront with the Id of 31847. Ours returned our lovely support team member Ben Mitchell's customer information.

mceclip5.png

This signifies a successful request and response. Unsuccessful requests should still contain useful information for you to understand why the response did not contain what you expected.

mceclip6.png

Using Postman Tests to manipulate your Environment variables

If you download our Collections, some may contain some Tests that will inspect the response of a particular request and then update an Environment variable.

mceclip7.png

This just helps chain multiple API calls together without having to manually modify values each time.

For example the Test above is used on the Get Customer data API call and takes the response JSON, looks for an entity called 'Guid' and then sets an Environment Variable called 'CustomerGUID' with the value.

In subsequent calls after this that require the CustomerGUID value it will already be populated and if you search for a different CustomerID it will then update the CustomerGUID for that customer when it is run.


Postman: Update orderline status


Pre-requisites

Prior to following this article, you will need to understand our main Postman article here, along with having a basic understanding of how API calls are structured.

API Call

Identifying Which to Use

When using this API call, there are two parts you need to configure:

  1. The orderline ID
  2. The new status ID

The orderline ID is the easiest one to find - you can find this under the "Job ID" columnin Shared Print Operations:

mceclip0.png


And once again in the "Job ID" column of the "Products" tab when viewing the order through Sales -> Orders.

mceclip1.png

Please note that you must include the letter prefix shown in Shared Print Operations when making the API call, otherwise Catfish will not recognise the orderline ID.


The new status ID can be found documented in /services/api , but they are also listed below:

  • Printed = 8
  • Shipped = 9
  • AwaitingApproval = 10
  • AwaitingData = 11
  • AwaitingParts = 12
  • AwaitingProof = 13
  • InArtworking = 14
  • InFinishing = 15
  • InPacking = 16
  • InProduction = 17
  • InReprographics = 18
  • OnHold = 19
  • ReadyForCollection = 46
  • Blocked = 49

Configuring the Call

The base URL for this call is "/api/OrderlineItem/UpdateItemStatus/{id}" and thankfully there are only two changes that need to be made, so there is not too much configuration required.

Firstly, you'll need to set {id} to the orderline ID.

In the screenshots shown in the section above, the orderline ID has been identified as "n934", so the URL will then become:

/api/OrderlineItem/UpdateItemStatus/n934

Next, the new status ID needs to be passed in the newStatus parameter. For this example, the orderline status is going to be set to "Shipped", and in the table above we can see that the "shipped" orderline status is "9".

This means the URL will then become:

/api/OrderlineItem/UpdateItemStatus/n934?newStatus=9

Alternatively, you can configure this with Postman's "Parameters" tab as shown below:

mceclip3.png

Response

Assuming the authorisation has been configured as explained in our Postman article, this URL is ready to post.

If the IDs provided were valid (as above), then you will receive a "200 OK" response:

mceclip4.png

After receiving the 200 OK, we can check the orderline and see that it has indeed been updated to the "Shipped" status:

mceclip5.png

Magento 2x plugin


The purpose of our Magento 2x plugin is to provide an embedded Infigo editor experience on an existing Magento 2.x website. Through our custom built plugin we make this a quick and easy process.

Below we cover the steps to install and configure the plugin so that you can get up and running, providing your end users with the flexibility and power of MegaEdit on your Magento website.


Installation

To install the Magento Catfish Extension, the Magento admin can use different options: to install it from Magento Community, or using COMMAND LINE or manual installation.

1.      Install extension using COMMAND LINE

Zip Folder need to have this structure

Name/app/code/ModuleName/ExtensionName/*.*

The Magento extensions can be installed in a few minutes by going through these following steps

  • Step 1: Download the Catfish extension
  • Step 2: Unzip the file in a temporary directory
  • Step 3: Upload it to your Magento installation app/code directory
  • Step 4: Disable the cache under System­ >> Cache Management
  • Step 5: Open command line, navigate to Magento installation root directory and enter the following command:

php ­-f bin/magento setup:upgrade

  • Step 6: After opening Stores­ >>Configuration >­>Advanced >­> Advanced, the module will be shown in the admin panel


3.      Install extension manually

To install the extension manually you have to follow the following steps:

  • Step 1: Download/purchase the extension
  • Step 2: Unzip the file in a temporary directory
  • Step 3: Upload it to your Magento installation app/code directory
  • Step 4: Disable the cache under System­ >> Cache Management


Edit app/etc/config.php file and three line code:

‘Ves_All’ => 1,
‘Ves_Megamenu’ => 1,
‘Ves_Setup’ => 1,

image2017-8-16_15-42-39.png

  • Step 5: Disable the cache under System >­> Cache Management
  • Step 6: After opening Stores ­>> Configuration­ >> Advanced­ >> Advanced, the module will be shown in the admin panel.


General Admin Configurations

Once the Catfish Extension is installed, the Admin will be able to see a new Menu, calledCatfish:

image2017-8-16_15-43-16.png

Via the Catfish, the Admin will be able to manage the list of the Catfish Products, API Settings and amend changes to the Catfish Editor.


Catfish API Settings

In this section, you will be able to configure the Catfish API credentials and download all the products from Catfish to Magento, by clicking theStart Syncbutton.

image2017-8-16_15-43-30.png


Please note, that you can configure different credentials per different storefronts or you can apply as default config for the whole Magento.

The sync process will copy all Catfish products to Magento.

Along with the Catfish API Settings, the user can configure the One Flow API Settings or FTP Settings.


Manage Products

Using this menu, the user can manage Catfish Products, amend changes, or delete them from Magento and Catfish platform. Please note, you can also create aVariable product, by uploading a pdf template.

image2017-8-16_15-43-50.png


Customize Editor

The user will be able to customize theInfigo Designerdirectly in Magento, by changing the colors to different components:

image2017-8-16_15-43-59.png


Link Magento Product to Catfish


In order to link a Magento product to a Catfish product, you should use theCatfish Linked Producton the Product Details in Magento. Here you can select the Catfish product, mark the output to be downloadable by the final user and import images from Catfish or not.

image2017-8-16_15-44-8.png


Sales


Once a order has been placed, you can check if the customer has ordered a Catfish product or not, by accessing theCatfish Order Statustab. Here, you can check if it is a Catfish product or not, if yes you’ll be able to identify the job id and the status of the output. For products linked to a Catfish Product, the admin view should either say “Waiting for PDF file” or provide a link to download the generated PDF file.

Also along with the Output status, you have theRecreatelink, that will force the Catfish platform to recreate again the output.

image2017-8-16_15-44-18.png

Front End Changes


Front End changes are applied for all products which are linked to a Catfish product. All other products should show as usual.

For a product that is linked to a Catfish product, the final user will see “Edit” button instead of “Add to basket” button. Clicking on the Edit button, either the Infigo Designer or MegaEdit will be loaded in an iFrame, depends on which type of product is loaded.

image2017-8-16_15-44-27.png

Clicking on the “Add to basket” button in the Editor, an Order will be placed in Catfish. Important, the output will not be created until the Magento user places the order.

When the output is ready, the Catfish platform will try to upload it back to Magento and will update the Order details.

IMPORTANTall created files will be uploaded to this root:root/media/outputdirectory. This path should have write permission in order to be able to save the output.


SMTP

update /etc/php.ini 

image2021-11-2_11-15-52.png


Incomplete

Can’t find what you need?

Ask our Infigo Support Team for help..

🔎
Loading…
    Select a Problem Solver