🚀Attributes Problem Solvers 🚀

Choosing a Control Type

A control type decides how an option looks and behaves on the product page — a menu to pick from, a box to type in, a file to upload, and so on. Pick the one that matches what you're asking the buyer for.


Quick picker — which type do I need?

If you want the buyer to… Choose
Pick one thing from a tidy menu Drop-down list
Pick one thing with every choice on show Radio button list
Pick several things at once Checkboxes
Type a short line of text (a name, a reference) Textbox
Type a longer message or instructions Multiline textbox
Choose a date (event, requested delivery) Date picker
Upload a file (artwork, logo, photo) File upload
See a read-only note on the page Info
Enter a number (quantity, amount, copies) Number

Html Schema, System and Hidden are managed automatically and aren't shown to buyers — see the bottom of this panel.


The options in detail

Drop-down list — A compact menu the buyer opens to pick one choice. Best when the list is long or you want to save space. Each choice can change the price.

Radio button list — Like a drop-down list, but every choice is visible at once and the buyer picks one. Best for short lists (about 2–5 choices). Each choice can change the price.

Checkboxes — A set of tick boxes the buyer can select independently. The only type that allows more than one choice at a time — ideal for optional add-ons. Each ticked box can add to the price.

Textbox — A single-line field for free text such as a name or a reference. No preset choices; the buyer types whatever they need.

Multiline textbox — A larger free-text field for longer input over several lines, such as special instructions or a message.

Date picker — A calendar for the buyer to choose a date, such as an event or requested delivery date. Note: date options can't be used to build pre-priced product combinations.

File upload — Lets the buyer attach a file (artwork, logo, photo), with a preview and the option to replace it. Mark it required and the buyer is reminded to upload before checkout.

Info — A read-only note shown on the page — guidance, a notice, or an estimate the buyer can see but not edit. It can also apply a surcharge, handy for handling or setup fees.

Number — A numeric field with optional default, minimum, maximum and step values, in whole numbers or decimals. It can drive the order quantity or adjust the production turnaround — the most flexible option for anything counted or measured.


Managed automatically (not shown to buyers)

You'll rarely set these by hand; the platform uses them behind the scenes.

Html Schema — Adds hidden product information that helps search engines (Google and others) list your products. Improves how products appear in search results; the buyer never sees it.

System — Used internally for certain checkout features, such as additional delivery addresses. Stays hidden on the storefront but travels with the order.

Hidden — An internal marker the platform attaches to an order to track related information. Created automatically, not added through the product screen.


Good to know

  • Required vs optional — Mark an option required when the order can't be produced without it; the buyer is prompted if they skip it.
  • Pricing — Drop-down, radio and checkbox choices can each adjust the price; Info and Number options can affect price too.
  • Keep it clear — Use a radio button list for a few choices and a drop-down list when the list grows long. Write friendly option names and help text for a non-expert audience.

How to hide price adjustment values from product dropdown options


Problem

Your product uses dropdown options with linked price adjustments, and the adjustment values are showing alongside each option, for example:

  • 2m [£275.00]
  • 3m [£550.00]

This can sometimes be misleading if the values are shown as additions to the base price and you’d prefer customers not to see them.


Cause

This is controlled by a catalogue setting in Infigo.

By default, product price adjustments can be displayed alongside attribute options in dropdowns and other product selectors.


Resolution

1. Go to Catalogue Settings

Navigate to:

Admin → Settings → Catalog

Look for the setting:

Show Product Price Adjustments


2. Disable the setting

Untick Show Product Price Adjustments

Once disabled, the dropdown will still show the option values (e.g. 1m, 2m, 3m) but without the price adjustment values in brackets.


Example

When enabled:

  • 1m
  • 2m [£275.00]
  • 3m [£550.00]

When disabled:

  • 1m
  • 2m
  • 3m

The screenshots on pages 2 and 3 show this before-and-after behaviour clearly.


Key takeaway đź’ˇ

You do not need custom CSS to hide dropdown price adjustment values in this scenario — there is a built-in catalogue setting for it.


Still not working?

Check the following:

  • You changed the setting in the correct storefront/catalogue
  • The setting has been saved
  • You’ve refreshed the product page to confirm the update

If price adjustments are still visible, it may be worth checking for storefront-specific behaviour or cached page output.

How Do I Add and Configure Product Attributes?


Product Attributes allow you to specify options, add-ons, and features to products. For example: size, lamination, product colour, bubble wrap packing, paper. 

Overview

Infigo Academy: Adding attributes to products


How To

1. In Admin go to Catalogue > Attributes > Product Attributes.
2. Click Add New, and fill in the relevant name, friendly name and description. This is your Attribute 'group' for example size, colour, finish, etc. Click Save. 

3. Next, go to Catalogue > Products > Product Management and find the product you want to add an attribute to and click Edit. 

4. Go to the Product Variant tab and click Edit. 

5. Go to the Attributes tab

6. Click on add new record

- Add an attribute, and specify the label the customer sees (prompt)

- Specify whether its required (mandatory)

- Specify the control type: (dropdown list, radio button, checkbox, textbox, multiline textbox, date picker, *file upload (customers can upload their own artwork), info, html schema, hidden). 

7. Click Insert and then Save and Continue Edit

8. Click View/Edit Attribute Values and add a new record 


You can now populate the drop down list or tick boxes with options.
You can also adjust the weight, dimensions and price of the item from its original cost for each individual attribute value.

When the product is ordered, the user will see the attribute populated on the Product Landing page. 

*file upload - file types supported jpg, jpeg, png, gif, bmp, pdf, csv, txt, tiff, tif, xls, xlsx, and Ai

How do I define the maximum upload size for a product attribute?


When Infigo populates an upload attribute, you can define the file size limit by visiting

Configuration > Settings > Catalog Settings

Adjust the setting ''

This is in bytes, so you may need to convert your requirement here

To add an attribute like this to your product please visit this article

How to Create Attribute Combinations


An attribute combination is a way of using a different SKU, stock count, set of images, and for certain MIS plugins, a different MIS mapping, all based on the user's chosen attributes.

For example, if you had a T-shirt stock item that came in two colours (red, blue), and you offered three sizes for each(small, medium, large), then logistically, you have six different items you are storing:

  1. Small red
  2. Medium red
  3. Large red
  4. Small blue
  5. Medium blue
  6. Large blue

Naturally, each of these are different stock items and would have their own SKUs and stock qty, so rather than make six different products in Catfish, you can use attribute combinations to have a single T-shirt product, which in turn has six different attribute combinations assigned.

Pre-requisites

For this article, the product "T-shirt" has already been set up, and has had the "Size" and "Colour" attributes assigned to it.

mceclip0.png

Also, the "Colour" attribute has the options "Red" and "Blue" assigned, whilst the "Size" attribute has "Small", "Medium", and "Large" assigned:

mceclip1.png

mceclip2.png

Creating the combinations

  1. Edit the product variant and navigate to Product variant attributes -> Attribute combinations:mceclip3.png
  2. Click "Add combination"
    mceclip4.png
  3. In the window that pops up, select the attributes that you want to set up a combination for, and then configure the fields accordingly.
    In this example, the stock for a red t-shirt has been set to "500" and the SKU has been set to "TSHIRT-R_S"
    mceclip5.png
  4. Click "Add combination" then the popup will close and you will see the new attribute combination you have just created
    mceclip6.png
    mceclip7.png

  5. Repeat steps 2-4 for each desired combination.

After following the steps above, the product's combinations now looks like this:
mceclip8.png

Now, when the user orders this product, the SKU code and stock qty used will be taken from the combinations, instead of the product variant.


In order to add a different product image against a specific attribute combination, click 'Edit' against your desired attribute combination.

Then in the edit popup window, select the images tab at the top.

mceclip0.png

From here you can click on the 'Upload a file' select your file and then click on the 'Add product picture' button. 

This image will then be displayed on the product landing page when that attribute combination is selected by the user.

CSV Import

Importing

You can create and update these combinations through a CSV import. The controls for this can be found at the end of the attribute combinations tab:

mceclip1.png

This CSV must follow a strict column structure, and so the header structure for the CSV must be:

CombinationId, StockQuantity, SKU, AllowOutOfStockOrders


After these columns, Catfish expects to have a column dedicated for each attribute e.g. Colour, Size. The Mis Externals Id columns are optional and can be removed if necessary.


When performing the CSV import to update existing combinations, you can target the combinations either by the combination ID, or the combination SKU. The new ID will be automatically generated when you create each combination, and the SKU will be whatever you configured when setting up the combination.

Please Note: When using 'By ID' you will need to add a representative value for all new records/attribute combinations and the system will create its own ID for them when they are created. For example instead of leaving the ID fields blank, put the ID as 1, 2, 3 etc for each new attribute combination.

You can select which one you want to target in the CSV with the dropdown highlighted below:

mceclip2.png

Exporting

You can get a CSV export of the existing combinations by clicking the "Export to CSV" button highlighted below. This can be particularly useful when you are planning to update the combinations en-masse, as you can simply export the CSV, make the changes, and then re-import it.

mceclip3.png

Product Attribute Conditional Logic


This feature allows you to create relationships between your Product Attributes so that you can manage what attributes you want to display to the user based on other attribute selections.

mceclip0.png

To start adding logic to an attribute, you first need to add an attribute to a product.


**NOTE**

If your product is using attributes in the variant navigate to:

Catalogue > Products > Product Management > Edit  > Product Variants > Edit > Attributes


OR


If your product is part of a product group, then attributes will be controlled from there:

Catalogue > Products > Product Groups > Edit > Attributes. 


Here you will notice a column in the attributes grid called ‘conditions’. Click on the corresponding ‘Add Logic’ button in the table to the attribute you want to apply logic to. This will then create an area for you to build your statement which consists of a parent attribute, a selected value of the parent attribute and a child attribute.

mceclip2.png

e.g. If Attribute1 has a selected value of Value2 then show Attribute2.

Or in this example: If Packaging Is equal to Plain Box Then show Attribute2

If you can create a new group by clicking 'Add New' and filling in the information as necessary, you will need to click 'Save and Continue Edit' to start working with attributes.

In order for any logic you create to affect your products you must add those products to this group. This is done by double-clicking on the checkbox next to the appropriate products in the 'Products in Group' tab, clicking 'Save Changes' at the top of the list and clicking either 'Save' or 'Save and Continue Editing'.


Linking Products, Attributes and Customers with external references


In order for many of our MIS Plugins to successfully interact and pass the correct information to the third party system it is important that the Products and their attributes are linked to their respective products and attributes in the MIS.

To do this we have introduced some simple UI steps.


Linking Products

Navigate to the product you wish to setup a link for. 

Click on the 'Product variants' tab and click edit.

mceclip0.png

Now you are in the Product Variant, whilst on the Product Variant Info tab if you scroll down you will see a button called 'MIS Configure'.
mceclip1.png

Click here and then from the 'MIS Plugin System Name' drop down list select the MIS plugin that is active on your storefront (usually this will only contain one in the list)
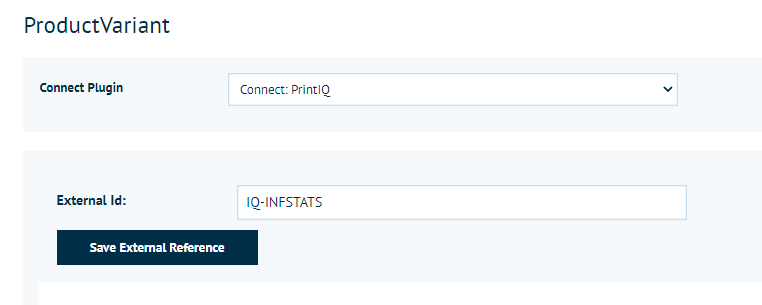
mceclip2.png

Depending on the MIS plugin you are using there are two ways of entering the external IDs.

1) Where possible, we have included a 'Load Available Ids from Plugin'. Clicking this will display a list of all available products in the respective MIS that you can select from. Selecting a product will then populate the MIS External Reference text field with the correct information.

2) In cases where this is not possible there will be no button, instead you are forced to enter the code manually into the MIS External Reference text field.

Once happy with the mapping, click on the 'Save Mis Attributes' button.


Linking Product Variant Attributes

As well as products there are also scenarios where it is required to link product attributes to their respective properties in the MIS.

To do this you need to create and setup your attributes as you normally would.

Once you have these setup, a button will appear under 'Actions'. Click MIS Configure to setup your configuration. 
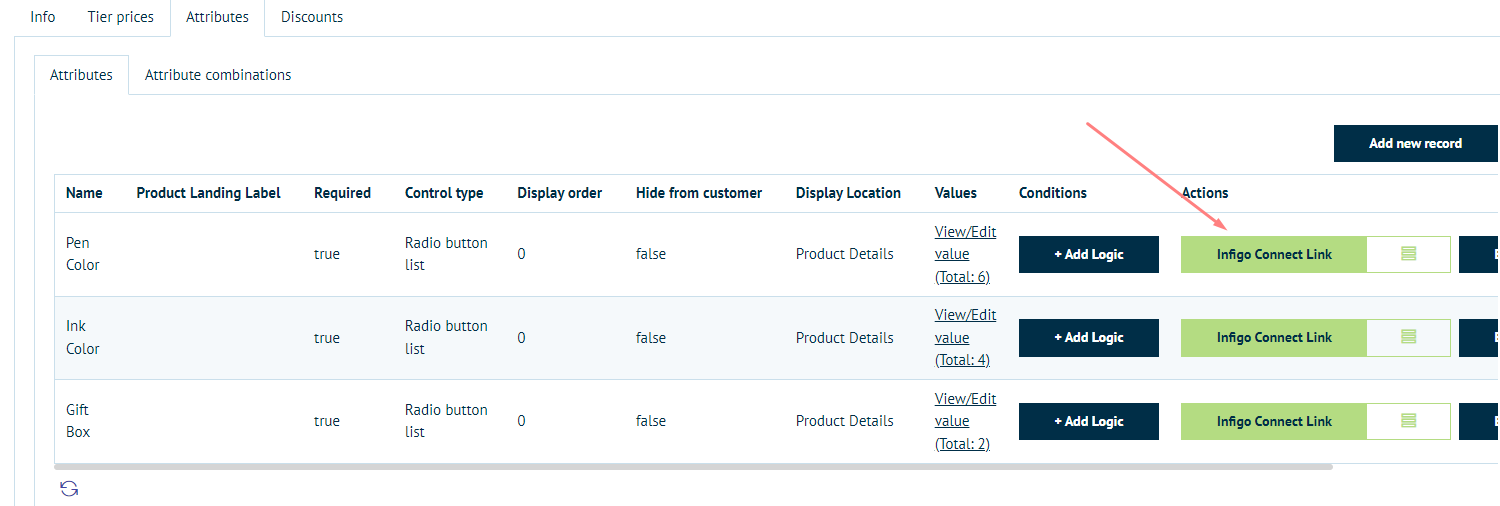
mceclip4.png


Clicking this will bring up a dialogue box that again allows you to select the required plugin and then manually enter in the respective ID for that attribute.
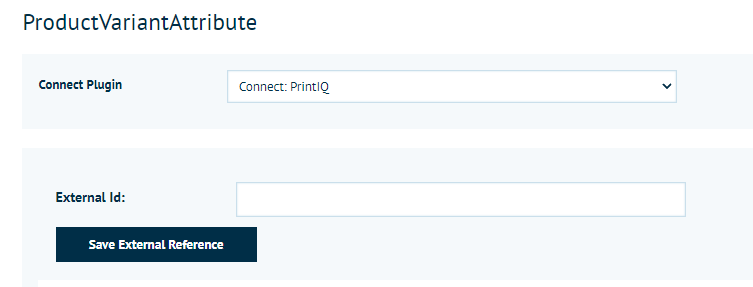
mceclip5.png

Finally, click 'Save Mis External Id' to save your changes.


Linking Attribute Combinations

As well as supporting the ability to map 1 Catfish product and individual attributes to a respective MIS SKU or IDs, we also allow through the use of Attribute Combinations to create and link multiple External IDs to not just a product but a combination of attribute values that may intern create it's own variation of that product.

Firstly you need to create an attribute combination, and then using the MIS Configure button you can set your External ID for that combination of attributes.


Linking Specification Attributes

The process is the same for Specification Attributes as it is for Product Variant Attributes however you setup the mapping on the Specification Attribute instead.

So you would have navigate back to the product, click on the Specification attributes tab and following the same process.


Customers

More often than not, the customer that is placing the order in Catfish must also exist in the target MIS. Therefore, unless this is automated or carried out by an other agreed process, the way to manually assign external IDs to a customer is very straight forward.

First navigate to the customer you would like to setup a link for.

At the bottom of the Customer Info tab you will notice a 'MIS Configure' button, similar to above. Clicking this will again open a dialogue that allows you to select your MIS plugin and to enter in the ID to be stored against this customer. 

This ID is then used in every interaction that specific customer has with the MIS, whether it be fetching a live price, adding a new address or simply placing an order.


Departments and Addresses

The concept is also the same for setting up External References for an Infigo Department, and a Customer Address. Simply navigate to the department or address, look for the 'Infigo Connect Link' button and enter in the value from the third party system and save.


Essentially, anywhere you see the green 'Infigo Connect Link' button on any Infigo element you can save against it your third party mapping.
mceclip6.png

Clicking on the main green button lets you set the value, clicking on the right hand 'hamburger' lets you view what is currently mapped. 

You can have a mapping for each enabled Infigo Connect plugin.

Specification Attributes


Specification Attributes are essentially placeholders of information that you can present to the user that help to describe the specifics of a product. Unlike Product Attributes, they do not require interaction from the customer but instead are there to simply display some information about the product.


Setup

Similar to Product Attributes you first need to create the attribute before assigning it to a product. 

1. Creating a Specification Attribute is very straightforward. Navigate to Catalog > Attributes > Specification Attributes. Press Add New to get started.

2. Once you name your specification attribute, you will need to click Save and Continue Edit to add an option to display to your customers.

mceclip0.png


3. Go to the Options tab, press Add a new option. A new window will open where you can add a new specification option. 

mceclip1.png


4. Once you have created the specification attribute, you can add it to a product by navigating to Catalog > Products > Product Management > Edit > Specification attributes.

Click the attribute you just created from the drop down and select any other settings you would like and then click add attribute.


mceclip2.png

Your product should now have the specification attribute assigned to it. 

Add RecordCount Attribute


The RecordCount attribute is implemented to give users transparency on the file they have uploaded; to display the number of records that have been recognised as records from the uploaded file in case of any errors in the file.

There are four steps to adding the RecordCount Attribute to your products:

1. On EVERY product you wish to have a RecordCount attribute add the following configuration to the attributes tab in the Product Variant section (right-click on image and select 'Open image in new tab' in case example is too small).

2. Once the attribute has been added on the product level you need to set up the script. Go to Catfish > Other > Custom Scripts and create new using the green tick and insert the script by clicking 'Edit' and pasting in the below as plain text:

var numItems = 0;
if(Item.IsBatch) {
if(Item.NumberOfRecords > 0)
{
numItems = Item.NumberOfRecords;
}
}
Item.setAttributeValue("RecordCount", numItems);

return Item.Price;


3. Enable the setting Configuration > Settings > Shopping Basket Settings > Show Batch Record Count (see below)


Attributes As Products Custom Product


This article serves to cover, illustrate and define the Custom Product Type of 'AttributesAsProductsCustomProduct'. For the purposes of this article, the creation of a custom product of a book will be outlined as an example.

Step One

The first step of the process will be to create six products (the primary product - book and five products which will serve as attributes. For the purpose of this article they will be the languages of Dutch/English/French/German and Spanish). Please note, in a real world scenario it can be more or less than 6 products.

Navigate to Catalogue >Products > Product Management and select 'Add New'.

mceclip0.png

Navigate to Catalogue > Attributes > Product Attributes and name and create the necessary product attribute. As a result of the previous step, and for simplicity, the product attribute will be named 'Language'.

mceclip1.png


Navigate back to the Product (Catalogue > Product Management then click 'Edit' on the Book product, then go into it's product variant and go to the 'Attributes' tab) and enter the necessary Product Variant Attribute (in this case, 'Language'). Following this, the attribute values will also be required.

mceclip2.png

mceclip3.png


Step Two

*Please note, from the above steps when adding the attribute values, the values must match exactly the name of the product in order for them to be linked.* 

Navigate to Catalogue > Product Types > Custom Products and press 'Add New'. Then from the next screen, select AttributesAsProductsCustomProduct from the dropdown and select your product. Then press Add new custom productmceclip4.png


Following the above steps, when viewed on the live storefront, the 'Book' product should now be present and feature the attribute of 'Language' and possess the five values (Dutch/English/French/German/Spanish).

mceclip5.png

How to Customize the Display of Unavailable Attribute Options

1. Overview

This guide explains how to manage the display of product attributes in your Infigo storefront using the Attribute Logic Display Mode. This functionality allows you to either hide or disable attribute options that are unavailable due to attribute logic conditions, providing a more intuitive shopping experience for your customers.

For additional information and detailed tutorials, the Infigo Academy offers extensive resources on a wide variety of topics. Visit the Infigo Academy to search and browse our content.


2. Contents

  1. Overview
  2. Contents
  3. Key Points and Takeaways
  4. Key Settings
  5. Scenario-Based Guide
    • Scenario 1: How to Hide Unavailable Attribute Options
    • Scenario 2: How to Disable Unavailable Attribute Options
  6. FAQs
  7. Alternate Search Terms

3. Key Points and Takeaways

  • Attribute Logic Display Mode now includes two options:
    • Hide: Completely remove unavailable attribute options from view.
    • Disable: Show unavailable options but disable them, preventing user selection.
  • Ensures a smoother shopping experience by guiding users toward valid attribute options.

4. Key Settings

Attribute Logic Display Mode

  • Path: Admin > Configuration > Settings > Catalogue Settings > Product Options > Attribute Logic Display Mode
  • Options:
    • Hide: Removes unavailable attributes from view.
    • Disable: Displays unavailable attributes as disabled.
  • Purpose: This setting allows storefront managers to control how unavailable attributes appear to customers, improving navigation clarity.

5. Scenario-Based Guide

Scenario 1: How to Hide Unavailable Attribute Options

Problem: You want to ensure customers only see available attribute options, hiding all unavailable ones.

Solution:

  1. Log in to your Infigo Admin Panel.
  2. Navigate to Catalogue Settings.
  3. Under Product Options, locate Attribute Logic Display Mode.
  4. Select Hide from the dropdown menu.
  5. Save your changes.
  6. Ensure attribute logic is correctly configured on your required product (found in the Product Variant settings under the Attributes tab).
  7. Test your configuration:
    • Navigate to a product page.
    • Ensure unavailable attributes are completely removed from the customer view.

Scenario 2: How to Disable Unavailable Attribute Options

Problem: You prefer customers to see unavailable options but want them visually marked as unselectable.

Solution:

  1. Follow steps 1–3 from Scenario 1.
  2. Select Disable from the dropdown menu instead of Hide.
  3. Save your changes.
  4. Ensure your attribute logic is correctly configured for your required product.
  5. Test your configuration:
    • Navigate to a product page.
    • Verify unavailable attributes are displayed but grayed out and cannot be selected.

6. FAQs

Q1: What happens if I don’t configure the Attribute Logic Display Mode? A: By default, unavailable attributes will be hidden, maintaining original functionality.


For additional information and detailed tutorials, the Infigo Academy offers extensive resources on a wide variety of topics. Visit the Infigo Academy to search and browse our content.

Managing Limits on the Number of Attribute Logic Statements in Infigo

1. Overview

This guide provides a detailed explanation of how to manage and resolve issues related to hitting limits on the number of attribute logic statements in your Infigo platform. It covers increasing the allowable logic statement count, understanding how attribute values impact limits, and addressing potential performance considerations.

For additional information and detailed tutorials, the Infigo Academy offers extensive resources on a wide variety of topics. Visit the Infigo Academy to search and browse our content.


2. Contents

  1. Overview
  2. Contents
  3. Key Points and Takeaways
  4. Key Settings
  5. Scenario-Based Guide
    • Managing Limits on Attribute Logic Statements
  6. FAQs
  7. Alternate Search Terms

3. Key Points and Takeaways

  • The Attribute Logic Max Conditions Count setting determines how many logic statements or conditions can be added to a product or product group.
  • Each individual value within an attribute rule is counted as a separate condition.
  • Default limits (e.g., 100 conditions) can be adjusted, but increasing the limit too much may affect performance, depending on storefront complexity.
  • Clearing cache is necessary after any setting changes to ensure they take effect.

4. Key Settings

Attribute Logic Maximum Condition Count

  • Path: Admin > Settings > System > LimitationSettings > Attribute Logic > Attribute Logic Max Conditions Count
  • Explanation: Sets the maximum number of conditions allowed in attribute rules. Adjusting this setting enables more complex configurations but may affect performance in storefronts with many attributes, integrations, or pricing rules.

5. Scenario-Based Guide

Managing Limits on Attribute Logic Statements

Problem:
You encounter an error when trying to add more attribute logic statements to a product or product group, indicating you’ve hit the system’s limit.

Solution:

  1. Check the current limit:

    • Navigate to Admin > Settings > System > LimitationSettings > Attribute Logic.
    • Locate the Attribute Logic Max Conditions Count setting and note its value. The default is typically 100.
  2. Adjust the maximum condition count:

    • Increase the value based on your requirements (e.g., set it to 250 if you need more flexibility).

  3. Clear cache:

    • After saving your changes, Clear Cache.
    • Clear your browser cache to ensure the new setting is applied correctly.
  4. Test the changes:

    • Attempt to add a new logic statement to confirm that the updated limit resolves the issue.
  5. Understand the logic condition calculation:

    • Each attribute value within a rule counts as a separate condition. For example, a rule involving three values will count as three conditions.

  6. Monitor performance:

    • Increasing the limit can slightly impact storefront performance, especially on systems with complex configurations.
    • Pre-selecting attribute values within rules may help improve performance.

6. FAQs

Q1: What happens if I hit the logic statement limit?
A1: You will not be able to add more logic statements until the Attribute Logic Max Conditions Count is increased.

Q2: Why am I still restricted after changing the setting?
A2: Ensure the changes were saved correctly and clear both storefront and browser caches. If issues persist, confirm whether storefront-specific restrictions might apply.

Q3: How are conditions calculated?
A3: Each attribute value within a rule counts as a separate condition. For example, an attribute with three values will count as three conditions, not one.

Q4: What is the recommended limit?
A4: The default is 100, but this can vary depending on the storefront's complexity. Testing with limits like 200-250 can help determine the best setting for your setup.

Q5: Does increasing the limit affect performance?
A5: Potentially, yes. Larger limits may slow request times on complex storefronts with numerous attributes and combinations.


For additional information and detailed tutorials, the Infigo Academy offers extensive resources on a wide variety of topics. Visit the Infigo Academy to search and browse our content.

Product Attribute Grouping

1. Overview

This guide explains how to configure and display product attributes grouped with HTML div wrappers in your storefront's product pages. By following the steps outlined here, you will be able to organize attributes with shared properties into a single group, ensuring they display neatly while maintaining functionality like hiding or showing attributes based on logic. This enhancement improves the customisation ability of attribute layouts, making it easier for administrators to customise the styling of select groups of attributes.

For additional information and detailed tutorials, the Infigo Academy offers extensive resources on a wide variety of topics. Visit the Infigo Academy to search and browse our content.


2. Contents

  1. Overview
  2. Contents
  3. Key Points and Takeaways
  4. Key Settings
  5. Scenario-Based Guide
    • Scenario 1: Grouping Product Attributes for a Storefront
  6. FAQs
  7. Alternate Search Terms

3. Key Points and Takeaways

  • New Entity: Product Attribute Groups: Attributes are grouped using the new Product Attribute Groups page.
  • Display Order: Attributes within a group follow their display order, with groups themselves ordered based on the lowest display order of their first attribute.
  • UI Enhancements: Div wrappers provide better control over visual appearance of grouped attributes using CSS.
  • Attribute Logic: Group visibility integrates with existing attribute logic for hiding and showing attributes dynamically.

4. Key Settings

1. Attribute Groups

  • Path: Admin Dashboard > Catalogue> Attributes > Product Attribute Groups
  • Explanation: Create and manage groups to categorize attributes with a shared purpose or behavior.

5. Scenario-Based Guide

Scenario 1: Grouping Product Attributes for a Storefront

Problem: You want to group related attributes (e.g., quantity-based attributes) and display them within a single div wrapper on the product page for further visual customisation.

Solution:

  1. Navigate to Admin Dashboard > Catalogue> Attributes > Product Attribute Groups
  2. Create a new group by providing:
    • A System Name for backend use.
    • An optional Friendly Name for UI display.
  3. When assigning attributes to a product (Product Management > Edit [on your chosen product] > Product Variants > Edit > Attributes Tab):
    • Select the associated group in the Group column when specifying the attributes within a product.
  4. Save the changes. The attributes will now display within a div wrapper which can easily be used for further visual customisation.
    • Please note: Knowledge of HTML and CSS will be required to stylize the resulting group.

6. FAQs

Q1. Can I add attributes to multiple groups?
No, each attribute on a single product can belong to only one group at a time.

Q2. What happens if no group is assigned to an attribute?
Attributes without a group will display individually without a wrapper.

Q3. Are grouped attributes compatible with custom styling?
Yes, you can apply custom CSS classes to group divs for tailored styling.

Q4. How does display order work for groups?
Groups are ordered by the display order of their first attribute, followed by creation date for ties.


For additional information and detailed tutorials, the Infigo Academy offers extensive resources on a wide variety of topics. Visit the Infigo Academy to search and browse our content.

Incomplete
🔎
Loading…
    Select a Problem Solver