🚀 Infigo Designer Problem Solvers 🚀

Picture of 🚀 Infigo Designer Problem Solvers 🚀
Description: Comprehensive guidance for Infigo Designer, the Adobe Acrobat plugin used to build variable PDF templates for products and operational documents. Covers installation and compatibility, creating and configuring text and image fields, placeholders and text flow, advanced editor behaviour and soft proof settings, embedded fonts and colour tools, barcodes and dynamic scripts, output naming and data mapping, and general troubleshooting.

About Infigo Designer

Infigo Designer is an Adobe Acrobat plugin used to create Infigo Variable templates for documents and products.

Important: Infigo Designer is a deprecated product and is no longer actively supported.

This documentation is provided for legacy purposes only, to support legacy customers who still use this functionality.

For customers who are still using Infigo Designer, we recommend upgrading to MegaEdit.

Install 32 bit Acrobat DC

Excerpt below taken from https://community.adobe.com/t5/acrobat-discussions/adobe-acrobat-pro-dc-32-bit/td-p/12766657 


Infigo Designer isn't compatible with 64 bit Acrobat, therefore we ask you use the 32 bit version. To install the 32 bit version please follow these instructions: 


Please remove the application using the Acrobat cleaner tool https://www.adobe.com/devnet-docs/acrobatetk/tools/Labs/cleaner.html reboot the computer and reinstall the application using the link https://helpx.adobe.com/acrobat/kb/acrobat-dc-downloads.html


To stop the Acrobat Reader DC 32-bit application from automatically upgrading to the 64-bit version, create the following registry key before the first launch of the application as described in the help page https://helpx.adobe.com/acrobat/kb/about-acrobat-reader-dc-migration-to-64-bit.html


SHORT VERSION OF INSTRUCTIONS:

  1. If you have already installed Acrobat, uninstall using the Adobe cleaner tool: https://www.adobe.com/devnet-docs/acrobatetk/tools/Labs/cleaner.html
  2. Restart your computer
  3. Download the Acrobat DC installer from https://helpx.adobe.com/acrobat/kb/about-acrobat-reader-dc-migration-to-64-bit.html
  4. Run the installer. Note: When you get to the final stage of the installer click "Finish" and NOT "Launch now" else you'll have to repeat steps 1 and 2.
  5. Create the registry key outlined in https://helpx.adobe.com/acrobat/kb/about-acrobat-reader-dc-migration-to-64-bit.html
  6. Launch Acrobat, it should remain as 32-bit


Getting the plugin to run (doing this on the Software node is critical):

mceclip0.png


NOTE:

If the above step does not work, use the Mapsoft Registry.reg - double click on it and install. Make sure that Adobe Acrobat is closed

Infigo Designer Installers/Upgrades

Overview

Infigo Designer is our Adobe Acrobat plugin which allows you to create Infigo Variable templates. These can be used for your Invoices, Job Tickets, and Packing Slips, as well as your Infigo Variable products. In most scenarios, you will be given training on how to use this plugin, and we ask that you install the plugin prior to the training so that it is ready to be used on your computer(s) during the session.

*PLEASE NOTE: you must have installed the full version of Adobe Acrobat for MAC or PC - you cannot use Acrobat Reader with Infigo Designer.

Steps

Click on these links to download a PDF of the installation instructions:

PC installation instructions

MAC installation instructions


The latest installers/upgrades for Mac and PC can be found below:

Please note that due to changes made by Adobe for Acrobat DC on Apple Macintosh machines (MACs), we only support Acrobat DC on Windows (PC). 

You can only install the plugin on a MAC if you have Acrobat Version 11 backwards, and are using OS version "Mojave" backwards.

MAC:

MAC Installer  (for fresh install)

MAC Update  (for MACs that have the software installed - Acrobat V8.0 > 10.0)

MAC Upgrade for Acrobat XI (MAC - You must have previously run and installed the relevant installer above)


PC:

PC Installer (for fresh install)

PC Update (for PCs that have the software installed - Acrobat V8.0 > 10.0)

PC Upgrade for Acrobat XI/DC (PC - You must have previously run and installed the relevant installer above)


If you encounter any issues, have any questions, or require assistance regarding the installation of the Infigo Designer plugin, please contact support by raising a ticket through our ticketing system.

Creating An Image Field Suppression If Empty

Creating a Text Field

In Infigo Designer, you can create variable text fields in one of two ways. You can either create a text field on the fly using our text field tool, or you can convert pre-existing live text in the PDF to a text field. 

Creating a new text field

To create a text field, you will need to open your template in an instance of Adobe Acrobat which has Infigo Designer installed. Once you have done this, open the Tools section, and then expand the Plug-In Infigo Designer tab.

Plug-in.jpg

In the expanded menu, you will need to select the top-left tool Add_tool.jpg. If you hover over this tool, you will see that it is annotated "Add text field to PDF". Clicking on this tool will change your cursor from what it was previously to a crosshair, which will then allow you to drag and draw a text field. As soon as you let go of the mouse, the text field will be created with the dimensions and positioning you have just drawn.

Dragged_Area.jpg

Once the field has been created, its Field Settings menu will automatically open, as seen in the screenshot below.

Field_Settings.jpg

You will be able to change your field settings as per usual here, however you will not be able to see a true preview of the text until you have saved the field by clicking OK. Please note that you will not be able to save the text field without providing it with a name. These names must be unique from all other fields, and must only contain alphanumeric characters.

We recommend using an efficient naming scheme for your text fields so that each field is named appropriately. For example, if you were creating a text field for the address on the first page, you could call it Address. If there was also an address on the second page, you could call it Page One Address

A good naming scheme will allow you to more easily navigate and modify your text fields.

Converting live text

In order to convert live text to a text field, you will need to open your template in an instance of Adobe Acrobat which has Infigo Designer installed. Once you have done this, open the Tools section, and then expand the Plug-In Infigo Designer tab. Please note that in order to use this feature, the PDF must contain live text.

Plug_in.jpg

Once you have opened the tools, you will need to highlight the text you wish to convert, then click on the bottom-right tool Convert_tool.jpg. If you hover over this, it will have the annotation "Convert the selected text into a Text Field"

Tooltip.jpg

Clicking this will cause the plug-in to try and convert the text to a text field. It will also try to pick up the leading, character spacing, font, colour, positioning etc. of the text, and save all of that in the newly created text field's Field Settings. If it cannot pick up the leading, the font is not present on the user's system, or if there is another issue preventing it from perfectly converting the text then you will be informed in a popup. If any of these issues are encountered, the plug-in will continue regardless and assign the default settings instead, which you can then change at a later date.

Once the plug-in has converted the field, it will automatically open the fields' Field Settings as seen in the screenshot below.

Converted_Field.jpg

As you can see in the screenshot, the field has picked up the text and the text settings, and has named the new field Converted Field. We recommend changing the name of this field before saving it to meet with the same naming recommendations provided earlier in this document, as well as ensure that there are no naming conflicts with fields converted later on.

Clearing PlaceHolders on the fields.

You can use a property called 'PlaceHolderText'. This will act as the default placeholder text but will automatically clear when you begin to type and re-appear when you empty the field.


To Enable the field on the text fields, please follow these steps:

1) Double click on a TextField and navigate to Field Information -> Properties and Click Add

2) Create PlaceholderText as a new text property and make sure Fixed Value, Visible and Create as predefined property are checked.

3) On the Predefined Property, select TextFields to propagate this feature across all the TextFields and click ok.

4) You should now have a new property text field in your Infigo Designer that would allow

you to populate the default placeholder text.

Text Flow Management

Using Infigo Designer, it is possible to set it up so that if text would originally not fit in a field, it can flow into another field instead of simply not appearing. This is done using the "Manage column flow" found under the Infigo Designer tab, as seen in the screenshot below.

Manage_colum_flow.png

For this example, I set up a simple PDF with three fields:

Original field - This is the field into which I will be inserting the text which does not fit.

Flow to A - This is the field the overflowing text from "Original Field" will flow into.

Flow to B - This is the field which the overflowing text from "Flow to A" will flow into.

Fields.png

When you click "Manage Column Flow..." the following menu will open:

Script_Menu.png

Here you can see a list of all the text fields in the document on the left, as well as any pre-existing flow sequences which have already been made by this function. As this is a brand new PDF, there are no pre-existing flow sequences.

To create one, click on "Start new Text Flow", this will highlight a blank flow base in the second box, as seen below.

Send_to_right_button.png

On the left, you want to select the field which is meant to start the flow, in this case "Flow From", which is the name I gave to the field "Original Field". After highlighting it, click the ">>" arrow, this will insert it into the "Text Flows" column, setting it as the beginning of the flow sequence.Flow_from_added.png

From here, you need to do the same for the fields the text will flow to. As you can see, the flow will automatically go in the order it was added. However, you can change this by selecting a field in the "Text Flow Sequence:" column and using the "Up" and "Down" buttons below it.

Sequence_Completed.png

Now that the sequence has been set up, click "OK" and save the PDF. Now, upload it to your storefront so that you can see the results.

Below is a screenshot of the product I uploaded the PDF to, as you can see the fields have retained their default text.

Before_text_filled.png

Now, if I fill the field "OriginalField" with too much text for the field size, it will flow into "Flow To A" and then anything which does not fit in this field will flow into "Flow To B".

Lorem_Ipsum_Inserted.png

Enable Fit to Box (Infigo Designer)

In Infigo Designer templates, you are able to configure your text fields to automatically increase or decrease their font size to ensure that the entered text will fit the field best. You are also able to set a minimum and maximum font size for your text fields which have this feature enabled. This will allow you to have your field's font size automatically adjust to ensure that all of the text is visible within the field, whilst ensuring that the font sizes remain within a reasonable range.

To do this, simply open up your template in Adobe Acrobat (ensure that you have Infigo Designer installed before proceeding).

Next, select the Select Field Entries tool (highlighted in the screenshot below) and double-click the text field you wish to configure this for.

mceclip0.png

In the Field Settings menu which pops up, navigate to Text Settings > Standard Format. You will see a checkbox with the text Fit Box beside it. Enabling this will also allow the Fit Box Options to be configured.

 Fit_Box___Options.png

Enabling Fit Box will enable the feature, however you can control how it acts using the Fit Box Options  below:

Allow Wrapping - This will determine whether the font will grow/shrink so that each line of text remains within its own line, which will likely force your text to shrink to a smaller value, or whether it will allow the text to wrap within the field and simply change the font size so that the text fits the box.

Set Limits - This will allow you to set minimum and maximum sizes (measured in points) the font is allowed to shrink or grow to when fit to box is enabled. If the font remains too large to fit within the box when it is at the smallest allowed size, then any excess font (most frequently the last characters/words) will not be displayed as they will be outside the field.

  • Min - This is the smallest size the font will be able to shrink to
  • Max - This is the largest size the font will be able to grow to

Dynamic Child script

Pre-requisites

Prior to following this article, you will need to have enabled Infigo Designer's Advanced Mode. Please see this article for an explanation on how to do so.

You will also need to have downloaded the attached .js file and moved it to your Infigo Designer "JavaScripts" folder. The file can be downloaded either at the end of this article, or by clicking here.

The directory for this folder can be found below:

PC

C:\Program Files (x86)\Adobe\{Your Acrobat Version}\Acrobat\plug_ins\Xclusive\JavaScripts

MAC

Macintosh HD -> Library -> Preferences -> Infigo -> Javascripts


You will know the script is in the correct folder when you see it in the list of pre-defined scripts which can be found by navigating to "Infigo Designer -> Predefined Javascripts":

mceclip0.png

mceclip1.png

What this script does

The purpose of this script is to show/hide fields in the Infigo editor's form to allow you to dynamically build/destroy the user experience based on how they interact with the template.

For example, you can allow the user to choose between one name or two, and if they choose two, then the entry fields for the second name will appear. If they choose one, however, then the entry fields will disappear.

Variable and Field Creation

Variables

Using the "One name" vs "Two names" example above, you will need to create four global variables:

  • FirstNameOne
  • LastNameOne
  • FirstNameTwo
  • LastNameTwo

As the names imply, this will be a set of global variables for each name.

Please note that you do not need to separate this into four variables, and whilst the article will be using the variables above, if you would like the user to enter the first and last name into the same field for each name, you can instead create the following variables:

  • FullNameOne
  • FullNameTwo

For this article, the document's global variables will look like this:

mceclip3.png

Fields

For this script, you will always need one field per global variable, one to control which fields are shown (usually a dropdown), and one for the variables to be displayed in.

The fields created for this article will be:

  • FNameOneInsert
  • LNameOneInsert
  • FNameTwoInsert
  • LNameTwoInsert
  • OneOrTwoNames
  • DisplayField

Note: the only field that needs to be on the canvas is "DisplayField". This is because the other fields do not need to be shown to the end user, and so they can exist outside of the PDF's canvas (Infigo Designer will still see the fields).

Below is how the fields have been created for this article:

mceclip2.png

Field Configuration

"Insert" fields

For each "Insert" field, you will need to add the respective global variable placeholder:

Field

Placeholder

FNameOneInsert

FirstNameOne

LNameOneInsert

LastNameOne

FNameTwoInsert

FirstNameTwo

LNameTwoInsert

LastNameTwo

To keep the fields clean, the default text has been removed from each "Insert" field and entirely replaced with the placeholder, and so the fields now show the placeholder's default text instead:

mceclip4.png

OneOrTwoNames field

The "OneOrTwoNames" field will need to be a dropdown that has the options "One" and "Two".

Below is the "OneOrTwoNames" field's property configuration to achieve this, with the relevant properties highlighted:

mceclip5.png

For a more in-depth explanation of how these properties work, see this article.

DisplayField

The DisplayField should have the "readonly" property set to "True":

mceclip6.png

As well as a placeholder for each variable, and "Front label" suppression enabled:

mceclip7.png

Configuring the Script

  1. Now that the setup has been done, you can run the script from "Infigo Designer -> Predefined Javascripts" by selecting it in the list and clicking "Run Script":mceclip8.png
  2. If this is the first time you have configured this script on the PDF, then the message "you currently have no rules set up" will show:
    mceclip9.png
    Simply click "OK" to acknowledge this, and it will take you to the next step.
  3. In the next popup, click "Add"
    mceclip10.png
  4. Select the field which will control whether or not the other fields show - "OneOrTwoFields" in this case - then click "OK"
    mceclip11.png
  5. Select the fist value then click "OK"
    mceclip12.png
  6. In this step, select all fields which you want to show if the user chooses the option from step 5. In this case, just the first name's variables, first name's fields, and "DisplayField" then click "OK":
    mceclip13.png
  7. Click "OK" to acknowledge that the rules have been updatedmceclip14.png
  8. Repeat steps 3 -> 5, but on step 5, you will need to select the other option instead - "Two" in this case:
    mceclip15.png
  9. As you want both the first name and last name fields to show if the user chooses "Two", you will need to select all fields in the list:
    mceclip16.png
  10. Following the rest of the steps as before, you will see the new rules have been set up, and can click "OK" to save them: mceclip17.png
  11. After closing out of the "Predefined Scripts" menu, you can save your template and then upload it to the storefront

As you can see, if you select "One" then only the first person's name fields are shown:
mceclip18.png

Whereas if you select "Two", then both the first and the second person's name fields are shown:
mceclip19.png

Clearing the second name

As you will have seen in the previous section, the dynamic child script only removes the fields from the form, it does not hide the actual content of the fields.

Therefore, if you want the hidden fields' text to also disappear, you will need to use the Javascript Wizard to empty the fields when they are hidden.

To do this, follow the steps below.

Create the condition

First, you'll need to create the condition or "IF statement", which is simply just telling the code to check if something is true or not. If it is, the code will go down the "If" path, if it is not true, then it will go down the "else" path.

It helps to visualise the condition like a sentence: "If this is true, then do this, else, do that".

To create the condition you need for this article, follow the steps below:

  1. Navigate to Infigo Designer -> Javascript Management
    mceclip0.png
  2. Click "Wizard"
    mceclip1.png
  3. Drag the "Condition" function to the empty "Item" section
    mceclip2.png
  4. Drag the "Text equals to" comparison to the empty "Test" section
    mceclip3.png
  5. This script is now going to be testing whether text A is equal to text B. You can use this to see if the text the user selected from the dropdown is equal to the text you manually enter. In other words, if you set text B to "One", then it will compare text A to the word "One".
    You can set B by hovering over it, then clicking the "Text" popup
    mceclip4.png
  6. Enter the text you're checking against - "One" in this case - then click "OK"
    mceclip5.png
  7. In the field list on the right, expand the field you're using as a dropdown - "OneOrTwoNames" in this case, then go to "Get... -> text value:" and drag "Text value" to A as highlighted below:
    mceclip6.png
  8. The steps above will have created your condition, and it should look something like this:
    mceclip7.png

Empty the text fields

Now that the condition is set up, you can tell the script what you want to do if the comparison is true; if the user has chosen "One" from the dropdown.

To do this, you will need to drag your logic down the "If Branch" since, as explained earlier in this article, this branch of code will run "If" the comparison is true.

The steps below will take you through the rest of the script:

  1. Since you want to remove the text for multiple variables (both "FirstNameTwo" and "LastNameTwo"), you need the "If Branch" to contain a sequence of events - changing the first variable, and then changing the second one.
    To do this, drag the "Sequence" function from the "Control Flow" category into the "If Branch":
    mceclip8.png
    This will allow you to add as many events/items to the "If Branch" as you would like.
  2. In the global variable list on the right, below the field list, expand the folders "FirstNameTwo -> Set..." and drag "value" to the first empty "Item" section of the sequence created in the previous step
    mceclip9.png
  3. From the "General Contents" area in the bottom left, drag "Text" into the new "value" section that was just created:
    mceclip10.png
  4. Since you are wanting to set the variable to be empty, simply don't enter anything in the popup box, then click "OK"
    mceclip11.png
  5. If you have followed the steps above, the script should now look something like this:
    mceclip12.png
    By reading the text, you can follow the logic that "If the text value of the field OneOrTwoNames equals 'One', then follow the sequence 'set the value of the text variable 'FirstNameTwo' to equal '' "
  6. Now that the first variable is being set to be '', follow steps 2 -> 4 for the other variable, "LastNameTwo". Once completed, your script should look like this:
    mceclip13.png
  7. Lastly, you should give your script a name and description. This will help you identify what the script is and what it does. This is really for your benefit, so enter whatever makes the most sense to you.
    mceclip14.png
  8. Click "OK" in the bottom right corner, "OK" again in the popup that appears, then save and upload your template
    mceclip15.pngmceclip16.png

Final Product

With everything in this article completed, your users should be able to choose one or two names, with the second name's fields hiding or showing both in the form and on the artwork depending on which choice they make:

mceclip17.pngmceclip18.png


The template used in this article has been attached to this ticket and can either be downloaded below, or by clicking here.

User-Controlled Barcode Field

Overview

Whilst you can create barcode fields in Infigo Designer (as explained in this article), if you want the end user to be able to populate it, you will need to use a script to set the barcode's value.

This article will take you through the steps to produce such a script with our Javascript Wizard.

Note: this is not the only way to set this up, it is just one example of how it can be configured.

Pre-Requisites

Advanced Mode

In order to see the Javascript Wizard, you will need to enable Infigo Designer's "Advanced Mode". To do this, follow the steps below:

  1. Navigate to "Infigo Designer -> Configuration"
    mceclip0.png
  2. Check "Advanced Version" then click "OK"
    mceclip1.png
  3. Restart Adobe Acrobat.
  4. Click "Infigo Designer" and check that the "Javascript Management" item is in the dropdown:
    mceclip2.png

Note: Since Adobe has a lot of background tasks running, you may need to fully restart your machine - only do this if restarting the application does not make the "Javascript Management" dropdown item appear.

Create Text Field and Barcode Field

For this article you will need to have created a Text Field and a Barcode Field. Your document can have other fields, however this article will only cover the two.

I am going to name the Text Field "Text" and the Barcode Field "Barcode", and I'm going to use the barcode type "Code QR" as this has very simple input requirements and will accept most text entered into the text field.

I have attached the PDF I will be working with to this article and you can get a copy by downloading "Base file.pdf" from the end of this article, or clicking here.

Creating the Script

Our Javascript Wizard will write the actual code for you, so all you need to do is use its UI. We have full documentation for this Wizard available, however I will only be going through the exact steps required to copy the content of the Text Field into the Barcode Field.

Logic

Since our Barcode Fields do not support directly being edited by an end user, we will need to create a script that sets the barcode value to the value of a Text Field, which the users can edit directly.

Set the Barcode

First, we need to create the code to set the barcode value. This may seem a little backwards as we haven't yet told the code what we're going to set the value to, but this will make sense later on.

  1. Navigate to "Infigo Designer -> Javascript Management":
    mceclip3.png
  2. In the menu that pops up, click "Wizard":
    mceclip4.png
  3. In the "Barcodes" part of the "Items" section on the right, click the "+" button next to "Barcode" to expand the menu:
    mceclip5.png
  4. Next, click the "+" next to "Set":
    mceclip6.png
  5. Then, click the "+" next to "barcode value":
    mceclip7.png
  6. Now, we need to chose what we're going to be setting about the barcode. In this case, we are going to be setting the "barcode text". 
    Therefore, we need to click and drag the "barcode text" item shown below:
    mceclip8.png

    Whilst dragging the item, the main area will grey out, except for the green "Item" section in the "Sequence". This is because the wizard will grey out everywhere the item we're dragging can't go, meaning we simply need to drag "barcode text" to the highlighted area:
    mceclip9.png
  7. If done correctly, your sequence will go red and look like this:
    mceclip10.png
    This is correct as the script is currently saying "Set the value of the barcode to..." and it doesn't know what value the barcode field should be set to. This is where the next section comes in.

Get the Text Value

The previous section ended off with the script ready to set the value of the Barcode Field, however we have not yet told it what to set the field to.

In order to tell the script what you want the value to be, you simply need to:

  1. Expand the "Text" menu in the "Items" section on the right, by clicking the "+" button next to it:
    mceclip11.png
    Note: if you named your text field anything other than "Text", you will need to click the "+" next to that instead.
  2. Then, since we are going to be getting information from the field instead of changing it, click the "+" next to "Get":
    mceclip12.png
  3. And then the "+" next to "Text Value":
    mceclip13.png
  4. As in step 6 of the previous section, you need to click and drag the "Text Value" item:
    mceclip14.png
    You will see the only locations we can drag it are highlighted. In this instance, we will be dragging it into the "Value" section:
    mceclip15.png
  5. As soon as you have dragged it in, the script should turn green as it now knows what it's setting the barcode value to:
    mceclip16.png
  6. Once the script has been configured, you can save it by clicking the "OK" button highlighted below:
    mceclip20.png

Name & Description (Optional)

Whilst it's not mandatory, you can set a name and description for your script using the "Script Details" section highlighted below:
mceclip17.png

For this article, I've given the script a simple name & description:

mceclip18.png

You will see the name and description appear in the Javascript Management window seen earlier in this article:
mceclip19.png

Editing the script

Once you've created the script through the Wizard, you can go back in and change it by navigating to "Infigo Designer -> Javascript Management", selecting your script from the list, and clicking the "Edit" button shown below:
mceclip21.png

Testing

As always, once you've finished setting your script up, you will need to test it. To do this, simply upload the template to your storefront, enter some text into the Text Field using the form, and then scan the barcode to make sure it's correct.

If your product is not working, please go over the steps again and compare it to the attached "Configured Script.pdf" file which is the file I created whilst writing this article.

You can either download it at the end of this article, or by clicking here.

Text Field Color Changer - Infigo Designer

You can utilize Infigo Designers JavaScript Wizard to implement a dropdown field to your editor that will change the text color of a certain field. 

In this example we use Black and White as the colors to be selected. You can have many more colors, but you will need to duplicate certain steps again. 

Before creating the script, you will need to add your colors into Infigo Designer > Manage Color. Once you have the colors setup, then you need to create a trigger field off of the canvas. This will be a text field, be sure to make the text field type Text List. Make sure your textlist values are the name of the color (in this example it's Black and White). Then change the description of the User Interface (UI). 

Now, navigate to Infigo Designer > Javascript Management. Next, hit Wizard. 

1. In the Functions tab on the left side, drag the condition to where you see Item

2. Now, drag text equals to where you see Test. 


3. Now, on the right of the wizard, you will see Items. Locate Text Fields > Trigger Field > Get > text value > Text Value. Drag this to Field A. 


4. Now, hover over Field B and the word Text will appear. Click this and type in "White." 


5. In the If Branch, drag over a logical and operator


6. Back to the right pane, drag the text colour for the TEXT field. This is found in Text Fields> TEXT > Set > text value > text colour , drag this to Item


7. You will see Value now for the Field Name and this is where you drag in the color. On the right side, find Colors >  then the color you want for TEXT. Here is White, drag it to Value. 


8. Your screen should now look like this:


9. To add Black, simply complete Steps 1 - 7. You will start Step 1 by dragging the Condition to Item. You can continue to repeat these steps for additional colors. Here is the the Final Output:


When you are all finished, you will see your script here:


You can name the script from the Top Left of the Wizard here:


Be sure to save your template, then re-upload to your site. Your dropdown field will then appear in the editor:

mceclip0.png

Dynamic Group Suppression

Introduction & Examples

In Infigo Designer, it is possible to link fields together so that they respond to each other and dynamically suppress themselves.

For example, if you have 4 address lines available but not all address lines are mandatory, you may want to keep all of the lines together so if a user does not enter one, the fields will suppress to keep them all in one block.

Another example of when this would be useful is if you had a contact block which contained telephone, mobile and an email field, but the mobile field was optional, and all three fields had an image icon as their label. If the user did not enter a mobile, you would expect the mobile icon to suppress, which Group Suppression can handle.

How-to

Group Suppression is easy to configure, however, as is the case with all Infigo Designer features, it is limited to only being able to affect Infigo Designer fields. This means that if you are using an icon label, and the icon is part of the artwork itself, you will need to remove the icon from the artwork and have it be part of an image field instead.

For the purposes of this article, I will be working with a simple Infigo branded business card.

***

All of the text and images in this document, excluding the logo in the bottom-left corner, are Infigo Designer fields, and so we can suppress these however we wish.

To configure the suppression, you first need to combine the fields into a dynamic suppression group. To do this, select the "Select field entries" tool (see here) then click and drag to highlight all of the fields you wish to configure suppression for. 

***

Once you have highlighted the fields, right-click on any of them and select the "Combine to group" option:

mceclip5_new.jpg

In the pop-up menu which appears, you will need to give the group a name that would allow you to easily identify the group. For this example, I am calling the group "Contact Group".

You will also need to ensure that you select "Dynamic Suppress Group" from the "Function" dropdown.

mceclip6_new.jpg

Once configured, click "OK" and the group configuration menu will appear:

(click here for full image)

In the screenshot above, we see three lists: Unused Entries, Lines, and Line Contents

Unused Entries

This will populate with all of the fields you highlighted that could not be automatically assigned to a line, as well as the fields which have been manually removed from a line using the tools. These will not be affected by the suppression, but it is best practice to ensure that this column is entry. If a field is not due to be affected by suppression, then it is best that you not include it in the group.

To add an item to the Unused Entries list, you must first select a line from the "Lines" list, and then a field from the "Line Contents" list.

Once you have selected these, your item, click on the "<<" button highlighted below:


This will move the field from the "Line Contents" list to the "Unused Entries" list. To move it back into the line, you simply need to select the line you want to add it to, using the method outline above, then select the entry you would like to move into the line, and click the ">>" button:


There are also the "Add All" and "Remove All" buttons, which will add all unused entries to the selected line and remove all entries from the selected line, respectively.

Lines

These will be the lines used when suppression is applied. The y-coordinates of each line are stored within the system and, if a line is empty, the line below it will move to take its place. 

For example, if Line 2 was at y-coordinate 50, Line 3 was at y-coordinate 25, and Line 2 was left empty, then Line 3 would be moved to y-coordinate 50.

As this is driven by coordinates, the order of the lines controls the direction in which the fields are suppressed. By default, the first line will be the highest one on the page, the second will be the second highest and so on. Since suppression always moves towards Line 1, the block of fields will suppress up.

However, if you were to configure your line order so that Line 1 was the lowest field, Line 2 was the second lowest and so on, suppression would still move towards Line 1, and so the fields would instead suppress downwards.

By selecting a line, you are able to use the "Up" and "Down" buttons to change the order in which the lines are loaded.


Please note, however, that the names of the selected lines will update, so you will only be able to identify what each line is by the line's contents - another reason it is good to ensure that you name your fields appropriately.

If the system has not detected enough lines from your field selection, you can add and remove lines using the "Add Line" and "Remove Line" buttons respectively. Please note that if you remove a line which contains fields, then these fields will move to the "Unused Entries" list.

Line Contents

This will list the fields contained within a line, once the line is selected, and will allow you to both set and remove a Master field. If a field is set to be the master, then whether or not this field is empty will determine whether or not the line should be suppressed.

Effectively, if the Master field has at least one character in it, then the line will show. However, if the Master field is empty, then the entire line will be suppressed, regardless of the contents of the other fields in the line. The master field can be identified by the field name having the suffix "(M)".

If a line contains one text field alongside one or more image fields, then the system will assume that the text field is the master as this is often the case, and it will automatically assign it to be the master. If it contains two or more text fields, however, then no field will be automatically assigned as the master.

To manually set the master, simply click on the field you would like to make a master, and click "Set as Master". There can only be one master, so if there is already one assigned, it will be removed as a master (though the field will still be there), and the new field will become the master.

Alternatively, if you do not want to have a master field, and would instead have all fields be required to be empty for the line to suppress, then you can select the master field and click "Remove Master".


Lastly, there are the "All Set" and "Auto Hide" check boxes.

All Set

If this is enabled, then the system will see all text variables within a given field as a set, and if any part of that set is missing, then it will count the line as invalid. This means that if you have two or more variables within a text field, and this setting is enabled, then if one of those variables is empty, the entire line will be suppressed.

Auto Hide

If this setting is enabled, then the system will suppress any fields which contain empty variables, so that if even part of a field has not been filled out, the entire field will be considered empty. Note that this is different to All Set as it will simply suppress the fields, not the line.

Phone Number Format Script - Infigo Designer Advanced

We have a phone number format script that will allow you to change how your phone number will output for your template. 

**You need to enable Advanced Mode before proceeding with these steps. 

Step 1 - Update Advanced Mode

PC

This step is critical as it enables the advanced button to appear in the Javascript Management in Infigo Designer. 

First, you will need to enable another advanced mode in Infigo Designer. On your local machine, you will need to Run "regedit". 


From here, you will want to follow this path: HKEY_CURRENT_USER > Software > Mapsoft > InfigoDesigner. The third value from the bottom, called ShowAdvanced, right click on this. Press Modify, and in Value Data, type in 1. Press OK. 


MAC

Open [HDD] > Users > [User] > Library > Preferences > InfigoVI Preferences and set 'ShowAdvancedButton' value to '1',


If you do not see your the Library folder refer to these links:
http://osxdaily.com/2013/10/28/show-user-library-folder-os-x-mavericks/
https://discussions.apple.com/thread/3829938?tstart=0


Step 2 - Insert the JavaScript File into Infigo Designer


Now, navigate to  Infigo Designer > Javascript Managment. Click Advanced. 

mceclip0.png

 In the Event drop-down, change the event to Perform before groups.

mceclip1.png

Press Add, then paste in the javascript code from NotePad (or any other code editing program).

mceclip2.png

Next, change the event to User fired event, press Add. 

mceclip3.png

Paste in the code as you did before, then press OK.

mceclip4.png


Step 3 - Apply the Script to your Field


Press Infigo Designer > Predefined Javascripts. Hit Phone number script, then press Run Script.

mceclip5.png

Select the field you wish to apply this too, then select the format you need. Please note, items in Brackets [] are either local or global variables. If you are using a local or global variable field, please apply the script to that field. In the example, Phone1 is the text field and [Phone1] is the local variable. 

mceclip6.png


To check if the field has the formatting applied, navigate to the field (or local or global variable), and in the Properties tab, you will see a PhoneNumberFormat field.


  mceclip7.png

Product Landing Page - Template Chooser: Infigo Designer

This article goes into detail on how to setup an Infigo Designer product that has a special feature on the product landing page: choosing a Template. This can be extremely useful if you want your users to choose from a selection of templates from the Product Landing Page to then be displayed properly in the editor. 

In the example in this article, I will be demonstrating how to setup a product where the user can choose a template for the back side of the product on the landing page, and it will be visible in the editor. 


Requirements:

1. You will want to make a copy of the template from page one, do not include any fields as they will be duplicates.

2. Set this copy to page 3 of your PDF, this allows for the template change to happen without losing your artwork. 

3. Set page 2 as a background. This will be the default. 

4. Set page 4 as your other background.  

 5. Navigate to Infigo Designer > Manage Document Properties...

 6. Be sure that NumOutputPages is set to 2 if you are using a business card. This can be changed depending on how many pages you are outputting for other products. 

*Note*

If you have multiple templates you want to chose from, you have to continue the pattern of templates. For every new template, it is required to have one blank template. Below is how this pattern looks with three backs:

Setting up the Template Chooser:

7. Navigate to page 2, add a new text field. Make sure it is off the canvas.  

8. Give the field a unique name - In this example the field is named 'TemplateChooser'. 

9. In the Properties tab, change the FieldType to 'TextList'. Set readonly to 'True' if you do not want your users changing the template after opening the editor. Press OK to save the changes. 

10. Navigate to Infigo Designer > Predefined JavaScripts

11. Select Template Chooser from the list. Then Press Run Script.

12. Press Add

13. Choose your field from the list, press OK

14. Type in 2, as this allows for the changes to happening properly, regardless of the amount of templates being chosen. Press OK

15. Name each template uniquely. The names will also be used on the Admin Side setup. Press OK. 

16. Select Yes for 'Should the field X be hidden after import?'

      Select Yes for 'Should the template selection values be added to the alternate list?'

      The final window is an optional choice. This example used Yes

      Finally press OK, and close the window. 

17. Upload the PDF to Infigo in Catalogue -> Products -> Product Types -> Infigo Editor -> Infigo Products


Infigo Storefront Configuration

First, we have to make sure the output setting for the Infigo Designer Editor are correct. 

18. Navigate to your product in Infigo Products where you uploaded the PDF

19. Press the Editor Settings tab, make sure Single Page Mode is enabled, then press Save. 


Now we have to setup the product attribute. 

20. Navigate to Catalogue > Attributes > Product Attributes, press Add new

21. Name the field EXACTLY as the field you chose to be your template chooser, in this example we used TemplateChooser as the name from Step 8. Then press Save.

22. Navigate to your product in Catalogue > Products > Product Management. Press Edit. 

23. Navigate to the Product variants tab, press Edit. 

24. Navigate to the Product variant attributes tab, press Add new record

25. Find the attribute you just created, create a product label, choose the control type, set required, and press Insert. 

26. Press View/Edit value

27. Press Add a new value. Name each value EXACTLY as the value you named the templates from Step 15


Now we have to map the product attribute to the field within the template. 

28. Navigate to Configuration -> Settings -> Product and Editor Settings -> Infigo Settings

29. Find ProductAttributeVariableItemMapping set the field name from Infigo Designer equal to the name of the product attribute. Make sure there is no space between the '=' sign. Press Save. 

30. You will now be able to choose a template from the product landing page!

Using the CopyContent script - Infigo Designer

Synopsis

One of the predefined Javascripts which comes with Infigo Designer is the CopyContent script. This script allows you to automatically copy the content contained within one field to another field of the same type (image -> image, text -> text). 


The Copy Content Script will only apply to Fields - Local and Global Variables cannot be used with this script. If you would like to copy a single variable to another page, please use Global variables. 

Note: The content will be copied over upon the creation of a downloadable preview or the output, but it will not be visible in the editor.

Example:

For this article, the example we will be working to produce is a two-page PDF, each containing a single image field and a single text field.

PDF_Setup.png

We will be setting up the product to copy the contents of the fields on the first page, to the respective fields on the second page.

Step-by-Step

1. Firstly, navigate to Infigo Designer -> Predefined Javascripts as seen in the screenshot below.

3.png

This will open up a menu which lists all of the predefined Javascripts which come with Infigo Designer.

2. From this menu, you will want to click on "CopyContent" and click "Run Script"

Script_menu.png

This will open another menu which lists all of the current instances of the script in the PDF, as well as allowing you to make a new instance. As no instances of this script exist within this PDF, it instead states "No scripts set":

6.png

3. Here, you want to click "Add" which will open up a list of all the fields contained in the PDF. As you can see, all four fields are visible on this list.:

Field_list.png

4. Firstly, we need to designate which fields are going to be copied from. To do this, we are going to select the "CopyImageFrom" field, then click "OK."

5. This redirects to a similar page, except as you can see, this is filtered to only show fields of the same type. In this instance, it is only showing the image field which is located on the second page. Here, we need to select the field we want to copy the image to, and once again, click "OK."

2.png

6. When we click "OK," we will likely be prompted with a box informing us that the target field is not fixed. This is referring to the "Fixed" setting that can be applied to fields in order to prevent user interaction. When using this script, it is recommended that all target fields are fixed, as the script will overwrite any interaction the user has with them and this can lead to confusion or irritation on the user's end.

1.png

7. Upon clicking "Yes" we will be redirected to the same box which opened up when we first ran the script, except as you can see, it has now populated with the script instance we have just configured.

4.png

8. Now that we have our first CopyContent script instance set up, we will need to follow steps 3 -> 7 and do the same for the text fields. Once this has been done, you will be able to see both script instances in the dropdown list:

5.png

9. Now, all that's needed is to save the PDF and upload it to the storefront.

Outcome

As you can see in the below screenshots, I can interact with the fields on page 1, but cannot do so on page 2. This is because the fields on page 2 are set to be fixed.

Page_1.pngPage_2.png

Below is a screenshot of the simple modifications I have made to the first page. I simply added an image to the image field, and changed the text in the text field.

Page_1_configured.png

After placing the order and retrieving the output, I can see that the script has worked successfully and the fields have been copied over to create a perfect replica of their originals.

Output.png

The download link for the PDF I created in this example can be found below, please feel free to use it as a reference for how the script looks in the PDF itself.

Dynamic Field Movement

With Infigo Designer, it is possible to move selected fields based on their individual sizes, allowing for a more aesthetically pleasing document with fields which automatically move to accommodate their sizes.

This can be achieved through the predefined Javascript "Dynamic Text Script" which is one of the many scripts which are installed alongside Infigo Designer. 


I will be demonstrating how to set this up using a simple document which contains only three fields, as seen in the screenshot below.

In order to configure the predefined Javascript, you need to navigate to Infigo Designer > Predefined Javascripts using the navbar at the top, as highlighted in the following screenshot.

Next, select "Dynamic Text Script" and click "Run Script"

A menu will pop up containing a list of all the instances in which you have used this script. If you've not used this script yet, this list will be empty. 

From here you need to click "Add" and then you'll be able to configure this instance of the plugin, allowing you to change three settings for this script instance:

Direction - Which direction the script will be moving the fields in, horizontally or vertically.

Sort Order - Whether the fields are sorted in ascending or descending order

Gap - The space allocated between each field

For this example, I will be changing the direction to "Vertical", whilst leaving the Sort Order as "Ascending" and the Gap as 5.

After clicking "OK" a menu will pop up containing a list of all the text fields contained within your document. You can select which fields will be affected by this instance of the script.

Next, you will be redirected to the menu which allows you to add new instances of this script, however this time it will contain the instance you have just configured.

All you need to do now is click "OK" on this menu and "Close" on the "External Javascripts" menu, save the document and then the script will be configured.

Below is a screenshot of how my document looks when it is first uploaded.

Please note: the fields have already moved closer together to fit the gap I set of 5.

In this next screenshot, I have added some text to increase the number of lines and the script has automatically moved the fields so that they do not overlap each other and maintain their gap of 5.


Dynamic Text Script

Image Selector Script - Infigo Designer

This article is going to explain how to use the Image Selector Script within Infigo Designer. This script is useful if you want your customers to select from a set of embedded images from your template for a specific location. 


The script is very simple to setup. All that is required is a trigger text field, an image field, and the script itself. 


1. The Trigger Field

This field must be a text field located off of your template. After creating the field, be sure to have a UI Description, in this example, Please Select an Image is used. 


2. The Image Field

The image field will be located on your template. After you create your image field, navigate to Image Settings > Image Selection. 

Here, you can embed images into your template that can be chosen from this field. To embed an image, press Select, choose your image from your PC or Mac, then press Embed Now

By hitting the drop-down, you can see every image file that you have embedded:


Lastly, be sure to have the image field as a Fixed Value. Once you have completed these steps, hit OK


3. Apply the Script

Now you can apply the Image Selector Script. Navigate to Infigo Designer > Predefined Javascripts. Select Image Selector, then hit Run Script. 


Press Add, then on the next screen, select the image field that will have images change. Press OK

Now select your Trigger Field, press OK

Now, create your text list values (image names) that the user will choose from. Select Add, then input the value, then hit OK


On the next screen, assign your text values to an image. 

On the next screens, simply hit Yes. Once this is setup, press OK

Be sure to save your product, then upload it to Catalog > Product Types >

Infigo Editor > Infigo Products. 


The Front End

The editor will now have a field to select the image, and the image will now update in the editor when chosen based on the selection!


Troubleshooting

If your script isn't working as expected, or you are experiencing difficulty, please raise a support ticket and we will assist you. 


Order Elements Script - Infigo Designer

This article is going to explain a very useful Predefined JavaScript called Order Elements found in Infigo Designer. This script allows you choose the order in which your fields appear in the editor on the storefront. 


Steps

1. Navigate to Infigo Designer > Predefined Javascripts

2. From the Javascript list, click Order Elements, then press Run Script

3. On Order Group Elements popup, click on Order.

4. A list of fields will be shown that you can move. Simply select the field you wish to move and use the "Up" and "Down" buttons to adjust the order of the fields. Press OK to save your adjustments. 

5. Re-upload your product and the new order will now appear!!


Field Property Setup – Basic Features used within Infigo Designer

In our Infigo Designer plugin, we have two main types of field: Text and Image. These fields subsequently have field properties which allow you to control certain aspects of your fields. However, some of these properties were once used by the system and now no longer have any effect on the fields. 

You can see these properties by clicking on the Properties section of any field's Field Settings, as seen in the screenshot below.

Field_Properties.jpg

Please see below a table listing all of the field properties present on a text field, and a brief description of each of them.

Field Property

Description

AllowAlignmentChange

This enables the Alignment Panel to display on the editor, which displays below the text field when your users select it.

What this will then do is allow your users to change the alignment of the text within the field. 

AllowAllFonts

This enables a dropdown of fonts available by default, allowing the user to change the font of the text they enter. These fonts are a standard set which are installed on the server and cannot be changed.

If you would like to use custom fonts then you will need to add them as alternate fonts.

Please note that Infigo does not take credit for any of the fonts used in your products.

AllowAnyColour

This allows a list of pre-set colours to appear in a grid below the field when the user selects it. This will allow the users to change the font colour of the text within the field to any of the colours displayed.

AllowFontSizeChange

This enables the font size slider to appear on the editor once the user selects the field. This will allow the user to change the font size of the text they enter - limits must be set using the MinFont and MaxFont properties (explained below), else this feature will not work.

BranchMapping

This is a legacy setting to do with a feature which we no longer support. This can be ignored.

CharacterCountdown

This allows you to restrict the number of Characters the user can enter into the field. It will display a live countdown of the number of Characters remaining underneath it once the user has selected the field and started making their changes.

To enable this feature, you will need to set this property to a value larger than 0. This value will become the field's limit.

FieldType

This setting allows you to chose how your field will be displayed in the editor. For Example, by default it is text field, but you could also display a text list (dropdown).

The complete list of types is:

Integer - A whole number

Double - A number with a decimal place

Boolean - True or false (a checkbox)

Text - Text

TextList - Dropdown

ForceServerSidePreview

This is a legacy setting to do with a feature which we no longer support. This can be ignored.

GroupName

You are able to group fields in Infigo designer for various purposes - this property allows you to designate which group the field belongs to.

HelpText

This is a legacy setting to do with a feature which we no longer support. This can be ignored.

LineLimit

This allows you to expand the number of lines the customer can type on. By default it is set to Unlimited (which means they can keep typing as much as they wish, however the UI only displays one line for text input).

For example, if you increase the value from Unlimited -> 5, the UI will display a deeper text input box, with room for five lines to be typed. It also means you can use carriage returns on the templates.

MaxFont

This allows you to specify the maximum font size used on the font size slider (See AllowFontSizeChange).

MinFont

This allows you to specify the minimum font size used on the font size slider (See AllowFontSizeChange).

NewName

This is a legacy setting to do with a feature which we no longer support. This can be ignored.

PlaceholderText

This property can accept any text as a value, and this text will appear as slightly greyed out 'ghost' text in the input field in the editor. This can be used to provide preview text to give the user an example of what they need to enter, without having to delete what is already present.

PrepopulateDataFrom

This property allows you to prepopulate a field with the data stored in the customer data of the user who has opened the editor (customer name, phone number, address line etc.).

The value to be prepopulated from is selected via a dropdown. Please note that not all values in the dropdown are still supported.

A rule of thumb is that if you cannot see the field when editing the customer's details through Infigo Admin, it's no longer supported.

ReadOnly

If you wish for a field to be seen in the editor, but not populated, then enable this setting.

For example, you may wish to show a non-editable product in the editor to use its zoom functionality as a preview. Simply draw a text or image field out, tick this property and save. Now, the editor will load but the customer cannot edit this field.

Please note that this does not prevent any scripts contained within your PDF from editing the value of this field.

Required

Tick this if it is required for the field to have changes made to it. How strictly this is enforced can be controlled with the RequiredType property.

The system will check if this field has been populated by checking to see if there has been a change made to it at all since the editor session was loaded.

This will take effect when the user attempts to add the product to the basket.

RequiredType

This property is a dropdown that allows you to control whether the required field is strictly enforced, or whether it simply reminds the user that they have not edited it.

Both of these options will utilise a popup which tells the user which fields have not been populated.

RequiredBranchMerge

This is a legacy setting to do with a feature which we no longer support. This can be ignored.

TabID

This is a legacy setting to do with a feature which we no longer support. This can be ignored.

TextListValues

This is the field in which you can populate the values of your dropdown list (Using the FieldType Property, above, when selected a Text List).

Clicking on the ... for this property will open a menu which allows you to edit the values for the dropdown.

UIDescription

This is the ‘label’ which is displayed next to a field in the editor. If you do not populate this field, it will simply use the field name as the label.     

UsePreviewAsDefault

This is a legacy setting which is no longer required. This can be ignored.

UseServerSidePreview

This is a legacy setting to do with a feature which we no longer support. This can be ignored.

ValidationType

This allows you to automatically validate the data entered into the field, forcing the user to enter something which adheres to the requirements of the selected choice.

The options are:

 - UK Postcode

 - UserID

 - Numeric

 - Email

If a user attempts to enter something which does not fit the validation into this field, then they will not be able to add the product to the basket.


Image fields share some of these properties, however they do not share all of them and in fact have some unique to them, as seen in the screenshot below.

image_properties.jpg

Please see below a table listing and explaining each of the properties unique to image fields.

 Field Property Description
EmbeddedFileList

If you populate this property's list with the exact filenames of embedded image files, you can restrict which embedded images can be used in this field if the field is set to use embedded images (this is controlled using the ImageUsage property below).

Please be aware that the items of this list must perfectly match the filenames of the embedded images you would like to be used in this field. For example, if you embedded image.jpg and you wanted users to be able to use this image in this field, you will need to add an item to this property list called image.jpg

If this property is empty, then this feature will be ignored and the user will have access to all embedded images (once again depending on the value of ImageUsage).

ImageUsage

This property controls the user's interaction with the image field when in the editor. The options are:

Display embedded images as gallery - This will display all of the images embedded in the PDF as a gallery for the user to choose from.

Display embedded images as gallery with the option for upload - This will display all of the images embedded in the PDF as a gallery for the user to choose from, however it will also allow users to upload and use their own images.

Upload Images Only - This will allow users to upload images to their personal user albums and use the images which have been uploaded.

Not Required - This will act similarly to the 'Read Only' property for image fields and prevent user interaction. However, the user will still be able to select the field in the editor and it will grey the rest of the document out, allowing the user to see the image more clearly.

SharedGalleryName 

This property is used to define the name of the shared gallery/album which this image field has access to. This will allow you to control which images the user can use for this field.

For more information on this feature, please see this article. 

ShowImageLibrary 

This property is used to control whether or not an image field can access the available shared albums (which the user must also have access to). 

This setting is enabled by default.

Add Avatar to Variable products

Catfish now allows you to create an image field that can contain an avatar from customers. As a storefront Administrator, Please follow these steps.

1) Open the PDF that requires customer's avatar
2) Create an image field (Example: ProfilePicture)
3) Navigate to Field Information -> Properties
4) Click on Add

5) Define the new Property and match the settings below (Be sure to copy the name "PrepopulateDataFrom" exactly as seen below. With spelling and capital letters).

mceclip0.png

Then add "Avatar" into the "PrepopulateDataFrom" field you just created.

mceclip1.png


6) Now navigate to Image Settings and select the settings seen in the picture below:

mceclip2.png


7) Click OK and save this document. You're file should now support your Avatar.


As Administrator, you also need to make sure the Avatar feature is enabled in Catfish. Navigate to Configuration -> Settings -> Customer Settings and check "


Once this feature is enabled for Front End users, they need to upload their avatar under My Account -> Avatar.


You will know if it worked successfully if you Avatar automatically loads into the image field. 

Infigo Designer Manual

Downloadable PDF manual of the Infigo Designer plugin for Mac and PC

Click here to get the latest version of the manual

Infigo Designer Modes

Infigo allows the upload of a .CSV file to populate multiple revisions of a variable data document. What this means is you can configure a product made in Infigo Designer to allow your users to upload a CSV when placing an order and receive an output per record.

1. To configure this, navigate to Catalog > Product Types > Infigo Editor > Infigo Products and either create a new Infigo Designer product, or edit an existing one. 

In the 'Edit Infigo Product' menu, where you can upload your templates, there is the 'Mode' dropdown which allows you to control whether the user interaction mode is set to Single, Batch, or Both.

mceclip0.png

Single:
This is the default setting and provides the standard functionality of allowing the user to simply order the products one output per orderline.

Batch:
Batch mode allows the user to upload a CSV and generate an output per CSV record whilst using a single order line.

Both:
Both will give the user the choice between either ordering the products one output per orderline, or upload a CSV. Effectively, this is a combination of Batch and Single mode.

  • When Batch or Both is enabled, you will be able to add a Price per Record, allowing you to charge the user per record (this charge is applied on top of the base price).
  • You can also use Batch tier pricing, allowing you to charge a different amount per CSV depending on the number of records contained within the CSV.

mceclip1.png


2. If you set the mode to Batch or Both, the 'Batch' button will appear in the top-right hand corner of the product's editor, as shown in the screenshot below.

mceclip2.png

  • When using batch upload, the CSV's headers will need to map to the Infigo Designer template's field names, as this is how the automatic mapping will take place.
  • However, the user will have the chance to map fields manually, and even set a static values which are the same across all outputs.

mceclip3.png

Global and Local Variables

In Infigo Designer, we support two types of text variables: Global and Local. Both of these variable types serve a similar purpose and can be placed within text fields, however they are subtly different.

Local Variables

Local variables can be used to allow your users to edit text within a field, without giving them access to the entire field. This can be useful in situations where you want a single text field to contain both static and variable text.

An example of when you would want to use this is if you were creating a business card, and you wanted to have the following labels:

Mobile: 

Email: 

Fax: 

You would want your users to be able to provide values for each of these, but you would not want them to be able to remove/change the labels. The best way to achieve this would be to create the static labels in the text editor, and then create a local variable for each of them. 

To create a local variable, you will need to open your template in an instance of Adobe Acrobat which has Infigo Designer installed. After doing so, you will then need to create a text field or edit an existing one.

Once you have done so, you will need to enter the Field Settings for that field and then expand the Text Settings - this can be done by simply clicking on it.

Text_Settings.jpg

From here, you will need to click on the Local Variables section. This will open a list of all local variables contained within the field. This is where the main difference between local and global variables comes in: local variables are localised to a single field, global variables are shared across the entire template.

Local_VArs.jpg

To add a local variable, simply click 'Add...' and provide the variable with a name. The naming scheme for variables is similar to field names in that they must be unique from one another (within the same field), however variables are slightly more strict with their character restrictions. The variable names can only contain alphanumeric characters.

VariableExample.jpg

As you can see in the screenshot above, the variable will have its own set of properties. These properties are a condensed version of the Text Field property list, and will only affect the variable. This can be useful for many reasons, an example of which would be utilising the UIDescription property, allowing you to control how the field is titled in the editor.

In the second column of the Variables table, you will be able to enter a default value for the variable. This will pre-fill the variable field in the editor with the text provided, allowing you to give your users an example of what should go in the field. 

Once you have configured your variable to your liking, you will need to add a placeholder for it in the Text Editor (if you want the variable to be seen in the editor and be a visible part of the output, that is).

To do so, navigate to the aforementioned Text Editor section, and select the variable you would like to add a placeholder for from the Local Variables dropdown highlighted below. Once you have selected your variable, click the 'Add' button adjacent to the dropdown and it will add a placeholder for the variable at the currently selected location in the text. This placeholder will always appear as , can be manually written, and there can be as many instances of the placeholder as you desire, all of which will contain the text entered into the same field in the form.

Local_Variables_dropdown.jpg

This placeholder will be replaced with whatever the user enters in the field in the form, however it will retain all formatting. This will allow you to control the font, alignment etc. of whatever the user enters by simply applying the desired result to the variable placeholder.

Global Variables

Creating and using a global variable is done through an almost identical process to creating and using a local one. You will need to do all of the steps you did for a local variable, except navigate to the Global Variables section instead of the Local Variables section. In the screenshot below, I have created a simple global variable.

Global_Variable.jpg

As mentioned earlier, the difference between local and global variables is that local variables are localised to a single field, meaning that they only exist in that field, whereas global variables exist within the document. This allows global variables to be created once, only require the user to enter data into it once, and allow them to be present across multiple fields.

An example of where you may want this is if you are creating a multi-page letter template with the user's name being either entered or pre-populated as the variable data, and the user's name must appear multiple times on each page. The best way to do this would be to create a global variable and add the placeholders for this in the appropriate locations across all of the fields. This will mean that the user is only required to enter their data once and it will update in each instance of the variable throughout the template.

Once you have created and configured your global variable (through the same methods as with a local variable) you will need to add it to the Text Editor using the Global Variables dropdown instead of the Local Variables one. This is highlighted in the screenshot below, and you will also be able to notice that this is not in the field I created the global variable in, yet as it is a global variable it is still present.

Global_Example.jpg

Although you can create and manage global variables through a text field, you can also do this directly by navigating to Infigo Designer -> Manage Global Text Variables... and using the menu which this opens - both of these can be seen below.

Manage_global.jpg

Manage_global_menu.jpg

I have saved this document and uploaded it to my storefront, and as you can see in the screenshot below, the placeholder text for both of the variables has not only been pre-filled and is rendered in the preview, but when I make changes to either of them the changes are reflected in each instance of their placeholders. To provide clarity, I have added a placeholder for the global variable into the text field containing the local variable as well.

Placeholder_editor.jpgwith_changed.jpg

I have attached the PDF I created through these steps to this article so that you may download it and have a working reference when creating your own global and local variables.

Infigo Designer - Hide Field on Output Creation

In Infigo Designer, it is possible to show a field in the editor, but hide it when the output file is generated. This can be useful in many situations, such as if there was a logo present on the stock which your output was being printed on and you wanted the editor to reflect this, but not be on the output. You could have the image be visible in the editor, but hidden on the output so that whilst the user sees a true representation, the output file will not include this logo.

This can also be used to show or hide crop marks on the output creation, allowing your print-ready artwork to contain crop marks without your user having to see them in the editor.

To achieve this, you will need to utilise our Javascript wizard, as well as our prepare strings. This article will explain how you can use these tools to achieve this goal.

First, you will need to have at least two fields in your PDF. However, for this article I will include three:

  • A text field which will be used by the script to determine if the output should be shown or not
  • An image field which will be hidden on the output creation
  • A separate text field which will be used to show that the only element of the PDF affected by the script is the image field

 As you can see in the screenshot below, I have created the first field off of the artwork in the PDF, and the second and third fields on it. This is because I do not want my users to see a field which is only used for the script, and creating it off of the artwork will allow the script to still use the field without the users seeing it. I have highlighted the script field in blue so you can more clearly see its location.


You do not need to do anything special with these fields' configurations and properties, as this will mostly be driven by the script. However, you will need to ensure that the names are appropriate and can easily be remembered when producing the script, so take note of what you have called each field after creating it. I have also made the image field a Fixed Value so that the user cannot change it within the editor (however the script will still be able to edit this as it will bypass this property).

It is also advised to make the field off of the artwork (which I will refer to as the trigger field from now on) read-only so that your users cannot interfere with the script. It will likely not affect the output if they are able to edit this field, but it can affect the behaviour within the editor itself.

Note: If you set the trigger field to Fixed then it will not be able to be changed on output creation, and so the script will not work.

You will need to set the pre-defined value of this text field to False - this is done through the Text Editor as seen in the screenshot below.


HideField.jpg


Once you have configured this, you will need to create the script, which you can either write yourself as Javascript, or you can use our Javascript Wizard. I will explain how to produce it in the wizard below.

In order to load the wizard, you will need to enable advanced mode for your Infigo Designer plugin. To do so, simply open up a PDF with the Infigo Designer plugin installed, then open the Infigo Designer menu and select Configuration. This will load the popup menu below, in which you will need to check the Advanced Version box and click Ok before re-launching Adobe Acrobat.


Advanced_mode.jpg


Now, when you re-open your PDF, you will be able to access Infigo Designer -> Javascript Management

ID_Menu.jpg

In the menu which appears, you will be confronted with a menu which will show you all of the scripts which you have previously created in this PDF. In order to load the script wizard, simply click Wizard.

Wizard_button.jpg

Upon clicking this button, the following editor will open:

Wizard.jpg

This is our drag & drop Javascript wizard which allows you to create simple to complex Javascripts for your PDF. 

The first thing we will need to do in this script is add a condition. What this will do is basically make the script check something and depending on the outcome of this check, it will either do one action or another. In our case, the check will be checking the value of a text field, and then either showing or hiding the field depending on its value.

To add the condition, you will need to expand the Control Flow folder in the Functions menu on the left, and then drag the world Condition into the green Item box in the grey area, which will result in the screenshot below.

Condition_only.jpg

Now that we have told the script there is going to be a condition, meaning it will have to check/test something, we need to tell it what the test is. We will be testing to see if the text value of our Trigger field is equal to True or False. 

To achieve this, we will need to now collapse the Control Flow folder, and instead expand the Comparison folder. After this, we will need to drag the text equals to value over to the Test section of the condition. Doing so will result in the screen seen in the screenshot below.

Text_equals_to.jpg

Now that the script knows it needs to compare two text values, we need to tell it which values to compare. The order in which we add these doesn't matter, however for the sake of making it as human-readable as possible, we're going to essentially make the script ask "Is the trigger field equal to False?"

To do this, we are going to now collapse the Comparison folder in the left, and instead navigate to the Items area on the right of the document. In here, we will need to expand the folders Text Fields -> HideField (our trigger text field) -> Get... -> text value:  and drag Text Value from this folder into the red section of our text equals to script area. 

This will result in the script looking like the screenshot below:

Field_value_gotten.jpg

Next, hover over the B section - this will cause a small popup with the word Text to appear. 

Text_hover.jpg

Clicking on this will cause yet another popup to appear, in which you will be able to enter the text we will be checking the Trigger field against. In this instance, I will be using the word False. Take note of the exact characters and casing you used for this word, as we will need to make sure that this is perfectly matched in our later configuration.

Constnat.jpg

After adding this text and clicking OK, the script sequence will now look like this:

Compared.jpg

At this point, the script is essentially asking the question "Is HideField set to false?" and depending on the answer to the question it will either follow the If Branch if it is true, or the Else Branch if it is not.

Now that we have the condition set up, we will need to set up the actions. As we are asking if HideField is true, it would make the most sense to hide the field if the answer is Yes, so we will configure the If Branch to achieve this. To do this, look to the Items section on the right half of the page and expand the folders Image Fields -> Logo Image Field -> Set... -> field value: and drag the visibility attribute over the If Branch. See below for a screenshot of the attribute which needs to be dragged, as well as the visible result of this action.

Visibility_Attribute.jpg

Vis_attrib_if_branch.jpg

This will fill the script so that it is trying to set the value of the visibility attribute of this image field. Basically, the visibility attribute determines whether or not something is visible, both in the editor and in the final artwork. So, if the value of HideField is False, then we will want to make the field visible, which we can do by setting the visibility attribute to true.

The easiest way to do this is to hover over the Value field, and click on the white text saying Logical Value.

Vis_attrib_if_branch.jpg

This will open a popup which allows you to determine which value to set the field to through the use of a simple checkbox. If the checkbox is ticked, then the value will be true, and likewise if it is not ticked, the value will be false. For our purposes, we will want to ensure that the box is ticked

Enter_constant_value_tickedf.jpg

Next, click OK and the Value will be replaced with a Logical Value that is true.

If_branch_filled.jpg

The script is almost complete, now we just need to configure the Else Branch. Thankfully, this follows the same principle as the If Branch, and is almost identical in fact. The only real difference is the Logical Value, as this time we will want it to be set to false instead of true. This is because if HideField is set to True, then we will want to hide the field, and since HideField will no longer equal False, the script will go down the Else Branch. 

Since we have concluded that the Else Branch should hide the field, we will need it to set the visibility attribute of the field Logo Image Field to false. To do this, follow the exact same steps outlined when configuring the If Branch, except make sure that you do not tick the box in the Constant Value pop-up menu. 

If you have configured the Else Branch correctly, then the script should now look as follows:

Complete_script.jpg

The script is now complete, and all that's left to do is add a description, a name, and save it. The description and the name is up to you, however we advise that you ensure that both the name and description are relevant and appropriate. 

To provide these, you will need to utilise the Script Details section in the top-left of the editor UI. See the screenshot below for an example of both the name and the description.

Name_and_desc.jpg

Once you have finished with the name and description, click OK in the bottom-right hand of the UI, then click OK again in the Javascript Management menu.

OK.jpg

JSM_OK.jpg

The script is now saved and your PDF template should now be finished and ready to be uploaded against a product. See here for further instruction on how to do this.

All that is left to do is to configure the storefront so that the value of HideField is set to True on output creation.

In order to achieve this, you will need to navigate to Configuration > Settings > Product and Editor Settings > Infigo Settings and navigate to the XML and Prepare String Data tab.


hidefield_xml.png

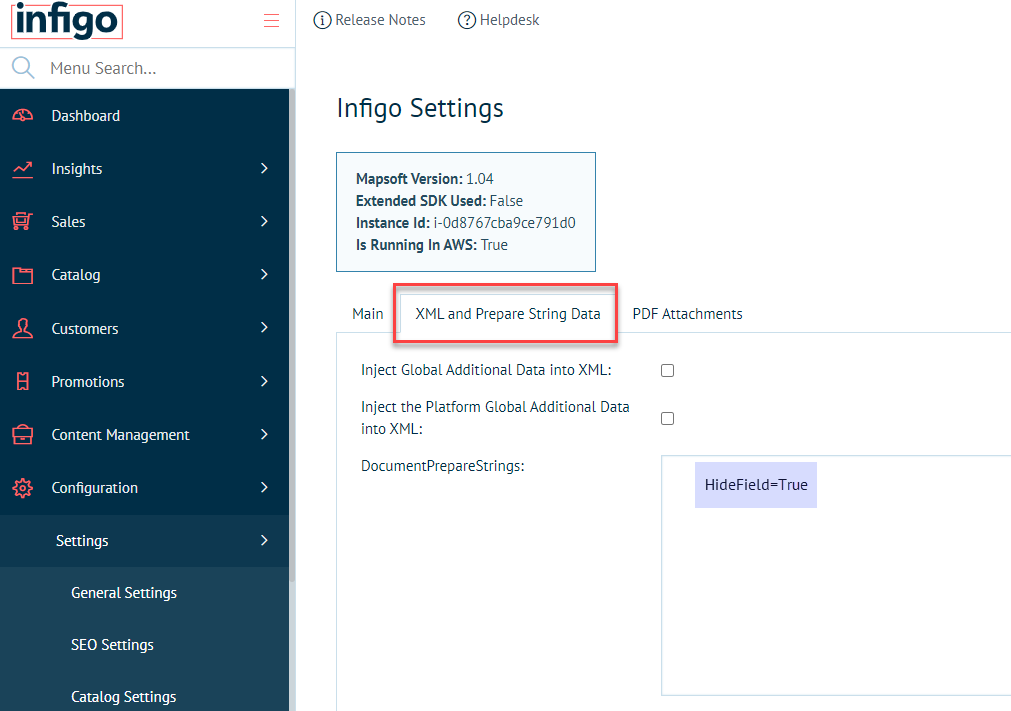
As you can see in the screenshot above, it is very easy to assign the value of HideField. All we need to do is type it in using the format =. This will only take place during output creation, so it will not affect the editor whatsoever. Once you have mapped the value to the field, simply click Save and then it's time to test the product. (please note*** new strings added require an app server recycle - these are performed nightly - so will need 24 hours to let this setting to be active).

In the screenshot below, I have loaded the product I just created on my storefront and changed the text to ensure that my changes to fields not included in the script are unaffected.

Hide_Field_in_editor.png

As you can see in the screenshot below, the text I entered has been retained, yet the image field is no longer visible. 

Output.jpg

I have attached both the PDF created in the making of this article and the output file of the order I placed when testing the product.

The logic in this article can be flipped so that the image field is instead hidden in the editor and shown on the final output, which could be useful if you wanted to include crop marks etc. without your customers seeing them. To do this, simply swap the If Branch and the Else Branch.

Infigo Designer HKCU Error

If you see the error "Can't open registry key 'HKCU\Software\Mapsoft\InfigoDesigner' (error 5: access is denied.)" when using Infigo Designer please follow these steps: 


Before continuing please ensure you are using 32-bit version of Acrobat (not Acrobat Reader). For more information please see https://infigosoftware.zendesk.com/hc/en-us/articles/7404898160657-Install-32-bit-Acrobat-DC 
 

Step 1: Open regedit in admin and go to Computer HKEY_CURRENT_USER\software\ - right click set permissions for ALLOW full control on the ALL APPLICATION PACKAGES 

Step 1 (1).png


Step 2: Close Acrobat
 
Step 3: Open regedit in admin and go to Computer HKEY_CURRENT_USER\software\ - right click UNSET permissions for ALLOW full control on the ALL APPLICATION PACKAGES 

Step 2 (1).png


Step 4: Open regedit in admin and go to Computer HKEY_CURRENT_USER\software\Mapsoft - right click set permissions for ALLOW full control on the ALL APPLICATION PACKAGES 

Step 3 (1).png
 
5: Re open Adobe Acrobat
 
6: Check tools section - should see Infigo designer icons and in Top Menu. 

Step 4 (1).png

Populate Filename with Editor Field Value

It is possible to configure your product so that the value of a field in the Infigo Editor carries through to the output filename. This can have many uses, such as making it easier to organise your files once you have downloaded them, or to allow you to more easily identify an output. This is accomplished by copying the value of the text field through to a product attribute during output creation.

To demonstrate this, I have created a simple PDF which contains a single text field called "OperatorNameField" as well as a product attribute called "OperatorNameAttribute".


Attribute_Name.png

Field_Name.png


As the product attribute is only being used to 'carry' the field value to the output, the user will not need to see this on the landing page. Because of this, I have set the control type of this attribute to Hidden as shown below.


Attribute_configuration.png


After creating a product with this configuration, you will need to configure the file output name so that there is a placeholder for the attribute you have just assigned to the product.


The file output name can be edited by navigating to Settings > Product and Editor Settings > Infigo Settings and configuring the OutputFileNameTemplate field. However, in order to use the template configuration, you will need to enable the setting UseOutputFileNameTemplate by checking the box highlighted in red below:

Filename_config.png

As you will be able to see in the field highlighted above in blue, the field is already populated with the template:

%TypeLetter%_%OrderID%_%JobID%_%Username%_%ProductName%_%Quantity%_%OrderItemsNbr%-%OrderItemsSetSize%_%Date%_%Time%.pdf

This is the default configuration, and anything which is surrounded by two % signs is a variable which can be found in the XML and Prepare String Data of the Infigo Settings page. However, it is possible to add product attributes as a template, by simply adding AttributeCFPARAMETERAttributeName. The "CFPARAMETER" is there to act in place of : as this character is not accepted in a filename.

For this configuration, I will be adding _%AttributeCFPARAMETEROperatorNameAttribute% to the end of the filename. The _ is not necessary, but it looks more appealing and allows us to more easily distinguish one attribute from another. My file name template is now the following:

%TypeLetter%_%OrderID%_%JobID%_%Username%_%ProductName%_%Quantity%_%OrderItemsNbr%-%OrderItemsSetSize%_%Date%_%Time%_%AttributeCFPARAMETEROperatorNameAttribute%.pdf


Note: Please be aware that these placeholders do not support spaces - meaning your attribute name cannot contain a space if you intend to use it in the filename.

Now that the filename and product has been configured, the field name will need to be mapped to the attribute in order for the value to copy through to the filename. 

To do this, you will need to use the field VariableItemProductAttributeMapping which is located still on the Infigo Settings page. 

The mapping follows the template FieldName=AttributeName. See below for an example on how this would be done for the product used in this example:

Mapping_config.png

Now that the output template has been configured, and the variable has been mapped, all that's left is to place a test order to ensure that the product is set up correctly.

As you can see in the screenshots below:

There is no visible attribute on the landing page


Landing_page.png

I have entered "John Doe" into the field OperatorNameField


Editor.png

"John Doe" appears in the filename

Output_filename.png


I have attached the PDF I used in the creation of this article to allow you to follow these steps exactly when first trying to configure your storefront to recreate this behaviour.

CMYK colour picker

Want to print using the CMYK colour model? This document will walk you through the steps to set this up on your site.

*Please note this is to enable the use of different colour options for Fonts ONLY*

Firstly, you need to create a property on the field you want to use the CMYK colour picker, in this example the field name is ‘TextFront’.

This new property should be called ‘UseAdvancedColours’.

This property needs to be a Text Value List and can contain the following items:

  • Cmyk
  • Hex
  • Rgb
  • All


These options allow you to select what colours models you would like to be made available in the colour picker. Selecting CMYK and HEX will enable the user to enter in CMYK and HEX values into the colour picker to select their colour. Entering in ‘All’ will of course provide all options.


Regardless of the values in this property the output will always be CMYK when this is used.


If this property is missing or is left blank then the CMYK colour picker will not be used.

If the AllowAnyColour Property is set to “True” then this will override the UseAdvancedColours property and just use that colour option.


Now, when you navigate to this product in the editor you will notice that the colour option is now a button that looks like this


And then when you click on the button you will be presented with this dialog.

This example has the value ‘All’ in the ‘UseAdvancedColours’ property so it is displaying the RGB, CMYK and Hex values.

Change the DPI

Infigo allows the customers to change the resolution of preview in the Infigo Editor.

Configuration > Settings > Product and Editor Settings > Infigo Settings and located "ProductThumbnailWidth" and change the current value to 10000

Hiding pre mapped fields in the editor when not required (batch merge)

When a template requires a mixture of Batch upload and Single page setup it can be beneficial to hide fields not required in these steps.

This functionality depends specifically on the Infigo Designer Property: MappingColumnName

Screen_Shot_2013-04-04_at_08.47.50.png

MappingColumnName allows you to identify exactly what column of an uploaded CSV file matches the field/variable in question

These fields are not always required within the Single Product editor (only batch)

To hide mapped fields, navigate to the PDF upload screen for your product (Catfish -> Infigo Variable Data -> Manage Infigo Products)

Locate the file you want to hide these fields on and Edit it.

Choose Editor Settings tab at the top of the upload control screen.

Screen Shot 2013-04-04 at 09.39.15.png

Check the box: HidePremappedFieldsinSingleEditor

Conversely, you may wish to hide non-mapped fields when the time comes to batch merge a data set. To do this, check the other box in the same place: HideNonPremappedFieldsinBatchEditor

*If you dont have this property value in your list then you will need to add it as a new property*

Click on Add button under the field property setup

Screenshot_2017-06-23_13.57.37.png

Add the info as seen above and use the property in "text fields" when asked to confirm.

The Property should now be added to the predefined property list.

Downloadable PDF Soft Proofs - Watermarks

Infigo allows you to switch on a downloadable PDF soft proof per storefront from the editor screen.

A Soft proof is a great way for a user to assess the file they are creating, but a watermark, and lower resolution prevents them printing it elsewhere.


Turn on the Preview

To enable this please navigate to Configuration > Settings > Product and Editor Settings > Editor Settings.

Locate and enable these settings:

editorsettings.SingleWatermarkEnabled:

editorsettings.BatchWatermarkEnabled:

This will enable the 'Download Preview' button in the bottom left corner of the editor

mceclip0.png


Change the 'Preview Text'

By default there will be a watermark on the preview which is removable. The default text is "Preview", you can change this within the Language Strings

1. Navigate to Configuration > Languages, then click View string resources for your primary language. 

mceclip1.png

2. On the next screen, press the filter button to the right of Resource name

filter.jpeg

3. The filter will drop down, change the value to Is equal to and copy Catfish.EditorSettings.WatermarkText in the blank space. Press Filter.

mceclip2.png

4. You will want to find the setting Catfish.EditorSettings.WatermarkText. Press Edit and change the value. I changed the new value to 'Proof'. Be sure to press Update

mceclip3.png

5. The new text will now appear on your template!

mceclip0.png


Please note, if you would prefer to have no watermark text then please use this 'fake' space as the language field can not be saved when nothing is present.

You just need to copy the space between the bold brackets [ ‏‏‎ ].

Enable Infigo Designer Advanced Mode

In Infigo Designer, there are some settings which are disabled by default due to the fact that they are considered complex and can potentially cause issues with your templates. An example of this would be the Javascript Management item in the Infigo Designer dropdown menu, which allows you to use our Javascript Wizard to create your own scripts.

To enable this, you simply need to navigate to Infigo Designer -> Configuration and enable 'Advanced Version'.

Configuration.png

Advanced_Version.png

Once enabled, simply click 'OK', save your current PDF, and close Acrobat. 

Note: you will need to ensure that Acrobat is completely closed in order to ensure that the configuration is re-loaded and the appropriate features are enabled. The best way to ensure this is to restart your computer, however this may not be required.


How to Install the 'Read Only' Field - Infigo Designer

Infigo Designer has many field properties that you can enable on your plug-in to access more features for your product. Visit this article to view a list of properties for Infigo Designer that are not always present when you install the plug-in. In this article, we will show you how to enable the 'Read Only" field for an Image. 


Requirements

1. First, you must enable Advanced Mode in the plug-in. View the this article on enabling this feature. 


 Applying this to Field 

1. Reopen your PDF. Click on an Image Field using the Select field entries tool. The Field Settings window will open. Press the Properties tab, then press 'Add...' 

2. The Define New Property window will open. Here you will add the 'ReadOnly' field to your properties. It is very important you put this value in exactly as shown above, as this is case sensitive. Then select Boolean as the type. You can leave Fixed Value and Visible Checked, then press 'OK'.

3. You will now have the ReadOnly field available to use in your Field Property Setup! 

**NOTES**

You can leave the Advanced Version enabled all the time. Each time you want a ReadOnly Field for a new field, you will have to add it using the above steps. 


Colour Switch JavaScript

Control Variable Text from the Product Landing Page

It is possible in Catfish to populate a field in an Infigo Product with the value of a product attribute. What I mean by this is that if you have a product attribute assigned to a product, the value of that attribute can be used to populate a field for the product itself.

This can be useful in many situations, such as having the user enter their name/username in an attribute on the landing page so this information can be carried onto the job ticket, whilst also having the same value appear on the order itself without the user having to type it out twice.

In order to set this up, you will need to create both a product attribute and a text field on the variable template for the product you would like to set up. You will need to remember the name of these and make sure that they are unique, and that there are no variables on the same name contained on the template.

For the sake of this example, I will be creating a blank PDF with only one text field, and I will only be assigning the required product attribute to it. Below are screenshots of the attribute and field names I am using respectively.

(click here for full image)

Field_name.png

I have assigned the product attribute to the product I am using to test this and I have simply set it to a textbox input type.

(click here for full image)

Once you have configured the product attribute and assigned it to the Infigo Variable product, you will need to map the variable to the attribute. In order to do this, you need to navigate to Admin -> Catfish -> Infigo Variable Data -> Infigo Settings and assign it in the field ProductAttributeVariableItemMapping.

The mapping follows the template FieldName=AttributeName. See below for an example on how this would be done for the product used in this example:

Mapping_configuration.png

After completing these steps, the product will now have a textbox on the landing page called "Name" and anything you put into that field will carry through to the text field in the editor - however this can still be changed in the editor itself.

As you can see in the screenshots below:

I have entered "John Doe" into the product attribute on the landing page. 

Landing_page.png

"John Doe" has carried through to the field "NameField"

Editor_screen.png

I have also attached the PDF I created whilst writing this for comparison.

How to Embed Fonts in Infigo Designer

To embed a font in Infigo Designer open the target PDF in Adobe Acrobat and navigate to Infigo Designer > Show Field Settings (OR if you are creating a new field for text using the font go to Tools > Infigo Designer > Add text field to PDF). See below for a screenshot illustrating these options;

Once the Field Settings box has appeared select your desired field from the list and navigate to Text Settings > Standard Format Setup to select the font. If the font is currently installed on your computer and accessible from Acrobat you will be able to select it from the list of fonts on this page. However if the font has not been installed or is not currently accessible in Acrobat click Alternate

This will open the window shown below. From here you can select fonts that have been installed on your computer but have not been imported into Acrobat. To install a font on your computer to import into Acrobat please see "http://www.howtogeek.com/192980/how-to-install-remove-and-manage-fonts-on-windows-mac-and-linux/"

Once you have installed and selected/selected your font click OK which will return you to the Standard Format Setup Window. Selecting your font from the 'Font-Face:" drop-down box will embed that font into the file. If this returns an error this means your font is incompatible and you will need to try a different version.

To double check which fonts are embedded into the file navigate to File > Properties > Fonts

If the font is shown as Embedded Subset you will need to save the file to embed it fully. Though if (upon opening the saved file) this is still listed as Embedded Subset please use a different font


If your font is not visible in the 'Alternate Font Setup' dialog box then a way to test this is to navigate to Acrobat > Infigo Designer > Configuration and enable the setting 'Show fonts with licensing issues'. HOWEVER if your font shows once this setting is enabled it indicates there is an issue with the license on the version of the font you are using. This means your version of the font may only be licensed for personal use and you will have to purchase another version for commercial use

Adjusting the X coordinates of fields

How to make a fixed variable in Infigo Designer

In Infigo Designer, variables do not have native support for being fixed values. However, if you have advanced version enabled, then you will be able to add a property to the variable to set it to read-only, disallowing the user from editing the variable.

Whilst this is not a configuration which you will always need, this can be very useful in certain situations, such as when you are trying to use variable suppression but you want certain information to remain present in the document.

In the screenshot below, I have enabled advanced version and set up a basic field that contains two variables: one which will be fixed, and one which we will allow the user to edit. In order to add the property that can make the variable read-only, you will need to select the variable you wish to make fixed and click on the 'Add...' button highlighted in red.

Variables.png

In the menu that appears, you will need to set the name to 'readonly' (case sensitive), and set the Type to 'Boolean' - this will make it a 'true or false' variable.

Define_new_property.png

Once done, simply click 'OK', then save the PDF. If you would like to make this available for all text variables in the future, then you can do so by enabling 'Create as predefined property' in the above step. Please note that you will need to have opened Acrobat as an administrator prior to doing this, else your operating system will prevent Infigo Designer from saving this change.

Now that the variable has been created, all it takes is to set the readonly property to 'True'. This can be done either by selecting 'True' from the dropdown, or double-clicking 'False', which will change the value from False to True.

Variable_true.png


Add order line data to packaging slip

Catfish now supports the ability to populate a field in your packaging slip with order line specific data.

This data includes both text and images and can be achieved through naming fields in Infigo Designer whilst following a specific naming convention which varies depending on the field.

Attributes

The naming scheme for getting text, and subsequently attributes, from an order line is OrderLineText_X_Y where X is the order line index, with the first order line at index 0 and the order lines which follow incrementing by 1 per line, and Y being used to select which attribute you would like to populate the field with.

For example, if there was an attribute called "Hazardous" which would be used to determine whether a package contains hazardous content, and you wanted to display this attribute for the first order line, you would target it by naming the text field OrderLineText_0_AttributeCFPARAMETERHazardous. This can be shown in the screenshot below.

If you wanted to do so for the second order line then you would use OrderLineText_1_AttributeCFPARAMETERHazardous and continue incrementing the number used in place of X for each order line.

Note: AttributeCFPARAMETER comes from how you pull a specific attribute from the Attributes field. You would normally do this by Attribute:SpecificAttribute but as the names of fields in a PDF cannot contain the character ":" this is worked around by using CFPARAMETER in its place.

Below is an example of both the setup and the output of a packaging slip which I have made following the instructions above.

Setup:

Output:

The order I placed to perform the above test contained two order lines of the same product. The first one had the attribute "Hazardous" set to "Yes" and the second had it set to "No", both of which have successfully pulled through to the output.

As you can see, the output of the third field is "---", this is because I only had two order lines in the order this packaging slip was created for and so I am referencing an order line which doesn't exist, resulting in the placeholder of "---".


Thumbnail Image

To import a thumbnail image onto the packaging slip, you need to create an image field and name it using the naming convention OrderLineImage_X_Y, where X is the order line index and Y is the index of the order line thumbnail you want to get the thumbnail for. If Y is left empty, it will default to the first available thumbnail.

For example, if you wanted to get the thumbnail image for the third item in the first order line you would name the image field OrderLineImage_0_2

Or if you wanted to only get the first available thumbnail for the third order line then you would name the image field OrderLineImage_2. An example of this can be seen in the screenshot below.

Below is an example of both the setup and the output of a packaging slip which I have made following the instructions above. Note: I edited the packaging slip used for the first example so it will contain the same fields that were present in that one.

Setup:

Output:

As you can see in the screenshot above, the image fields I have created have populated with a low-resolution preview of the products I have added to this order. I have not assigned the "Hazardous" field to the products used for this packaging slip so, as you can see in the output, it has filled all three fields this time with the placeholder "---"

Note: The products used in this test only contained "Packaging Slip Test:" followed by the name I used when creating the field to make it easier to identify which field was which.

Infigo additional data

Currently Infigo Products support additional data files. These files can be uploaded against a specific product and then referenced from the PDF template through scripting. When editing an Infigo Product, you can enter a simplified explorer view to upload and manage files, create folders etc.

Those files are accessible during output creation by using a base folder which will point towards that repository. The base folder is injected into a document property called "Base" and you have to use Infigo Designer JavaScript code to use that data.

However, that repository is specific to each product and cannot be easily shared, so we have introduced a new Global Additional Data repository.

This can be found under Catalogue > Product Types > Infigo Editor > Infigo Additional Data, where you have the ability to manage and upload global data. Visible to ALL Infigo Products.
The Infigo Additional Data directory is split per storefront.

Under Configuration > Settings > Product and Editor Settings > Infigo Settings, XML tab, we have created two new settings to enable the injection of the required global base properties in Infigo Designer:

One is used to enable the injection as default - and one to also include the platform data.

That means that in addition to the storefront global data, you can access the platform global data as well separately, which would mean you can share files across the entire platform. These would obviously need to be setup and managed on the platform level.

The second is for the storefront global data.

mceclip0.png


These are two new document properties in Infigo Designer:

- GlobalBase
- GlobalPlatformBase

When the settings are enabled in Infigo Settings these properties will get created automatically and the path will be injected so that it can then be referenced accordingly.

Some sample JavaScript code that uses these properties could look like:

var base = Document.getProperty("GlobalBase");
if(base) base = base.getValue();

if(base) {
//The file names are hardcoded here
//We load one from the root - and one file from a subdirectory
var img1 = base + "\\dancers.gif";
var img2 = base + "\\Test\\angel.jpg";

var imgField1 = Document.getField("Image1");
var imgField2 = Document.getField("Image2");

imgField1.setFilename(img1);
imgField2.setFilename(img2);
}
else {
alert("No global base available");
}

This functionality allows you to have a large amount of PDFs, images, etc. that you would otherwise either have to embed within the Infigo Variable PDF or upload per product in the product specific additional data directory, that can now be made visible in one central location to ALL Infigo products. This makes it extremely easy to maintain going forward and will ensure your PDF files are not bloated with embedded files causing potential resource and performance issues.

Adding Mask Layers on PDF document

Infigo Designer gives you the ability to create image fields that can act as overlay mask where you can overlay an image field with a transparent image on top of the actual image field.

1) Create a transparent .png in Photoshop, which will be used in the masked image field. Please ensure this PNG is 300dpi and the dimensions are the same as the field you are going to place it into.


2) Create the actual image field and position it on the document where it needs to be.


3) To create the mask with the same coordinates (X, Y, Width and Height), copy the image field and Paste (Preserve Position).

a) Copy the image field

b) Paste the image field using Paste (Preserve Position)


P.S: The copied image field is now positioned on top of the image field created at step 2.


3) Once the mask field is copied/created, Use the infigo designer selection tool and double click on the image and navigate to Field Information -> Properties and make sure OverlayMask and readonly are ticked.


4) Upload the mask into the image field under images settings -> Image selections:
1. Use “Select” to locate the mask1 on your machine
2. Once the mask is located click on Embed Now to embed the mask.

Using Custom Job Names in Infigo Designer

Catfish now allows you to a select a Field, Global and Local with a new property called ‘CustomNameBuilder’ so then the printable job has its unique name.

The new property ‘CustomNameBuilder’ needs to be an integer type and should be used to order multiple fields/variables to create your custom name.

For example, if you would like your custom name to be made up of the Firstname, Lastname and Postcode fields in your template then you would create a property for each of these fields, and set the Firstname property to 1, Lastname property to 2 and Postcode to 3 (Result: Douglas Gibson RH10 1TT). Equally if you wanted it to just adopt the company name field then you would create a ‘CustomNameBuilder’ property for Company Name and set its value to 1 (Result: Infigo Software Limited).

This is then displayed as the Job name in the shopping basket, approval workflow pages, Order detail report, Shared Print Ops, Invoice, Packing slip and Job ticket.

To start using custom name you need to enable to the feature switch:

Catfish > Infigo Variable Data > Infigo Settings : EditInfigoOrderProductName

In order to use this script, Add the script to your predefined javascript directory. Then when you execute the script from Infigo Designer -> Predefined Javascript it will list all the available text fields, local and global variables in a dialogue. This first dialogue allows you to select the relevant fields you want to use to make up your custom job name. Once you have made your selections, a second dialogue will allow you to order your selections - moving fields up and down as you please until you have the desired result (the field at the top will be the first to appear in the job name, followed by second, third etc) Confirming the second dialogue will then create the relevant properties and set that PDF up ready to use Custom Job Names.


You can simply download the attached JavaScript file and copy it onto:

Mac Users:
/Library/Preferences/Infigo

PC Users:
C:\Program Files (x86)\Adobe\Acrobat 11.0\Acrobat\plug_ins\Xclusive\JavaScripts

Please Note: you can also apply this script to multiple name in order to get a sequence.

Date picker/Calendar pop-up field control

This allows for a calendar popup field in the data entry form used for date fields.

  • The field/variable type must be Text (nothing else)
  • Change FormatSpecifier to "Date" ("Text" does nothing at the moment and is only there for future use)
  • Optional: the field FormatSpecifierPattern can contain a date format pattern to use. If none is set, it defaults to dd/mm/yy
    E.g. use "DD, d MM, yy" to output something like "Tuesday, 7 January, 2014" instead
  • The date will be used in the text form for the field/variable

Please note: You will need to enable advanced mode to allow the Add button feature mentioned below. Go to Infigo Designer menu item and select configuration.  Enable Advanced version and close and re open Acrobat to proceed.


In order to create the FormatSpecifier property, open the field that allows for the "Date" option and navigate to Properties


Click Add in order to create the new property.


1. Type in FormatSpecifier.
2. Tick Set
3. Tick Create as predefined property
4. Click OK


Click "ADD" and insert the following Items

1. None
2. Date
3. Text

Once all the items are added, Click OK.


Ensure None is selected on default.


If you want to add in your own custom date pattern then you follow the same steps above but add in a property for FormatSpecifierPattern and set the field to Text type - not Set.


On "Select the field type to which this property applies" select Text Fields and Click OK


The property is now added to the list. In order to use the date popup, make sure Date is selected from the dropdown.

Font SizeSlider

In order to enable the FontSlider functionality on products, first you need to select or make the field, then open Field Settings and follow this sequence:

1. Click on Properties.
2. AllowFontSizeChange should be checked.
3. MaxFont: Maximum size that customers can choose.
4. MinFont: Minimum size that customers can choose.

Screen_Shot_2013-06-25_at_14.22.00.png

P.S:

1. Also keep in mind that this function can only be applied to "Fields" not "variables" and "Fit to Box" should not be checked.
2. If you can't see these options please make sure you have downloaded the latest version of "Infigo Designer"
    https://infigosoftware.zendesk.com/entries/22523157-Infigo-Designer-Installers-Upgrades

Incomplete

Can’t find what you need?

Ask our Infigo Support Team for help..

🔎
Loading…
    Select a Problem Solver