🚀 MegaEdit Problem Solvers: Canvas, Layouts & Output 🚀

Picture of 🚀 MegaEdit Problem Solvers: Canvas, Layouts & Output 🚀

Disable Positional Error Checks for Elements Extending Beyond the Canvas

When designing products, some image elements may intentionally extend beyond the visible canvas. In these cases, the system may display positional error messages that could confuse customers.

This article explains how to disable the positional error checks for individual products without affecting global settings. This is ideal for designs where out-of-bound elements are a deliberate part of the artwork.

Following this guide will help ensure users do not see unnecessary error messages while still retaining error checks for other products that require them.

Use cases

  • Products with design elements purposely extending outside the canvas.
  • Scenarios where disabling error messages on a per-product basis avoids customer confusion while retaining checks for other items.

Key settings in the product editor

  • Do not check for positional issues: Found in the Menu > Product Options under the General Field Features section.

Step-by-step guide

  1. Open the product editor for the item you wish to adjust.
  2. Navigate to Menu > Product Options.
  3. Scroll down to the General Field Features section.
  4. Tick the box labeled Do not check for positional issues.
  5. Save your changes.
  6. Perform a quick test (preferably by impersonating a registered user) to ensure the product displays as intended.

Related links

For additional guidance, please visit the Product Academy or contact Customer Support.

Uploaded File Auto Resizing on Dynamic Canvas

When using the MegaEdit product with a dynamic canvas, uploaded images or PDFs are automatically resized to fit the full canvas area. This behavior is part of the current default settings.

For example, when a file with dimensions smaller than the canvas (such as a 106 x 238 mm PDF) is uploaded to a canvas set at 1500 x 2500 mm, it is scaled up to fill the entire canvas. This can make it difficult to verify if the file was produced at the correct dimensions.

Currently, there is no customizable setting available to display the file at its original size. All files, regardless of their original dimensions, are scaled to the canvas size upon preview.

Use cases

  • Verifying artwork dimensions after upload.
  • Comparing small design elements against the canvas size.
  • Ensuring files are correctly formatted for output.

Key settings in the Product

  • Dynamic Canvas: Located under the product setup screen where canvas dimensions are defined (e.g., setting the canvas to 1500 x 2500 mm).
  • Measurement Units: Configured on the product landing page to display units in millimeters.

Step-by-step guide

  1. Access the product setup page and configure the dynamic canvas dimensions (e.g., 1500 x 2500 mm) with the desired measurement units.
  2. Upload your file (such as a PDF with smaller dimensions) either via drag-and-drop or by selecting from your desktop.
  3. After the file is uploaded, click the preview button to view how the file is displayed on the dynamic canvas.
  4. Observe that the file is automatically resized to cover the full canvas area, regardless of its original dimensions.
  5. If you require the file to be displayed at its actual size for verification, please note that this behavior cannot be changed with the current settings.

Related links

For additional guidance, head over to the Infigo Academy or contact our Customer Support team.

How to Configure Margin Value in MegaEdit

The margin value, located under the details tab in the pop up text options for text fields allows you to add a pixel padding amount around all sides of your text field.  This is used to allow text from certain fonts to bleed outside of the text field.  See image below to illustrate.

Screenshot_2018-07-05_09.37.21.png

How to Configure Zoom Padding

MegaEdit provides the ability to control the pixel padding around your product's canvas when the Reset Zoom button is hit. This allows you to predefine the zoom of your default product view.

Find this feature in the Product Options of your MegaEdit product. This can also be set within the product defaults for all new MegaEdit products, using the MegaEdit Product Settings menu within Infigo admin.

Locate the Zoom Padding input. Entering a new value and clicking Save will immediately update the product view to display the new padding. It will appear as a number of pixels between the edge of the canvas and the MegaEdit work area and will be controlled by the canvas edge closest to the edge of the work area.

Once moved or zoomed in, hitting the Reset Zoom icon will restore to this view.

How do I calculate my MegaEdit Spine Width? [Calculator]

Pages Number of sheets Infigo Spine (pages only) Infigo Total End spine width
10 5 0.508 2.032 6.5
20 10 1.016 2.54 6.5
30 15 1.524 3.048 6.5
40 20 2.032 3.556 6.5
50 25 2.54 4.064 6.5
60 30 3.048 4.572 6.5
70 35 3.556 5.08 6.5
80 40 4.064 5.588 6.5
90 45 4.572 6.096 6.5
100 50 5.08 6.604 6.604
110 55 5.588 7.112 7.112
120 60 6.096 7.62 101.6
130 65 6.604 8.128 8.128
140 70 7.112 8.636 8.636
         
MegaEdit settings - Constants    
Minimum spine width 6.5    
Additional spine 1.524    
Page Micron thickness 101.6    

How can I Rename the Page Numbers in MegaEdit?

In MegaEdit, it is possible to change the number displayed between each page to any given text. This can be useful in cases such as changing the "1" below the first page to "Front Page", the second page to "Contents Page" etc.

This can be done by editing the "Page Name" value for the page under "Edit Page Data".

To start, create a MegaEdit product, edit it whilst signed in as a storefront administrator, and click "Show Menu" at the top.

Show_menu.png

From the dropdown which appears, click "Edit Page Data"

Edit_page_data.png

In the menu which appears, there will be a numbered list of all the pages currently contained within the product. The "Page Name" field will be blank by default, which will cause the number to be displayed instead of a custom name. You can change these fields simply by typing any text you want in the "Page Name" field and clicking "Save".

As you can see in the screenshots below, I have filled out the "Page Name" field for the first page, but left it blank for the second page. I have colour-coded the screenshots to better highlight which field correlates to which page name.

Page_Edits.png

Page_list.png

How to Change Between Imperial and Metric Dimensions in MegaEdit

Depending on your client or business structure, you may need to change dimensions in Megaedit from Imperial to Metric or vice versa.

There is a simple solution for this, you will need to navigate to Admin --> Configuration --> Measures --> Measure Dimensions

From this page, there are a list of different dimension types, to change to the dimension, click the 'Select' button under 'Mark as primary dimension' to change the dimension to your requirement.

How to Edit Layout Names and Delete Layouts

Once a layout name is created in MegaEdit it cannot be changed within MegaEdit unless you create a new layout.  This may result in multiple or extra layouts that you do not want.  The solution allows you to edit layout names and delete layouts.  Renaming a layout in infigo translates to an updated layout name in MegaEdit.  Deleting a layout in Infigo removes it from MegaEdit. 

  1. Navigate to Catalogue > Product Types > Megaedit Products > MegaEdit Canvas

2. Select Edit on the canvas that your product is using.

mceclip3.png


3. Navigate to the Layout Categories tab

mceclip1.png

4. Select Configure on the Layout Category that corresponds to the layout you wish to edit or delete.


Editing a Layout Name

5. Under Upload Files: find the .json file for the layout you want to edit and select the gear icon.

mceclip4.png

6. This will open a dialog box where you can now rename your layout. Select Ok when finished.

7. On a separate tab, navigate to or refresh your megaedit product and you will notice that your layout name has been updated.


Delete a Layout

8. Under Upload Files: find the .json file for the layout you want to delete and select the X.

mceclip5.png

9. Confirm you wish to delete the layout.

10. On a separate tab, navigate to or refresh your Megaedit product and you will notice that your layout name has been updated.


How to Rotate Output Files During Output Creation

Have a requirement for the output file to be a specific orientation but do not want to compromise the user experience in the editor by having it rotated in the editor? Then we have a MegaScript that you can use that will allow you to rotate your output files during the output creation process.

If you can't find MegaScripts in your Infigo Admin menu under Configuration, please raise a support ticket.


Background

Before you start please note:

You can create a custom MegaScript in MegaScript Management, which you can apply in MegaScript Instances, or you can choose from our the dropdown list within Instances:

mceclip0.png


How To

Go to Configuration > MegaScripts > MegaScripts Instances

Create a MegaScript Instance and set the configuration for the degrees of rotation you would like to be applied to the output file.

Simply select from the dropdown list the 'Page Rotation' script you just enabled and click 'Create'.

Then give your instance a name of '90 degree output rotation' (depending on how much you want to rotate your output by and ensure the 'Enabled' setting is enabled.

Also ensure the 'Output Creation' setting is enabled too.

Now you need to create a configuration entry for the script depending on how you want your output to be rotated.

Below is the full config but this will need amending depending on how you want your output to be rotated.

{
pageConfig: "all", //"odd","even","1","3-5"
rotation: {
angle: 90 //0, 90, 180, 270
},
attributeName: 'name',
attributeValue: 'value'
}


For example:

{
pageConfig: "all",
rotation: {
angle: 90,
},
attributeName: 'Orientation',
attributeValue: 'Portrait'
}

The example above shows a rotation of 90 degrees on all pages when the attribute Orientation is set to Portrait.

Click Save.

Assign rotation script to a product

Supported product types include: MegaEdit, Infigo Product, Multipart

MegaEdit: Catalogue > Product Types > MegaEdit >MegaEdit Product > Edit > Output MegaScript

Infigo Product: Catalogue > Product Types > Infigo Editor > Infigo Products > Edit > Output MegaScript

Multipart: Catalogue > Product Types > Multi Part Products > Edit > Output MegaScripts

Navigate to your product and when editing it you will see an 'Output MegaScript' drop down. Select your Rotation script from it and save the product.

How to Change Canvas Size Using Selected Product Attributes


BEFORE YOU START: This does not work with Invent templates. This will only work for standard MegaEdit products. 

As a default if different canvas sizes are used in an ME product the customer would have to start the editor, select 'Menu', click on the current canvas size, and then select a different canvas size if they wanted it, but here are some steps so the different canvas size options show on the product landing page as a product attribute.

Create all the different canvas sizes as separate sizes


Create the Mega Edit product (If not already created)

See How to Create a Dynamic Product? - MegaEdit for assistance


Assign all these canvases to your ME product 

Don't forget to 'Save changes' when done


Create the attribute


Add values to the attribute 

Please Note: The values MUST match the name of the canvases EXACTLY


Assign the latest 'Form Builder' script to the product


In the script config 

Add the below

{
hideForm: true,
hideTabArea: false,
SizeControlAttribute: "Size"
}

Change 'Size' to the name of the attribute (this must be exact with capitals and spacings)

For example 'Canvas Size' (as this is the name of the product attribute above)

Don't forget to Save any changes made at each step


If you now have 2 fields on your product landing page, the original Canvas field, and the Canvas' via product attributes field, you need to disable this setting.

'MegaEdit Products Settings' > 'Product Attributes' Tab > Disable 'Show Canvas Options on Product Landing Page' > 'Save'

Please note this is a global setting and will affect all products:


Now whichever canvas size attribute is selected the correct canvas will be used


An Additional (optional) step you can take to stop customers (non-admins) from changing the canvas size in the editor

Enabled the setting 'Hide global options dialog' in 'Product Options' (when the editor is open)

How Do I Add a Coil Binding to my MegaEdit Canvas?


Let’s say you want to add a coil binding to your MegaEdit canvas - for example, if you're selling school books. This guide walks you through how to do that.

  1. Find or create an image of a coil binding. You can design your own or source one online.

  2. Navigate to MegaEdit → General Data and create a new clipart category called Coil Bindings.


  1. Upload your coil binding image into this new clipart category.


  1. Create a MegaEdit product in Product Management. Assign the required elements such as:

    • Canvas

    • Stock

    • Output Type

    • Fonts

  2. Assign the Coil Bindings clipart category to your product so it becomes available in the editor.


  1. Log in as a Storefront Admin and open the product on the storefront.

  2. In the editor, go to the Cliparts tab. Drag and drop the coil binding onto the canvas and position it as needed.


  1. Click on the Clipart field on the canvas and on the popup, under the Details tab (far right), enable the following settings:
    1. Do Not Print
    2. Show In Preview Despite Not Being Printed


  1. Once you're happy with the design, open the top menu and click Save Product as Default.
    This ensures the coil binding is always displayed on this product.

And that’s it - your MegaEdit product will now include a coil binding by default!

Output Type Creation and Settings


When creating a MegaEdit product one of your 3 key/core components is an output type.  This dictates the bleed a product will have whether it is a single, multipage, or booklet with cover growth, spine size, pricing etc.  In this article we will look at the different sections of the output type and explain each use.


Creating the Output Type

You can create an output type in admin under:

Catfish > Infigo Variable Data > Dynamic products > Output Type

Click Create to add a new output type to the list specific to your needs.  A product can have multiple output types.  For example you may have a booklet/brochure product where you offer a softcover as standard but you can also offer a hardcover option as an up-sell, but the details for a hardcover will be very different compared to a softcover.

  • Name: this name can be whatever suits your workflow and is displayed under the output type list under the dynamic product properties tabs.
  • Description: used internally only for you as the administrator under the list of Output types. 
  • Bleed: used as the main bleed added to the product/document. This can be either a multiple page document or inside page bleed for a booklet setup.
  • Unit: you can set different measures when configuring output type, Inches, Pts, Cm and Mm's can be used.


Covers and Gutter

The Covers section specifies the details you wish to apply to the output type if a cover is required. 

  • Use Covers: enables the use of covers. 
  • Cover differences: used to add extra Height x Width to the cover. For example, if you were creating a hardcover output type. 
  • Cover Wrap: this is the extra wrap you wish to allow on the cover that wraps inside the cover.
  • Edit cover inside pages: allows you to make the inside pages of a cover editable - if NOT ticked you will see a grayed out page, anything left on these pages will not print out. 
  • Separate cover pages front and back: allows your booklet setup to display the covers as separate pages as opposed to spreads as is default. You would have a single cover page first, then all your spread pages and then the single back cover page at the end.  If you are using this mode, there is an additional tick box to use to make sure that the front and back pages are swapped around when using a spread output cover. 
  • Gutter: this is an additional size that is added to the inside pages ONLY.  This ONLY appears on the final output's inside pages of the binding page edges. 
  • Upload a gutter image: upload your own gutter to be used on the final output PDF.  Here you click browse and upload your jpg/png.


Margins

You can add margins to your products in MegaEdit.  These do not print out but are there purely as guidance for the end users.  These can be useful in terms of helping the end user position their fields around the canvas.  The margins are green by default but can be changed in color under the product options in the editor (admins ONLY).

Under the Price and weight factors section you can specify a different price and weight option for each of your output types.  For example if you had a booklet product that had both a Softcover AND Hardcover you may wish to offer the Hardcover option at a higher price, perhaps 50% more expensive.  This is done using the factors, which are percentage based, so a factor of 1.5 would make that option 50% more expensive, 1.25 = 25% more expensive or 0.5 = -50% less expensive etc.  For the Weight option this adds a weight to the final output product.  For example a hardcover would weigh more than a softcover and if you were using the shipping by weight options in catfish then you need to ensure that your products are an accurate final weight so you are not under/over charging your end users etc.


Spine

You can also specify different spine options for the output type here too. 

  • Additional width the cover adds to the spine: this allows you to add an extra amount of spine width on top of the spine calculation using the micron thickness of the stock.  Example, if your have a 20 pp booklet and that page block adds up to 0.4 mm thickness you can then add additional amount for binding purposes.  So if you added 10mm your total spine width would be 10.4 mm wide etc. 
  • Minimal spine width: this setting allows you to set the smallest spine width amount if pages are deleted by the the end user.
  • Duplex Printing: used in spine width calculation only. For example, if you specified a booklet of 40 pp but you were printing duplex, then the spine width calculation would be halved to 20 pp.  
  • Spine Tiers: are an option to set predefined page tiers where the spine width increases based on a page count value.  For example by clicking "Insert" you could specify that up to 20 pp the spine width is 10 mm and then above 20 but up-to 32 pp the spine width increases to 20 mm and then when the pagination reaches 40 pp the spine width jumps to 30mm.  So rather than the spine increasing dynamically on a per spread basis it increases at preset values.

After you have made all your changes you then click "Save" to register these updates.


Layout Selection on Product Load


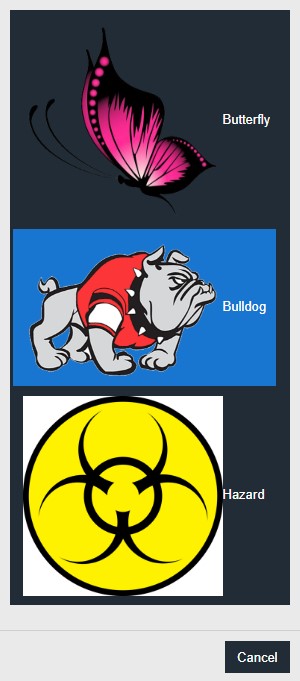
The Dynamic Form Builder Script allows for your users to choose layout via a popup menu which appears as soon as the editor loads, and the users will be able to re-open it through the use of a button. Click here to learn more about layouts.

The popup which loads will not have any styling added to it, so it will likely not look to be in a usable state when you first load it, However, through the use of CSS styling, you can adjust the look to however you wish - see below for an example of this popup with some very light styling applied to it.
Loosely_skinned_popup.jpg

The three sections (shown by the hover color change on the Bulldog option) act as buttons which have been configured in the script to correspond to the MegaEdit layouts. The images displayed for the buttons are uploaded in the CSS override section of the storefront - so they can be a scaled down version of the layout, something which represents the layout, or something else entirely.

To configure this script, you will need to first assign it to your product by navigating to Admin -> Catfish -> Infigo Variable Data -> Dynamic Products -> {your product}: Edit

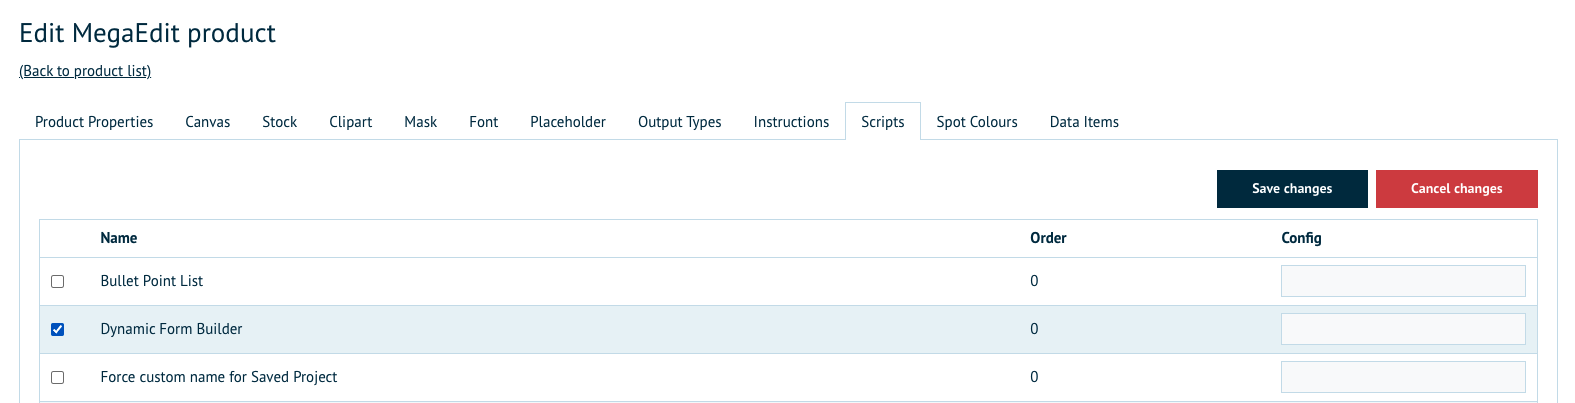
Once you are editing your dynamic product, navigate to the Scripts tab, double click on the checkbox next to Dynamic Form Builder and click the button. Be sure to press Save Changes.
Screenshot_2021-11-09_at_15.32.50.png

Enabling the script won't make it work right off the bat, however, you will need to create your layouts and configure the script first. When creating your layouts, make note of the name of your layouts - you will need to reference these in the configuration.

Once you have your layouts configured, you will need to copy and paste the following script into the Config section of the Scripts tab shown in the above screenshot.

 { "textAreaTag": "TextArea", "textFieldTag": "TextField", "customAreaTag": "CustomArea", "customFieldTag": "CustomField", "paddingFactor": 0, "zoomEnabled": true, "useLayoutQuickSelect": true, "startOnLoadLayoutQuickSelect": true, "layoutCategoryFilter": "Layout Category Name,
"layoutSelectTitle": "Image", "layoutMapping": [ { "name": "Butterfly", "pages": [ { "nr": 1, "layout": "Butterfly" }, { "nr": 2, "layout": "Butterfly Back" } ], "thumbnailUrl": "https://www.webtoprintdemo.com/2068969090/Handler/CSSOverride/GetImage/92/PNG.png" }, { "name": "Bulldog", "pages": [ { "nr": 1, "layout": "Bulldog" }, { "nr": 2, "layout": "Bulldog Back" } ], "thumbnailUrl": "https://www.webtoprintdemo.com/331222566/Handler/CSSOverride/GetImage/92/GIF.gif" }, { "name": "Hazard", "pages": [ { "nr": 1, "layout": "Hazard Front" }, { "nr": 2, "layout": "Hazard Back" } ], "thumbnailUrl": "https://www.webtoprintdemo.com/-360773339/Handler/CSSOverride/GetImage/92/hazardous-waste-symbol-clipart-1.jpg" } ] }

You will need to configure it to match your product i.e. ensuring that the page numbers are correct, the layout names provided perfectly match the name of the layout in MegaEdit, the thumbnail URL points to the correct image uploaded in CSS override, etc.

You can add as many layout options as you would like - simply copy the below code, configure it, and paste it one character before the last square bracket in your script.

, { name: 'Selection Name', pages: [{ nr: 1, layout: 'Selection page One' }, { nr: 2, layout: 'Selection Page Two' }, ], thumbnailUrl: 'YourThumbnailURL' }

See blue text below for an example of where this should be copied into 

 { textAreaTag: "TextArea", //This is the tag you will need to assign to text fields which you want to have more than one displayed entry line in the form textFieldTag: "TextField", //This is the tag you will need to assign to the text fields you want your users to be able to see a single entry line in customAreaTag: "CustomArea", customFieldTag: "CustomField", paddingFactor: 0.0, zoomEnabled: true, //This will determine whether or not clicking on a field in the form causes the editor to zoom in on the respective field useLayoutQuickSelect: true, //This enables the layout feature
layoutCategoryFilter: "Layout" // This is to target the Layout Category, startOnLoadLayoutQuickSelect: true, //This determines whether or not the layout menu appears upon first loading the editor layoutSelectTitle: 'Image', //This determines the name of the button which will appear in the editor layoutMapping: [{ //This starts the list of layouts which will appear in the editor name: 'Butterfly', //This is the displayed text next to the image for the lsit item pages: [{ //This section allows you to control which page should be changed to which layout when the list item is chosen on the popup menu nr: 1, //This is which MegaEdit page will have its layout changed - this will not count covers as pages layout: 'Butterfly' //This is the name of the layout which the page will be changed to }, { nr: 2, layout: 'Butterfly Back' }, ], thumbnailUrl: 'https://www.webtoprintdemo.com/2068969090/Handler/CSSOverride/GetImage/92/PNG.png' //This is the URL of the image which will be displayed in the popup menu for this item }, { name: 'Bulldog', pages: [{ nr: 1, layout: 'Bulldog' }, { nr: 2, layout: 'Bulldog Back' }, ], thumbnailUrl: 'https://www.webtoprintdemo.com/331222566/Handler/CSSOverride/GetImage/92/GIF.gif' }, { name: 'Hazard', pages: [{
nr: 1, layout: 'Hazard Front' }, { nr: 2, layout: 'Hazard Back' }, ], thumbnailUrl: 'https://www.webtoprintdemo.com/-360773339/Handler/CSSOverride/GetImage/92/hazardous-waste-symbol-clipart-1.jpg' }, { name: 'Selection Name', pages: [{ nr: 1, layout: 'Selection page One' }, { nr: 2, layout: 'Selection Page Two' }, ], thumbnailUrl: 'YourThumbnailURL' }] }

This can be repeated as many times as you wish, and you can affect more than two pages per item by doing a similar step to the above. Simply copy and paste the code below and paste it one character before the last square bracket before the thumbnailURL for your selection.

{ nr: PageNumber, layout: 'Layout' }, 

See below for an example of how the code would look with the above code added.

{ name: 'Selection Name', pages: [{ nr: 1, layout: 'Selection page One' }, { nr: 2, layout: 'Selection Page Two' }, { nr: PageNumber, layout: 'Layout' }, ], thumbnailUrl: 'YourThumbnailURL' }]

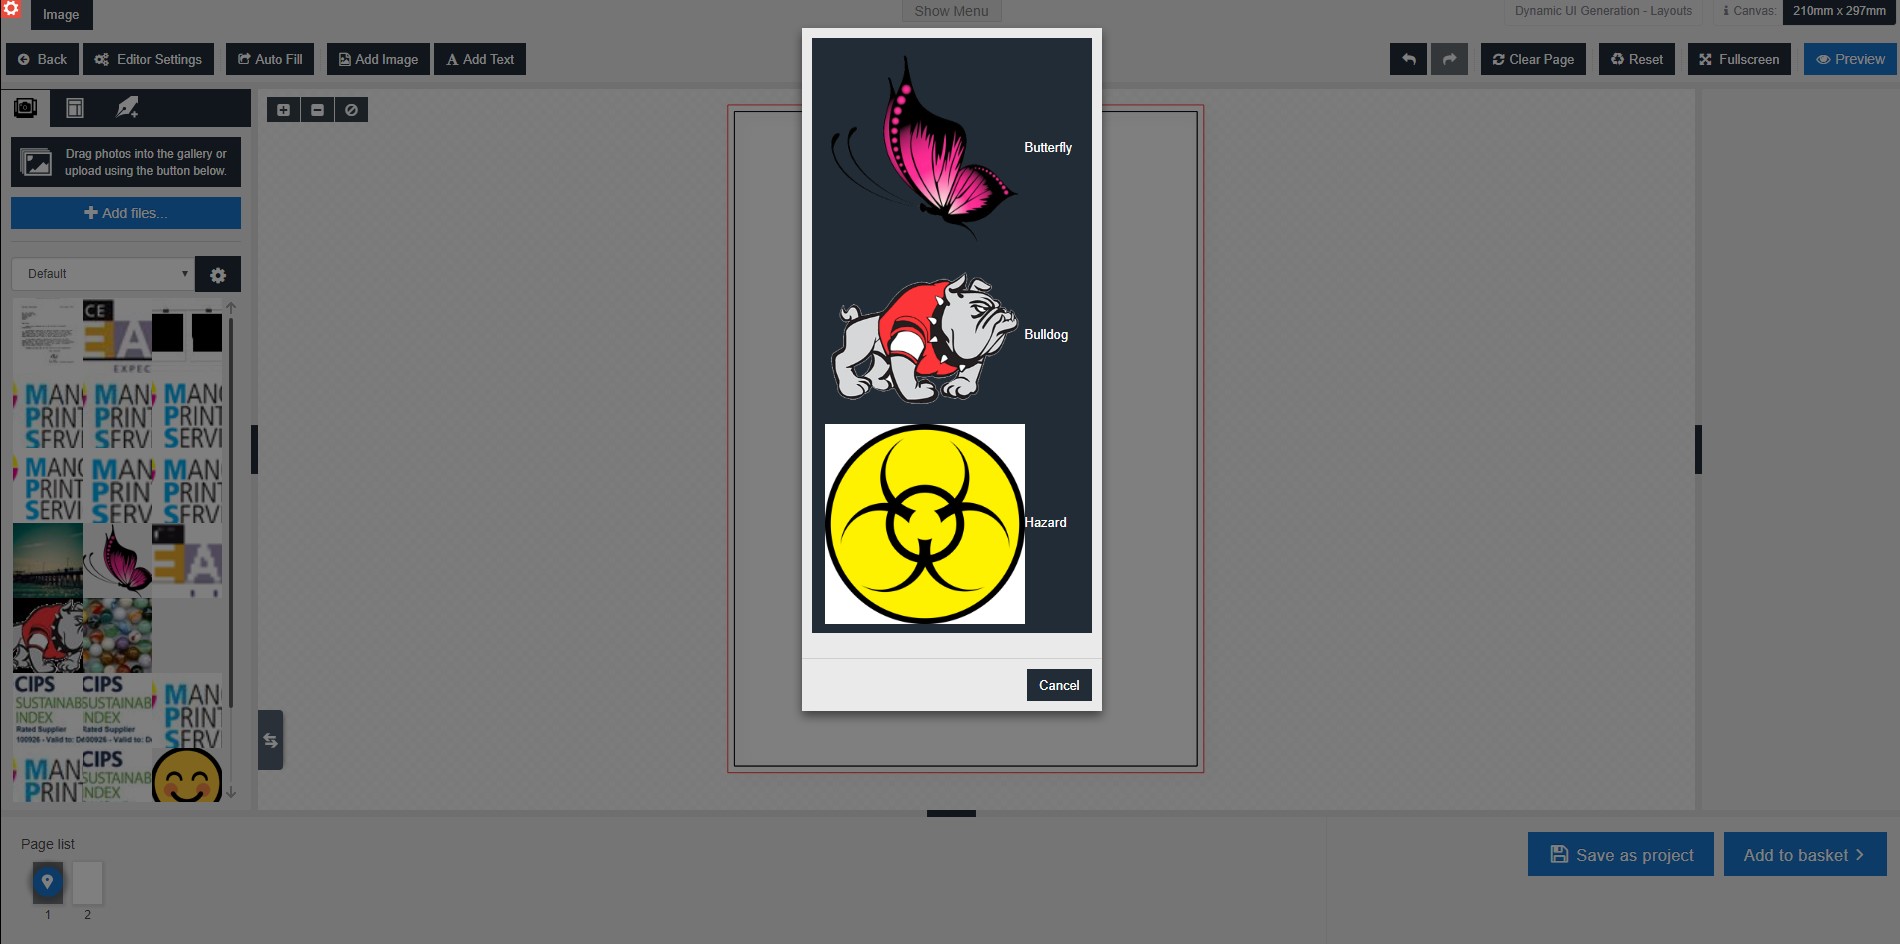
As you can see in the screenshot below, the button now is present in my MegaEdit editor, and if I click on it, the menu loads. To allow the images to load correctly in the editor, I simply gave the img tag a max-width value of 200px

Button_in_editor.jpg

Menu_opened_in_editor.jpg


User Controlled Canvas Dimensions


Please note, this article will be working with pre-made MegaEdit canvases. Please click here for instructions on how to do this.

MegaEdit supports the functionality to allow customers to choose their canvas size, rather than use a pre-existing one. This can be done both in the editor and through MegaEdit properties on the product landing page, both of which I shall explain how to use in this article.


Startup

Navigate to:

Catfish > Infigo Variable Data -> Dynamic Products -> Canvas

Either Create a canvas, and click its corresponding "Edit" button or choose an existing canvas.  For this example, I will be using the canvas "Dynamic Canvas"


This will take you to the Canvas' properties page. As you can see in the screenshot below, the "Dynamic Size" fields are all set to 0, this disables the dynamic size feature.


In order to configure this, all you need to do is fill in the values to set the boundaries for the dimensions of the canvas. This will allow you to set minimum and maximum values for both the width and height, as well as the steps for each of these. 

Note: The Step is how many units it will increase or decrease in. For example, if you set the step to 10, the user would only be able to increase or decrease the value by 10 or multiples of 10. This allows you to ensure that your products will only create outputs with dimensions that you can work with, if such a requirement is present.

As you can see in the screenshot above, I have set the boundaries so that the canvas can be no smaller than 50mm x 50mm, and no larger than 200mm x 200mm, as well as only allowing the user to increase/decrease the width in a step of 10, and the height in steps of 5. Although I have set these values to be in millimeters, the system will convert these values to whichever measurement the user chooses to use on the landing page. The supported units are: Centimeters, Millimeters, Inches, Points.

Note: In order for this feature to function properly, you need to disable "Same Size for all pages" as I have done in the screenshot above. Similarly, if you do not set all of the values to be anything above 0, the feature will not be correctly configured and will not activate.

Once you have made your configurations, all you need to do is click "Save" and the dynamic sizes will be configured. To enable it to your product, navigate to your product's settings, navigate to Canvas and check the canvas you created, then press Save.


Enabling More Settings

In order to allow your users to configure these on the product landing page, you will need to enable the Canvas Options on your landing pages. To do this, navigate to:

Admin > Catfish > Infigo Variable Data > Dynamic Product Settings > Product Attributes

Enable "Show Canvas Options on Product Landing Page" then click "Save".


Note: Only the attributes which have been given a name in their respective fields will be visible on the landing pages. Also, this will turn these attributes on for all MegaEdit products, however the attributes used for dynamic canvas sizes are configured separately, and so they will not appear on this list, so all of these fields can be left blank. 

For this example, I have simply named the Width and the Height fields "Page Width" and "Page Height" to allow me to directly edit them on the landing page.

As you can see in the screenshot below, I have enabled the Width and Height product attributes for the product's landing page, which directly connects with the settings I have just configured. The slider will not let me go below 50 Millimeters, nor will it let me go above 200. There is also a dropdown which allows the user to change the units of measurement - this will automatically adjust the values to ensure that the canvas remains at the correct size.


In MegaEdit

Loading into the editor, you can see that the values I entered on the landing page have carried through to the canvas.

In-editor_dimensions.png

If you click on the canvas dimensions in the top right (highlighted in red) it will take you to a menu which allows you to live-edit the canvas size within the editor.

In-editor_controls.png

Using the slider, you can change the dimensions for each individual page, or all pages at once - this is controlled by utilising the "Change only current page" checkbox.

In-editor_configured.png

Upon clicking "Change" you will be fronted with the following two warning menus. These are in place to warn the user about the potential issues with both the resolution of images and the aspect ratio of layouts. Clicking "Continue" on each of these menus will acknowledge the potential problems that changing the canvas size could cause.

Resolution_Warning.pngAspect_ratio_warning.png

As you can see in the screenshot below, I have been able to successfully update the canvas dimensions within the MegaEdit Editor.

Dimensions_changed.png


Different Canvas Sizes as a Dropdown List

As a default if different canvas sizes are used in a ME product the customer would have to start the editor, select 'Menu', click on the current canvas size, and then select a different canvas size if they wanted it, but here are a few easy steps so the different canvas size options show on the product landing page as a dropdown list.

First, you need to create all the different canvas sizes as separate sizes

Second, you need to assign all these canvases to your ME product 

Don't forget to 'Save changes' when done

Finally, you need to enable a setting in 'MegaEdit Products Settings' > 'Product Attributes' Tab > Enable 'Show Canvas Options on Product Landing Page' > 'Save'

Now all your canvas sizes will show on the product landing page as a dropdown.

When any of the options are selected and then the editor is started the correct canvas size will load.

As you can see 'Default' is also showing for all the canvas sizes.

This is the 'Canvas Sizes' name and can be edited to show whatever you want. (See the 'Canvas Sizes' tab inside each of the newly created canvases)

Just scroll to the end of the section and click 'Edit' > Make the change > click 'Update'

For example:


Please note that you can not save the name as blank/nothing, however, you can just use a space (so it appears as blank/nothing), but that will still leave the dash showing.

And here are the results of those changes:

Incomplete
🔎
Loading…
    Select a Problem Solver