🚀 Storefront Configuration Problem Solvers: Catalogue & Product Setup 🚀

Infigo’s Storefront Configuration Problem Solvers (Q&A) hub for Catalogue & Product Setup. This space brings together a growing collection of concise, targeted articles designed to help you fine-tune your storefront setup. Whether you’re exploring a specific feature, solving a niche configuration challenge, or looking for practical guidance within the Infigo admin area, you’ll find clear, focused support right here.

Looking for something else? The other Storefront Configuration Problem Solver pages cover Site Setup, SEO & Localisation and Checkout, Customers & Access.

How Do I Fix Incorrect Out-of-Stock Messages?


Sometimes product pages display an out-of-stock error for certain sizes even when inventory is available. This issue may occur when the system still holds inventory amounts as on hold, causing a mismatch between actual stock and what the customer sees.

In some cases, the inventory for product variations is not properly updated when orders are placed. This can result in product variants showing available stock in the backend, yet the storefront displays an out-of-stock message.

A common resolution is to clear the on-hold inventory amounts via the admin interface. Once cleared, the product page should accurately reflect available stock and allow orders to reduce inventory as expected.

Use cases

  • Product pages showing an out-of-stock message despite available stock.
  • Inventory counts not reducing after customer orders are placed.
  • Discrepancies between stock information in the admin panel and the storefront display.
  • On-hold inventory amounts affecting attribute combination stock settings.

Key settings in Infigo

  • Product Variant Inventory: Accessible via Admin > Product Variant Edit to review stock levels and attribute combinations.
  • On-Hold Inventory: Located within the inventory management section where on-hold amounts are recorded for products that have shipped.
  • Order Management: Check if orders are correctly decrementing the inventory and managing on-hold stock.

Step-by-step guide

  1. Log in to the admin panel and navigate to the Product Variant Edit page for the affected product.
  2. Review the stock levels for each product size, paying close attention to the on-hold inventory amounts.
  3. If the on-hold value is causing the error, use the delete button to clear the on-hold amount for the specific variants (e.g. XS and 2XL).
  4. Save your changes and refresh the product page to verify that the out-of-stock message is no longer displayed.
  5. If the issue persists, confirm whether your inventory is managed manually or via an external MIS system to further troubleshoot the discrepancy.
  6. Contact Customer Support for additional guidance if necessary.

Related links

For additional guidance, head over to the Infigo Academyor contact our Customer Support team.

How Do I Import Products with Images?


This article explains how to import a large number of products along with associated images using the Upload Folders feature. It covers the requirements in your CSV file and the necessary steps to ensure that product images are correctly mapped and removed from the upload area once imported.

When importing products to your storefront, you need to have your images stored in the Upload Folders area. The CSV file that you import must include a column named ProductImage that references the exact file name of each product image.

This guide outlines the process, common use cases, the key settings inside the system, and step-by-step instructions to help you successfully manage your product imports without having to repeatedly ask the same questions.

Use cases

  • Importing a large catalog of products for a new storefront.
  • Adding product images efficiently as part of a bulk upload process.
  • Managing and updating product image assets via a centralized upload area.

Key settings in the system

  • UploadFolders access: Ensure that the user role has permission to access the UploadFolders area.
  • ProductImage column: In your CSV import file, include a column named ProductImage with the exact file names of your images.
  • Upload Location: During the import process, select the correct upload location where the images are stored.

Step-by-step guide

  1. Upload all your product images to the UploadFolders area.
  2. Prepare your CSV file ensuring it includes a ProductImage column with the file names corresponding to the uploaded images.
  3. Start the import process by selecting the appropriate upload location that matches where your images are stored.
  4. Once the CSV is imported, the system will map the images to the respective products and remove successfully mapped images from the UploadFolders area.
  5. If issues arise during the import, verify that the file names in your CSV are accurate and that you have the correct access permissions.

Related links

For additional guidance, head over to the Infigo Academy or contact our Customer Support team.

How to add a new Category and Sub-Category?


Infigo Academy: Create your first category 

Overview

Categories are a way of visually grouping products and presenting them to your users. How you group your products is completely up to you but it is key to focus on making the navigation and location of products within categories as simple and as intuitive as possible.


For example: Business Cards, Letterheads and Compliment Slips Calendars can be added under a single category called Stationery.


How-To

To add a new category,

1. On the Infigo administration page, navigate to Catalogue > Categories > Manage Categories

The Manage Categories page is displayed. Click on Add new.

mceclip0.png

2. The Add a new category page is displayed.

mceclip1.png

Each category information can be classified into:

  • Category Info
  • SEO
  • Products
  • Discounts

3. Enter the following details:

Option Description
Category Info

The Category Info tab helps you add the basic information for your category.

  • Name - Enter a name for the category.
  • Short Description - a short description for the category
  • Price From - allows you to add a descriptor that says when the prices start in the category
  • Description - Enter the category description. You can use the format bar to change the font, color, and other properties for the description.
    • Alternatively, you can make HTML changes. Simply change the Description editor to Code Mirror Editor, press Save and Continue Edit and then you can make changes via HTML. 
  • Bottom Description - Same as above.
    • Alternatively, you can make HTML changes. Simply change the Bottom description editor to Code Mirror Editor, press Save and Continue Edit and then you can make changes via HTML. 
  • Category Template - Choose a category template from the drop-down menu. This template helps you display the categories in a professional manner. The choices are listed below:
    • Products in Grid or Lines
    • Products in expanding lines
    • Horizontal Navigation
    • Horizontal Navigation iOS
    • Horizontal Navigation Carousel iOS
    • Dualview for A.C. Data
    • Products as Gallery
    • Subcategory with products
    • Products in List
    • Category Slider
    • Category Search
  • Picture - You can also add a picture for your category. Only JPG, JPEG, and PNG files accepted
  • Parent Category - Select the parent category (if any). If selected, this category will be added as a sub-category to the parent category.
  • Price Ranges - Enter a price range for the category.
  • Show on home page - Select if you want to show this category on homepage or not
  • Custom Category Class -  this is used for CSS. You can put in a custom class name in order to target a specific category instead of all categories. 
  • Published - By default, this option is always selected. Uncheck the option if you do not want to publish this category on your website.
  • Display order - Enter the display order for the category. The smaller the number, the higher in the list it appears. 
  • Page Size -  you can specify how many product you want to appear on each page.  
SEO

The SEO tab helps you add information to make this category SEO friendly.


  • Meta title - Give an SEO title for this category.
  • Meta description - Enter a description. 
  • Search engine friendly page name - Give a friendly name for the category
  • Meta keywords - Enter the keywords for this category. 

Open Graph Data

  • Title - give an OGD title
  • Site Name - this is generate from General Settings
  • Description - an OGD description
  • URL - dynamically generated
  • Image - supported file types are JPG, JPEG, and PNG

Tracking Scripts

  • You can now add a tracking script for your page
Products

Be sure to save your category first. If you have products on the site, simply press Add a new product, toggle the checkbox against the product, and press Save. 

mceclip2.png

Discounts When you have a discount that is assigned to categories, this is where you can enable it. To create this discount, please see this article in the section Assigned to categories.

4. Ensure that the details entered are correct.

5. Click Save and the category will be added and listed.

How Do I Add a Custom Binding to My Storefront?


This article will help explain the process of how to add a new URL to your storefront. If you also plan on obtaining an SSL to secure your site, we have to complete the binding first. You can read this article on the steps for implementing an SSL if you would like to obtain a certificate for your new domain. 

Please note, that implementing a new binding will accrue the following charge:

UK: £15 + VAT / USD $18 / €18 / AUD $30 / CAD $26

Pre-Requisites

Prior to raising a ticket for us to configure a domain binding for you, you will need to have purchased your domain so that you can configure your DNS.

A majority of our customers purchase their domains through GoDaddy or 123Reg, but please use whichever service you prefer.

What We Need

When raising a ticket for configuring a new domain, please be sure to provide the following:

  1. Current Storefront URL (e.g. yourCompany.infigosoftware.com/storefrontName)
  2. New domain URL.

The Process

  1. After raising a support ticket with the above information, a support team member will raise a formal task to our development team to implement this new domain against the storefront requiring this binding.
  2. When the binding has been applied to your site, it will be part of the the next release. We deploy every 2 weeks and the agent will inform you of when you can expect your binding to be live on your storefront. Note: This task will need to be raised to the development team a few days prior to one of our releases otherwise it will have to be included in the next release.
  3. Once released, the support team will provide you a CNAME record to point this new domain towards. Note: This must be configured in your DNS. This is not a task Infigo can carry out as it is something you need to do with your hosting provider. 


Please Note:


This process can take up to 2 weeks to complete.

How Do I Add a Product to my Storefront?


Login to the storefront you wish to add a product to.

Choose Catalogue > Products > Product Management

mceclip0.png


The Product management page shows all products currently created in your Storefront. You can search for an already created product using the search utility at the top, browse through the list and locate it below, or create a new Product by clicking Add New in the top right.


mceclip1.png


Adding Products

  • Give the product a name which identifies it on the customer site.
  • Short and long descriptions can be used to populate details about the product for customers browsing through.
  • Populating admin comments allows details to be published to a job ticket about the file, but remain hidden from the customer.


mceclip2.png


  • Once completing the form, click Save and Continue in the top corner.
  • Use the tabs along the top to choose Category Mappings.
  • Assigning the product to a Category allows users to browse the categorized list of products easily from the front end website.
  • Add a New Record.
  • Choose a Category from the drop down list. Choose Insert to save your selection. If you have no Category setup, you can follow the guide here to administer Categories.
  • You can add a product to multiple Categories. Simply repeat the steps above, selecting a different Category from the drop down each time.

mceclip3.png


Your product will now appear in the Category list on your website. 

This is the quickest way to add a product. If you would like to adjust the Product further the following links allow you to:

Setting a Product Variant

Add a Variable PDF to a Product

How to Create a Multi Part Product


Infigo Academy: setting up a multi part product 


In order to create a multi part product you must first have created a product (covered in a previous article). Once your product has been saved with the necessary information go to Catalogue > Product Types > Multi Part Products (You may need to enable this product type to have access to it. Please see this article for how to do this.)

mceclip0.png


...and click "Add New"

mceclip1.png

From here, you can decide which product the Multi Part Product will be based upon and whether or not the user can have the option to upload their own file.

mceclip2.png

Once this has been saved, you will be redirected to the Multi Part products page where you can see the entry for the product you have just created and configure further options by clicking Edit on the far right.

On the Edit page you can set the price per page of the editable product and edit the product's XML configuration (for advanced users)

mceclip3.png


Congratulations you have created your first Multi Part product!

Why Do Multiple Tag Filters on a Storefront Not Narrow Results Together?


When using Tag Filters on an Infigo storefront, you may notice that selecting multiple filters does not always narrow the product results as expected.

This occurs because the storefront filtering logic currently uses an OR condition when multiple Tag Filters are selected. This means the system will return products that match any of the selected tags, rather than only products that match all selected tags together.

As a result, selecting additional filters may broaden or maintain the result set rather than progressively narrowing it.


Example

Imagine a storefront with the following Tag Filters:

  • Colour = Blue

  • Size = Large

If a customer selects Colour = Blue, the storefront will show all products tagged with Blue.

If the customer then also selects Size = Large, the results may include:

  • products tagged Blue

  • products tagged Large

  • products tagged Blue and Large

Because the filtering logic matches products that satisfy any selected filter, the results are not restricted to only items that match both filters simultaneously.


How Tag Filtering Works

When multiple Tag Filters are selected:

  • The storefront evaluates all selected tags.

  • Products matching any of those tags are included in the results.

  • Products do not need to match every selected filter to appear.

This behaviour applies regardless of whether filters are selected within the same Tag Category or across multiple categories.


Product Tagging Considerations

Product tagging can also influence the results you see.

If a product contains multiple tags that correspond to different filters, it may appear in results even if it does not match all selected filters.

For example, a product tagged with both Blue and Large may appear when either filter is selected.


Summary

When multiple Tag Filters are selected on a storefront:

  • The filtering logic uses OR-based matching

  • Products that match any selected tag will appear in results

  • Results will not necessarily narrow to products matching all selected filters together

This behaviour is part of the current storefront filtering logic.

What Image Sizes should I use across my platform?


In this article, we will walk you through some recommended image sizes for various parts of the platform. However, please note, these are just recommendations/guides for the image sizes, you will need to test all uploads before going live. Also, images are resized to fit the screen it is being viewed on, so the image uploaded may appear slightly different depending on the device.


Location Image Size Example Where can this be edited
Image added in Homepage Banner section (one column) 1920 x 550px

'Homepage Banner' in Editable Content

(Content Management > Editable Content)

Featured Products (options 1 & 2)

1000 x 1000px

Changing between Option 1 and 2 - Appearance Settings

(Content Management > Appearance Settings)

Changing the image itself - On each Product Page

(Catalogue > Products > Product Management)

Feature categories (option 1) 620 x 752px

Changing between Option 1 and 2 - Appearance Settings

(Content Management > Appearance Settings)

Changing the image itself - Manage Categories

(Catalogue > Categories > Manage Categories)

Featured categories (option 2 - no whitespace between images) 847 x 700px

Changing between Option 1 and 2 - Appearance Settings

(Content Management > Appearance Settings)

Changing the image itself - Manage Categories

(Catalogue > Categories > Manage Categories)

Location Image Size Example Where can this be edited
Category images (E.g. subcategories) 1000 x 1000px 

Manage Categories

(Catalogue > Categories > Manage Categories)

Location Image Size Example Where can this be edited
Product images I.E. list of products 1000 x 1000px

On each Product Page

(Catalogue > Products > Product Management)

Location Image Size Example Where can this be edited
Login Image 1920 x 1080px

Appearance Settings

(Under Section Feature Images, see Login background)

Logo 2500px - 250px in width

Appearance Settings

(Content Management > Appearance Settings)

How Do I Configure a Product Variant?


A Product Variant controls all the vitals of a Product.

Infigo supports the use of only one Product Variant per Product.

Click the Product Variant tab at the top of a product you are editing, locate your Unnamed variant in the grid, and click Edit.
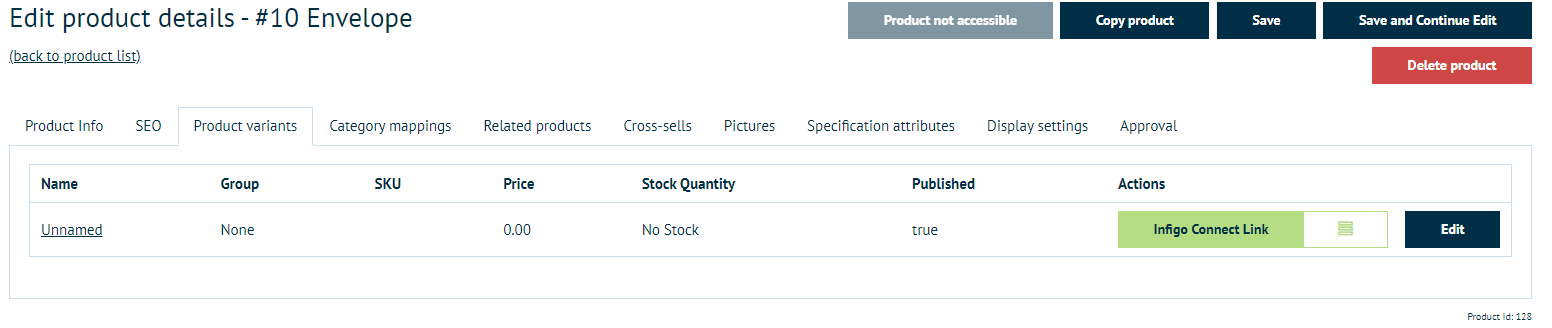
 

mceclip0.png


There is no need to give a variant a name. With no name it takes on the name given to the product which is mandatory.

A SKU code is useful, this can give you a stock reference and can be populated on the job ticket if required.


Pricing

Below you will find the price.

Pricing details can be found here.

The system currently supports the following pricing types:

  • Price per item
  • Price per item with tier reductions
  • Price per item with sliding cost adjustment
  • Quantity drop down pricing

It is also possible to set minimum/maximum order quantities, and batch counts items can be ordered in:
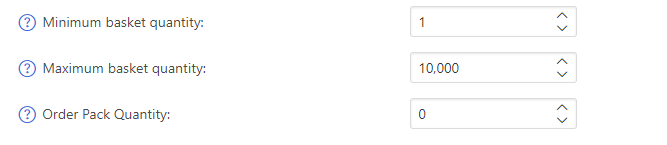
Postage

Delivery can be switched on or off per product. Switching delivery off allows you to skip the delivery address capture when checking out which is very useful for direct mail campaigns that contain their own address detail. 

You also have the ability to override any postage costs to set a product to use free delivery. All products must be set to free delivery with 0.00 the cost of the delivery in the basket on checkout.

You can override the default delivery price per item with an Additional Delivery Charge. This will add a value on at checkout if this product is in the basket.

Entering a weight will add this product into the weight lookup table found in the delivery settings.
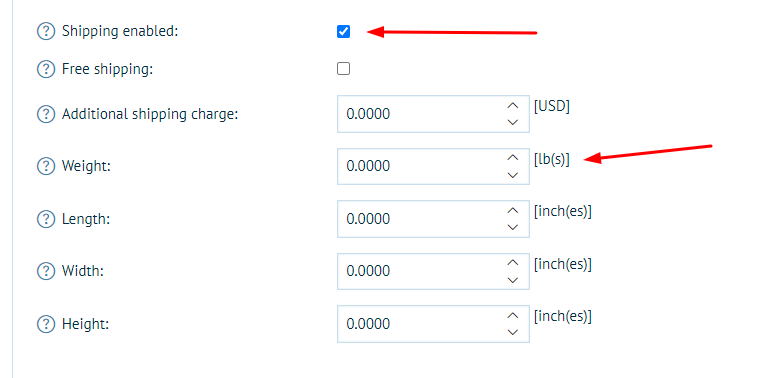
mceclip0.png


Tax

More information on Tax and setting it up can be found here.

You can switch tax on and off using the tax exempt option and set the tax band using the category list.


Stock Control and Management

Managing the inventory of products can be switched on per product.

Choose to monitor the Inventory from the drop down list and set the stock levels and notifications which appear to suit your requirements.


Attributes

Attributes can be added to products to adjust their pricing, weight, and function. These can be added through the Product Variant Attribute tab at the top of the Product Variant screen.

More information on Product Attributes can be found here.

How do I create a Static PDF product?


A Static PDF product must be assigned to an existing Product. Static PDF products are not editable, which means they have no fields.

To learn how to setup a Product, click here

Please follow the steps below on how to add a new Static PDF Product to your storefront:\


1. Login to the Storefront as admin


2. Navigate to Catalog > Product Types > Static PDF Products. This menu will show you all the Static PDF Products you have created. 

mceclip0.png


3. To add a new Static PDF Product, click Add New in the top corner.

mceclip1.png


4. The page shows a drop down list of all Products that have been created on the site that do not have a PDF attached to them.

mceclip2.png


5. Click Create a new PDF Product with the correct Product showing in the Product Variant list.


6. Browse and upload the PDF file from your local machine.

mceclip3.png


7. If the upload is valid, you will get Upload OK.

mceclip4.png

How do I edit Custom Job Names in Infigo?


Custom job names can be set for order lines either through Saved Projects, or during a mandatory step between the basket and checkout pages, or when adding a product to the basket (this step can be enabled/disabled).

We support this feature for the following product types:

  • Infigo Order Products
  • Multi Part Order Products
  • MegaEdit Order Products

Enabling Custom Names

Before proceeding, you must enable custom names on your storefront.

To do this, navigate to  Configuration → Infigo Settings

 and enable 

As a side note - you will also need the Saved Projects setting enabled in Order Settings section

Changing the name through "Saved Projects"

  1. Navigate to My Account → Saved Projects
  2. Click the "Edit" button highlighted in the below screenshot next to the order you wish to name
  3. Change "Default" to the name you want and click "Update"

Changing the name using the mandatory naming page when adding to basket

  1. Navigate to Configuration → Infigo Settings and enable the CustomNamesAreMandatory setting
  2. Attempt to add a product which is of a supported type to the basket
  3. You will be redirected to the following page which forces you to name each applicable product. Note: If you have a product which does not support custom names (such as NOP products) then they will not appear on this page.
  4. After clicking "Save and Continue" their custom names will be updated and you will be able to checkout as usual
    Note: This page will appear whenever a user either tries to add a product to the basket which supports custom names or when they try to checkout with products that support custom names in their basket, forcing the user to name all custom-nameable products before checkout.

Changing the name within the basket

  1. Add a supported product to the basket
  2. Click "Edit" next to the "Name:" field

Why aren’t breadcrumbs enabled after bulk product import?


Problem

You’ve imported products via Excel, but breadcrumbs are not enabled on those products.

You may also be wondering:

  • Is there a column in the import file to control this?
  • Can breadcrumbs be enabled in bulk?

Cause

Breadcrumbs are not controlled via product import.

Currently:

  • There is no column in the Excel import to enable breadcrumbs
  • There is no global “enable for all products” setting

Breadcrumbs must be enabled manually at:

  • Product level
  • Category level

Resolution

1. Enable breadcrumbs on a product

Go to:
Infigo Admin → Open Product → Display Settings

  • Toggle Breadcrumbs ON
  • This will display breadcrumbs at the top of the product page

2. Enable breadcrumbs on categories (optional)

If you also want breadcrumbs on category pages:

Go to:
Infigo Admin → Categories → Display Settings

  • Enable Breadcrumbs for the category

Important limitation ⚠️

If you’re importing large volumes of products (hundreds or thousands):

  • Breadcrumbs cannot currently be applied in bulk
  • Each product/category must be updated individually

This is expected behaviour in the current system and not an error.


Key takeaway

Breadcrumbs not appearing after import isn’t something missing from your spreadsheet—it’s due to how display settings are currently managed in Infigo.

How to create an Uploadable product


In order to make an uploadable product, first you'll need to make a new product with associated pricing and configurations under Catalogue > Product Types > Multi Part Products. (You may need to enable this product type to have access to it. Please see this article for how to do this.)

Find the product from the dropdown and make sure "Create a user upload product" is checked.


mceclip1.png


mceclip2.png

In order to charge per page, edit the newly created product and adjust the value of "PricePerPage"


mceclip3.png

The final step is to enabled Multi Part products to be visible on Shared Print Operations. To do this simply go to Infigo Settings > True and click Save. 

Infigo Placeholders

Overview

There is a complete list of placeholders in admin where you can search for Order specific or Orderline specific placeholders. These are located under Admin -> Placeholder Overview.

mceclip0.png

Order-specific placeholders are officially supported for things like Invoices and Packing Slips (which are at an Order context) and Orderline specific placeholders are officially supported for things like Job Tickets (which are at an Order line item context).

Note:  Some Order specific placeholders will still work on job tickets, and some Orderline specific placeholders will work on Invoices and Packing Slips, however this would not be an officially supported configuration and may not work as expected.

If you click the > next to a placeholder in the list, you will see that it expands to give you an example of how to use the placeholder, as well as a brief description of what it's for:

mceclip1.png

A placeholder when used throughout the system should be included within a starting and ending percentage symbol. For example:

%JobId% - is the correct way to use a placeholder that will be replaced with the Job ID value

%CustomName% - is the correct way to use a placeholder that will be replaced with the Job Custom Name value.

Custom Data

Before creating your Custom Data Category you should have created your Custom Data CSV for import. 

***

1. Go to Configuration > Resources > Custom Data and click Add new record. 

2. Enter the name and click Insert. 

mceclip0.png

3. Click on Manage to upload your Custom Data CSV. 

4. Uploading your Custom Data CSV - either click to upload your CSV or drag and drop it. 

mceclip1.png

Once uploaded the Category page will list the uploaded data: 

mceclip2.png

How to Update the Display Order of Subcategories in a Category Page's Sidebar Navigation

1. Overview

This article explains how to update the display order of subcategories in the sidebar navigation of a category page.

For additional information and detailed tutorials, the Infigo Academy offers extensive resources on a wide variety of topics. Visit the Infigo Academy to search and browse our content.


2. Contents

  1. Overview
  2. Contents
  3. Key Points and Takeaways
  4. Key Settings
  5. Scenario-Based Guide
    • Scenario 1: Sorting Subcategories by Display Order
  6. FAQs
  7. Alternate Search Terms

3. Key Points and Takeaways

  • To sort subcategories using a custom order, you need to configure the display order and ensure the sorting setting is correctly applied.
  • Lower values in the display order setting will move a subcategory higher in the list.

4. Key Settings

Display Order

  • Path: Catalogue > Categories > Manage Categories
  • Explanation: This will show a list of categories, including those designated as sub-categories to another primary category. The “Display Order” field for each category allows you to assign a numerical priority to each. Subcategories with lower numbers will appear higher in the list.

Default category sortation

  • Path: Configuration > Settings > Catalogue Settings > Categories > Default category sortation
  • Explanation: This allows the administrator to choose how the categories on the same level are sorted in relation to each other.

5. Scenario-Based Guide

Scenario 1: Sorting Subcategories by Display Order

Problem:
You want to reorder subcategories in the sidebar navigation but find that changes to the display order have no effect. The subcategories still appear in a different order.

Solution:

  1. Access the Subcategory Management Section
    • Go to Catalogue > Categories > Manage Categories
    • Locate the relevant level of subcategories.
    • Manage Categories list showing the Display Order column
  2. Adjust the Display Order Values
    • For each subcategory, click Edit and find the "Display order" field.
    • Assign numerical values to the subcategories based on the desired order. Lower values will appear higher in the list.
    • Category details: the Display order field
  3. Set Default Category Sortation to Position
    • Go to Configuration > Settings > Catalogue Settings.
    • In the Categories section, find Default category sortation.
    • Select "Position" so the display order values are used, then click Save.
    • Catalogue Settings: Default category sortation set to Position
  4. Clear Cache
    • After making the changes, click Clear cache at the top of the admin area to ensure the updates are reflected on the frontend.
    • The Clear cache link at the top of the admin area
  5. Check the Frontend Display
    • Visit the category page and verify the sidebar navigation. The subcategories should now appear in the updated order.

6. FAQs

Q: Why are my changes to the display order not reflected?
A: Ensure that Default category sortation is set to "Position" in Catalogue Settings and clear the cache after making updates.

Q: Can I use alphabetical sorting instead of display order?
A: Yes, set Default category sortation to "Name" in Catalogue Settings to sort alphabetically.

Q: Does clearing the cache affect other settings?
A: Clearing the cache only refreshes stored data. It does not delete or alter saved settings.


For additional information and detailed tutorials, the Infigo Academy offers extensive resources on a wide variety of topics. Visit the Infigo Academy to search and browse our content.

How to add a new Sub-Category?

Infigo Academy: Create your first category 


Overview

A sub-category is just like any other category other than it is assigned to another category acting as its parent. This means that in order to navigate to that sub-category you must first go through the parent it is assigned to.

How-To

Sub-Categories can be added to an existing category. It helps you organize the category details better.

To add a new sub-category, please follow the steps below:

1. On the Catfish Administration page, navigate to Catalogue > Categories > Category List.

The Categories page is displayed. Click on the Add new button.

mceclip0.png

2. The Add new category page is displayed.

mceclip4.png

3. Enter the details as mentioned in section How to add a new Category?

Note: Ensure that you select the appropriate parent category from the Parent Category drop-down menu.

mceclip2.png

4. Click Save.

The sub-category will be added and listed in the category list like seen below:

mceclip3.png

Displaying Minimum and Maximum Order Quantities on the Product Page

2. Overview of the Feature

Many suppliers apply minimum and maximum order quantities with their price or stock feeds. Previously, shoppers had to guess these limits by trial-and-error in the quantity box. The new Show Min and Max on Product Page feature surfaces those limits directly next to the quantity field, so customers instantly understand how much they can (or must) order.

When enabled:

  • The product page shows “Min: X Max: Y” beneath the quantity selector.

  • The quantity input itself is automatically constrained to those limits—preventing invalid entries from the start.

  • If no maximum applies, the interface reads “No Max”.

  • The same experience is available in the CERM “My Account > Products” list when the corresponding CERM UI setting is switched on.

This removes friction at checkout, reduces validation errors, and clarifies pack-sizing rules for end users.


3. Key Settings

Setting Location What it Does Typical Values / Notes
Show Min and Max on Product Page Configuration > Settings > Catalogue Settings > Product Options [Section] Toggles the “Min / Max” text and quantity-box constraints on standard product pages. On (default Off). Applies to all storefront products, including pack and versioned items.
Minimum Basket Quantity / Maximum Basket Quantity Product Management > Edit [Product Variant] > Info [Tab]  Input the minumum and maximum quantity allowable on a particular product.  
 

4. Use Cases

  1. Print-on-Demand Packs – Show that booklets must be ordered in multiples of 25 (Min 25 / Max No Max).

  2. Promotional Items – Clearly state a run of pens requires at least 100 units, capped at 5 000 due to stock limits.

  3. Versioned Products – Prevent mix-ups when each variant (e.g., size or color) has its own limits.


5. Step-by-Step Implementation Guide

  1. Navigate to Settings
    Go to Configuration > Settings > Catalogue Settings > Product Options [Section]

  2. Enable the Catalog Toggle
    Find Show Min and Max on Product Page and set it to On. Save.

  3. Review Product Data
    Go to Product Management > Edit [Product Variant] > Info [Tab]  for products requiring minimum and maximum stock. Confirm each product has correct Minimum Quantity and Maximum Quantity values in its data feed.
    Tip: A max of 0 or 999 999 is treated as No Max.

  4. Verify on the Storefront

    • Open the product page.

    • Check the “Min: X Max: Y” text under the quantity field.

    • Attempt to type a quantity below the minimum or above the maximum— the input should block the value and, on blur, show the validation message.


By surfacing minimum and maximum quantities directly on product pages—and enforcing them in the input—you give shoppers instant clarity, reduce cart errors, and streamline the ordering process.

How to Update Product Landing Page Thumbnail Based on Selected Attributes

0:00 Hi, welcome to the Infigo academy. In this video, we'll be walking you through how to update the product landing page product image based on the attributes of customer selects.
0:11 So why would you want to update the product image based on selected product attributes? Let's say you have a color attribute with two values, red or blue.
0:21 You can change the product image to reflect these colors when either of them are selected in a combination with another attribute like product size.
0:28 So if you select size small with color red, it will display a specific product image you've saved against that attribute combination.
0:37 To start, you want to ensure that you have two product attributes created on your storefront. You can do this via the product attribute section in the admin area.
0:46 You can also pre-create product attribute values. But in this example, we'll be showing you by creating new attribute values on the fly.
0:54 Once completed, navigate to the Product Management page and open the Edit Product Variant section for the product you want to apply this configuration to.
1:04 Under the Attributes tab, click on the Add New Record button and add two separate attributes. In this example, we'll add Size and Color, but feel free to change the attribute names based on your own needs.
1:17 Click on the Edit Values button for the Size attribute and add three separate values. small, medium and large. Repeat the same process for the color attributes and add two separate values, blue and red.
2:02 Under the Attributes Combination tab, click on the Add Combination button and under the Size drop down, select the Small value.
2:10 Under the Color drop down, select the Red value and save the attribute combination. Click on the Add Combination button again and under the Size drop down, select small again.
2:32 But this time, under the color drop down, select the blue value and save the attribute combination. Depending on how many attributes you have, you will need to repeat this process until all attribute values have a combination.
2:45 So since we have three values for size, small, medium and large, we'll need to repeat this process for all of them with both red and blue colors.
2:53 If you're following this example, you should end up with six different attribute combination like you can see here. Upon saving and re-entering the edit section for an attribute combination, you'll see a new tab appear called images.
3:20 Under this tab, you'll need to add the product image you want to display when this combination is selected on the product landing page.
3:27 For example, if you want to display a red t-shirt when the customer selects size small and color red, you'll want to upload the picture of a red t-shirt here.
3:37 Ensure you click the ad product picture button after uploading the image, and this will save the image against the attribute combination.
3:44 Repeat the same process for the other attribute combinations, so for the color blue, you'll probably want to add a picture of a blue t-shirt.
4:14 Once completed, save the product, navigate to your storefront page and open the product you've saved this configuration to. Upon being redirected to the landing page, you'll see two attributes you've saved against is product.
4:28 Right now the product landing page is displaying the main product image saved in the pictures section within the edit product area.
4:39 However if you expand the size drop down and select the small option and expand the color drop down and select the red option you'll see the product image changes and displays the image you saved against the attribute combination in the previous steps and the same will happen when you select the color
4:55 blue. And this is how you change the product landing page thumbnail based on different attributes selected by the customer. And that's all for this video.
5:05 See you in the next one.

Downloadable PDF Products

Customers can request and download low resolution / watermarked versions of PDF files during the editing process. However, once purchased the customer can download the print ready file from their My Account page.

1. Go to Catalogue > Products > Product Management > find the product you'd like to update and click Edit. 

2. Go to the Product Variant tab > click Edit > scroll down to Downloadable Product and tick the box for more options: 

mceclip0.png

FYI Download Type:

There are 4 settings within Download Type which define how the downloadable PDF should be

  • Normal: Customers can download the PDF in full resolution + not locked.
  • Low Res: Customers can download the PDF in low resolution + not locked.
  • Print Locked: Customers can download the PDF in full resolution + locked.
  • Low Res & Print Locked: Customers can download the PDF in low resolution + locked.
  • Web Optimized: 

mceclip2.png

4. Once enabled the end user will see Downloadable Products within their Account unless Hide 'Downloadable products' tab is ticked in Customer Settings:

mceclip3.png

Assigning sample downloads to product landing page

If you wish to provide a download link for your customers on your product landing page then follow these simple steps.

  1. Navigate to the product variant where you want to upload the sample file
  2. Enable the setting 'Downloadable product'
  3. Scroll down and enable the setting 'Has sample download file'
  4. Using the file upload UI that then shows upload your sample file.
  5. Or Alternatively enable the 'Use download URL' setting and paste in a path to a hosted file.

Navigate to the product landing page in the front end and you will now see a link created with the default text 'Download sample'.

This text is a language string (Products.DownloadSample)

Product IDs

When contacting (submitting a support ticket here) the Support Team to query a product configuration, bug, etc. we will ask you for the Product ID. This is a unique ID or reference given to every product. It will only ever be used once per storefront and therefore allows the Support Team to quickly and easily find the product you're working on. 

You will see the above field in the ticket form "Product ID or URL" - to find this please either: 

1) log into admin, go to Catalogue > Products > Product Management. Search for the product you're working on, click Edit and then copy the URL, or, 

2) on the front end (the customer facing part of the website) go to the product page, and copy the URL. 

The unique Product ID will be in both. 

If you give us a product name, for example "business card" it can take us much longer to identify the right product. This could be because you have several products with similar names, or the name is ever so slightly different, for example "business cards". 

Please note - the ''Product ID'' can be a different value to the ''Product Variant ID'', so pay close attention to what URL you are taking an ID from:

''Product ID'' will end with /Admin/Product/Edit/''Product ID''

''Product Variant ID'' will end with /Admin/ProductVariant/Edit/''Product Variant ID''

Changing Header/Footer Links After Adding a New Binding

If you have just had a new binding created/changed then you may be seeing the old URL (e.g. storefront.infigosoftware.com) showing on category/header links. This article will let you know what changes need to be made so the new binding URL is showing instead.

There are two steps that need to be performed to get the new header links showing.

1. Change the Storefront URL

This can be done in General Settings by searching for the page or by navigating to Configuration > Settings >  General Settings

Make sure to add your NEW binding URL here

Don't forget to save the change made

2. Update the Links in the Header

This can be done in 'Header' editable content by searching for 'editable content' or by navigating to Content Management > Editable Content >  Click 'Edit' on 'Header'

On each of the links in the header if you simply click the drop-down 'Select one option'

Then search for (and select) the category the link should lead to

Then the correct URLs should be added

Don't forget to Save the changes to the editable content

Please note

  • You may need to clear your browser cache before you can see the changes take effect when checking the correct binding URLs are now showing
  • You may also need to change any homepage banner links/buttons in the same way as above.

Control how category tag filters combine product results

A per-storefront setting, Tag filter combination, controls how the category tag filter combines the tags a customer selects. It lets you switch from the default any-match behaviour to a mode where a product must satisfy every tag category the customer has selected from, so that choosing tags from different groups narrows results instead of widening them. The default preserves existing behaviour, the setting applies per storefront, and changes take effect immediately with no restart or reindex.

Problem

On a category page, selecting tags from different groups can widen the product results instead of narrowing them. All selected tags were combined into a single any-match list regardless of which tag category each belonged to, making it difficult to filter by more than one attribute at a time (for example colour and garment type together).

Environment

Infigo storefronts using the category page tag filter, on both the standard and Elasticsearch product search paths.

Configuration

Step 1: Open Catalog (Catalogue) Settings

In the admin sidebar go to Configuration, then Settings, then Catalog Settings, and scroll to the Tag category search options section. This page holds the per-storefront catalogue options, including the new Tag filter combination setting. Make sure you are on the storefront you want to change before editing, as this setting applies per storefront.

step1_catalog_settings.jpg

Step 2: Set Tag filter combination

Find the Tag filter combination setting and choose how the category tag filter should combine ticked tags. Leave it on Any selected tag to keep the original behaviour, where a product is returned if it carries any of the ticked tags. Choose All tag categories must match to switch to the grouped mode, where selected tags are grouped by their tag category and a product qualifies only if it carries at least one ticked tag from every category that has a selection; a tag category with nothing selected adds no condition. Then save the page. The change applies immediately, with no restart or reindex needed, and takes effect on both the standard and Elasticsearch search paths. To return to the original behaviour, set Tag filter combination back to Any selected tag and save.

step2_tag_filter_combination.jpg

Step 3: See it in action: Any selected tag (the default)

With Tag filter combination on Any selected tag, open a category that has tag filtering set up and tick tags from more than one group. In this example the Branded Apparel category has two tag categories, Colour and Garment Type. Ticking Red under Colour and Polo Shirt under Garment Type returns four products: every product that is red OR a polo shirt. Notice this includes a blue polo shirt (matched on Polo Shirt) and a red t-shirt (matched on Red), because any single ticked tag is enough to include a product. This is why selecting a second tag can widen the results rather than narrow them.

step3_frontend_any_or.jpg

Step 4: See it in action: All tag categories must match

Switch Tag filter combination to All tag categories must match and reload the same category with the same tags ticked. Now the selected tags are grouped by their tag category, and a product must match at least one ticked tag in every group that has a selection. With Red ticked under Colour and Polo Shirt ticked under Garment Type, the result narrows to just the two products that are both red and a polo shirt. The blue polo and the red t-shirt drop out because each satisfies only one of the two groups. This is the grouped, narrowing behaviour customers asked for when filtering by several attributes at once, such as colour and garment type together.

step4_frontend_all_and.jpg

Search Terms

tag filter combination category tag filter narrowing results filter products by multiple tags all tag categories must match catalog settings tag filter

Hide the "Product Details" button per product type

The "Hide Product details button for" setting in Catalogue Settings provides an individual checkbox for every product type enabled on your instance, including Stock. You can control exactly which product types hide their Product Details button on storefront product listing pages, without relying on custom CSS.

Problem

Administrators wanted a supported, built-in way to hide the Product Details button on listing pages for product types beyond Static, most notably Stock. The only workaround was custom CSS, which was fragile and could break when the platform was updated.

Environment

Infigo — Admin > Configuration > Settings > Catalogue settings.

Configuration

Step 1: Open the Catalogue Settings page

In the admin panel, go to Configuration > Settings > Catalogue settings. This is the page that holds the "Hide 'Product details' button for" setting. The page is long, so you will scroll to the relevant section in the next step.

step1_catalogue_settings_page.jpg

Step 2: Select the product types in the "Hide 'Product details' button for" section

Scroll to the "Hide 'Product details' button for" section. It now shows one checkbox per product type enabled on your instance. Stock and Static are always listed; Infigo Editor, MegaEdit, Multipart, Kit, Attributes As Products and Multi Product appear only when that product type is enabled. The hint text states that only the product types enabled on this instance are listed. Tick the checkbox next to each product type for which you want to hide the Product Details button on listing pages - for example, tick Stock to hide it for Stock products.

step2_hide_details_checkboxes.jpg

Step 3: Save the settings

Click Save at the top of the page to store your selection. Any product types you ticked will no longer show the Product Details button on storefront product listing pages; unticked types are unaffected.

step3_save_button.jpg

Step 4: See the result on the storefront

On a storefront product listing page, each product tile normally shows two buttons when you hover over it: Product Details (which opens the product details page) and Add to basket. The first image below shows a Business Cards listing before the setting is applied - hovering a Stock product tile shows both the Details and Add to basket buttons. The second image shows the same listing after ticking that product type in the "Hide 'Product details' button for" section and saving: the Details button is gone and only Add to basket remains, so shoppers go straight into ordering. To restore the button, untick that product type, save, and it returns. If a product type you expect is not listed in the setting, confirm it is enabled on your instance..

step4_frontend_before.jpg step4_frontend_after.jpg

Search Terms

hide product details button hide details button stock products catalogue settings product details skip product details page product listing button infigo

Catfish_ME_SpineWidth
Incomplete
🔎
Loading…
    Select a Problem Solver